With Intuitive Shipping, you can create shipping methods that allow your customers to choose from local same day delivery or next day delivery options for their orders.
There are a few different ways you can set this up:
Either/Or Setup with a Current Time Condition
Create two Scenarios, one for same day and one for next day, using a time condition to restrict when the delivery options are displayed. When a customer orders before the cut-off time, they’ll get only the same day option. When they order after the cut-off time, they’ll get only the next day option.
Either/Or Setup with a Current Day and Time Condition
Add a day of the week condition to each of the Scenarios created in the previous setup, so customers only see either same day or next day on certain days of the week. This setup may require a third Scenario that displays a shipping option on days of the week when same day and next day are not available.
Same Day/ Next Day Optional Setup
Create two Scenarios, one for same day using a time condition, and one for next day with no conditions. Customers will always see the next day delivery option and, when they order before the same day cut-off time, they’ll have the option to choose between either same day or next day delivery.
You can combine this setup with the ‘Current Day and Time Condition’ setup, so that both options are only displayed on certain days of the week.
All of these setups use a local delivery service shipping method, which calculate rates by distance.
All of the setups shown here have common times of day and days of the week. If you need to do something more complex, like offer next day shipping with cut-off times that vary from day to day, you can do that using condition groups.
Create An Either/Or Same-Day and Next-Day Local Delivery Setup
This guide will explain how to set up two separate options for same day and next day deliveries where only one option will appear depending solely on the time of day the order is placed, regardless of the day.
Skip this guide to view other Same Day/ Next Day options.
Add A Same Day Scenario
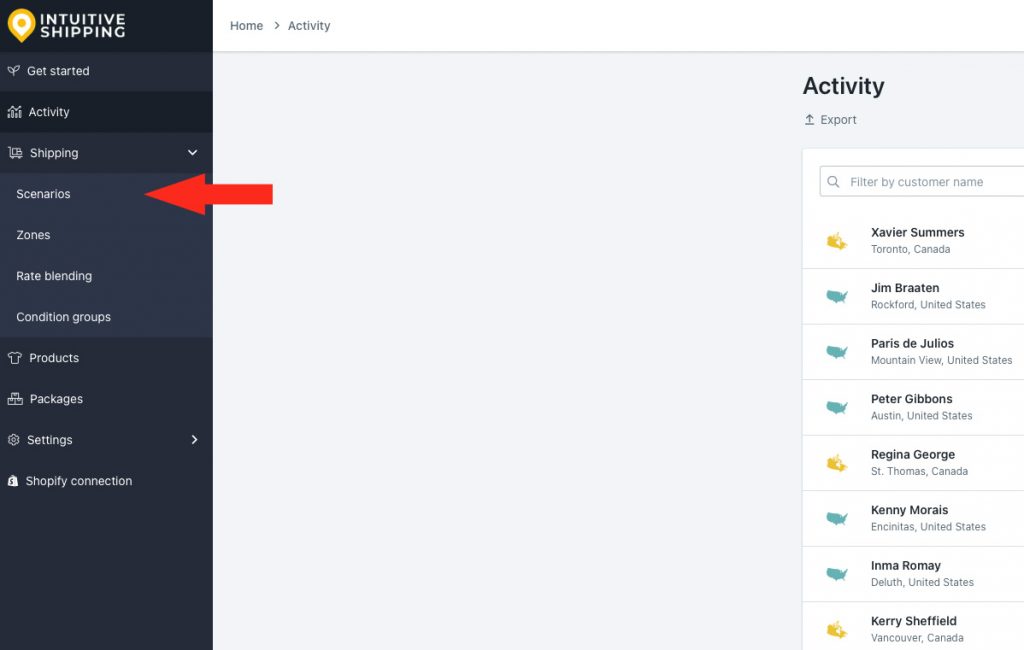
1) Click Shipping on the sidebar menu, then select Scenarios from the drop-down list.
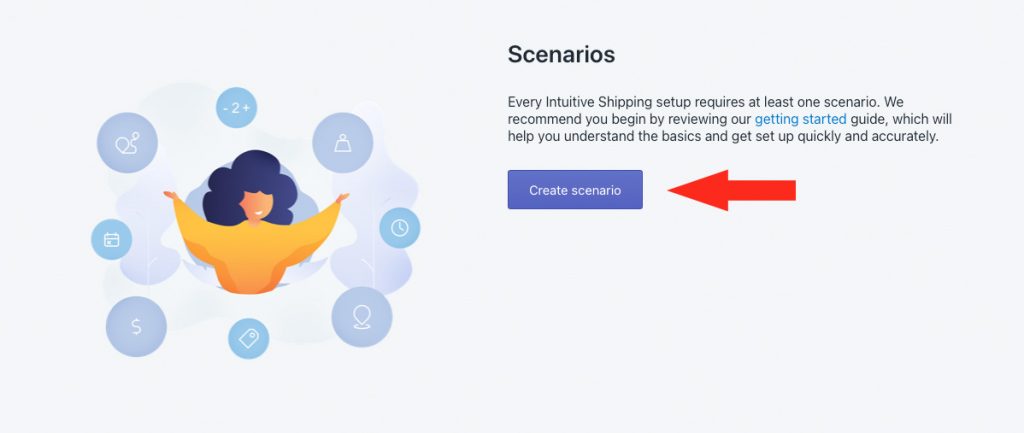
2) Click the Create scenario button.
General Settings
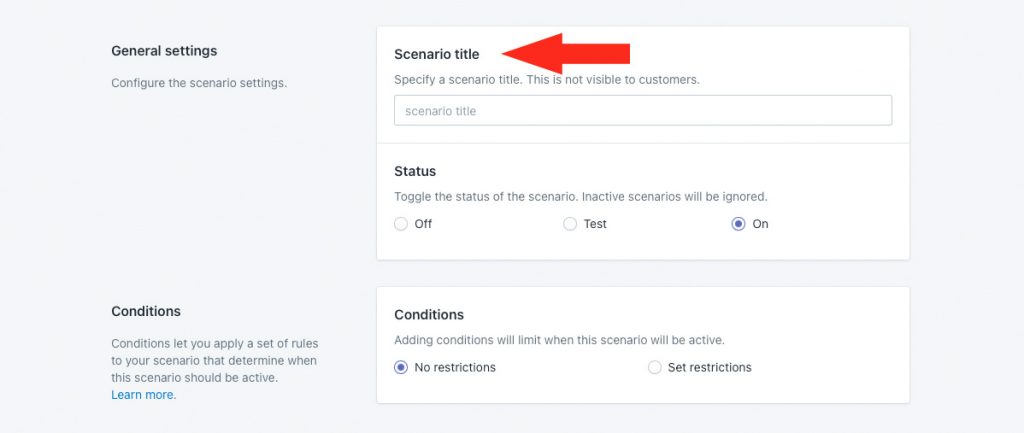
1) Enter a Scenario title, like ‘Same Day’.
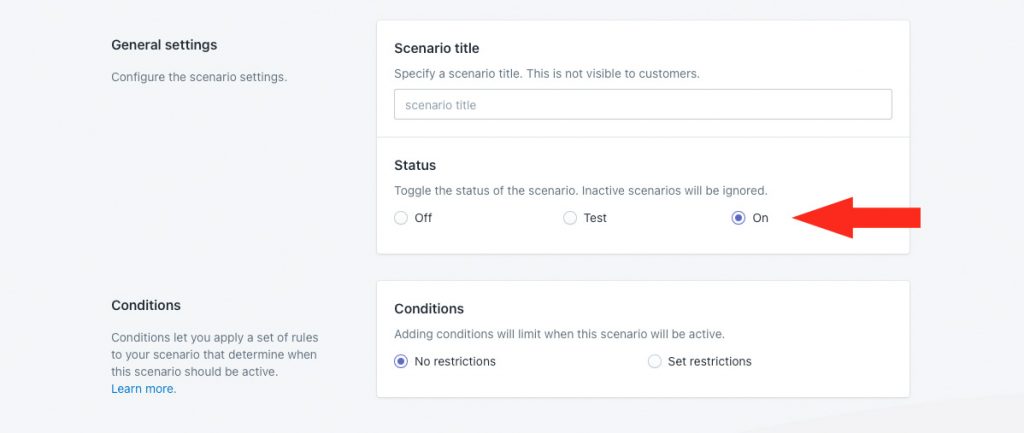
2) Leave the status set to On.
Conditions
1) Select Set restrictions.
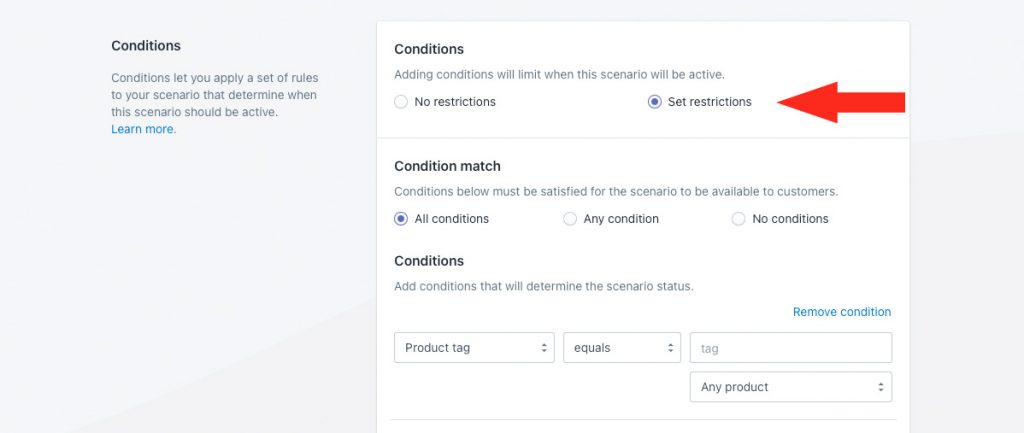
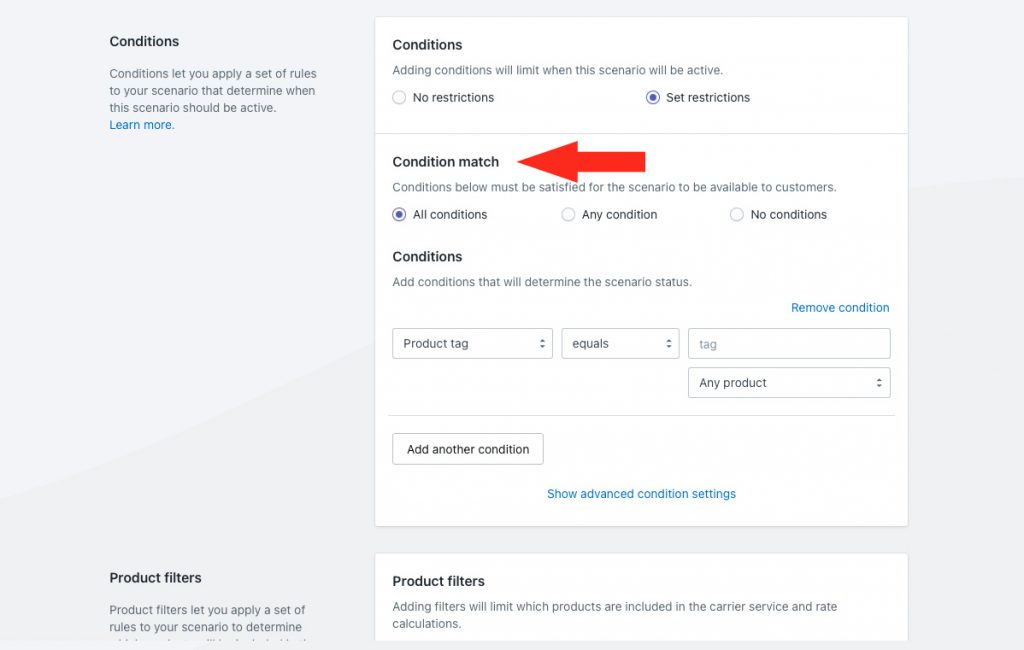
2) Leave Condition match set to All conditions.
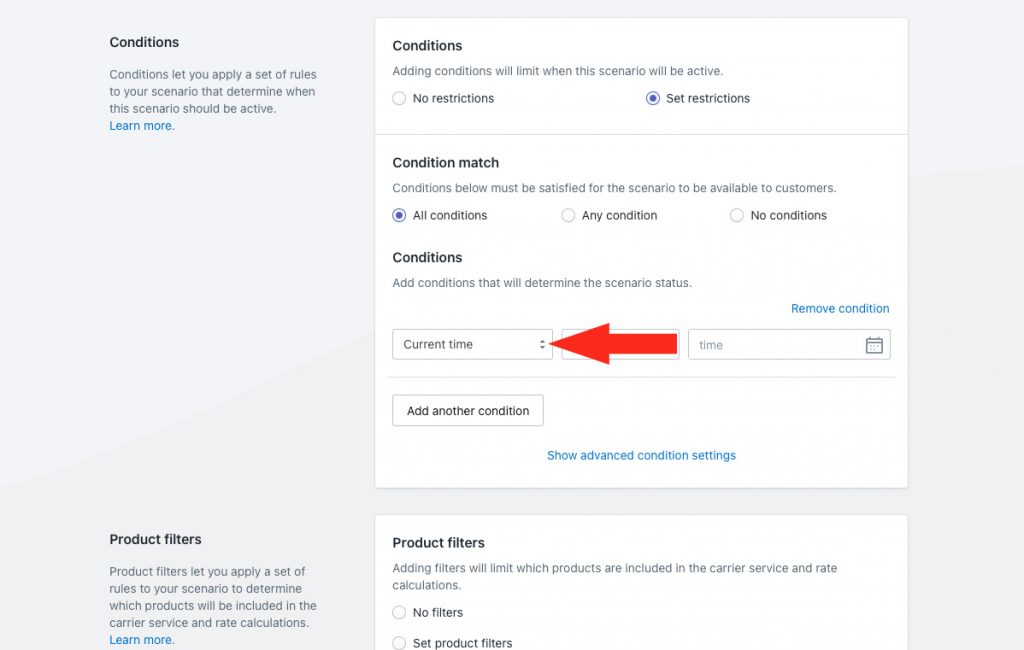
3) Select the Current time condition type.
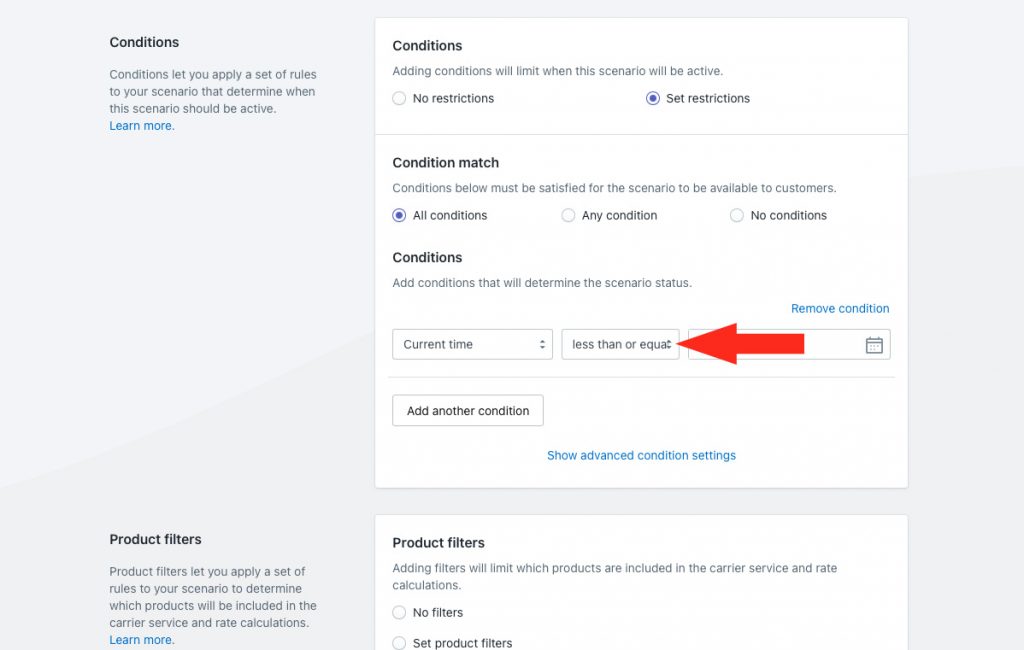
4) Select the condition logic.
For this example, we’ll change it to less than or equals, since we want the same day option to appear before or at the time entered in Step 5. If you prefer to have it only appear before (but not at) the time entered in Step 5, change it to less than.
5) Click the calendar icon to select a cut-off time, or manually enter a time as the value.
Selectable times are every hour on the hour. If, for example, you prefer to set a time of 10:30, you must enter it manually.
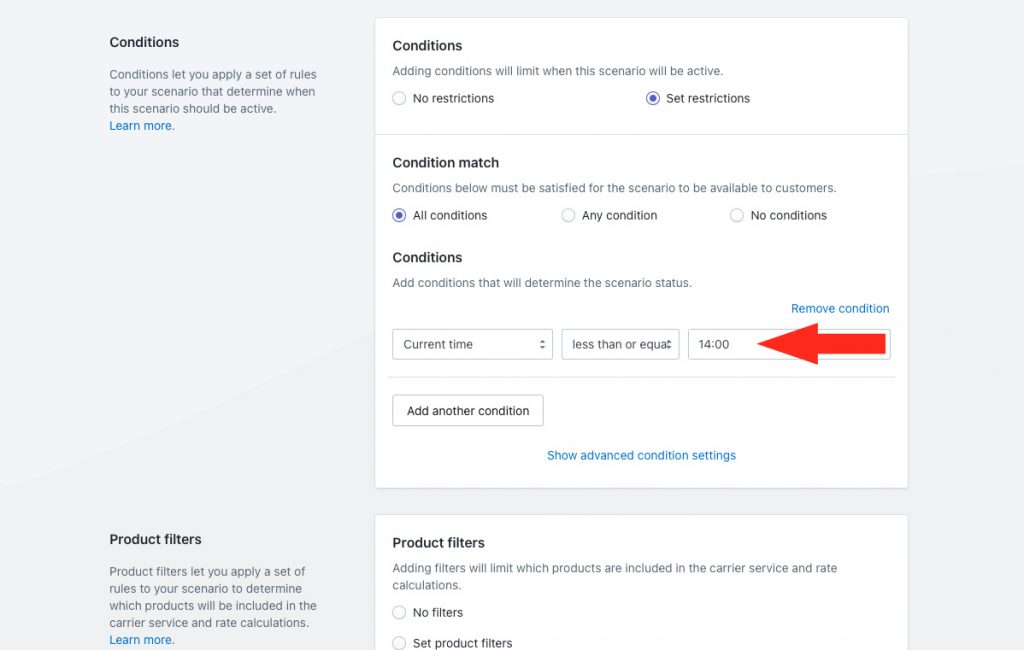
For example, if your cut-off time is 10:30 AM, enter ’10:30′. If the cut-off time is 2:00 PM, enter or select ’14:00′.
Product Filters
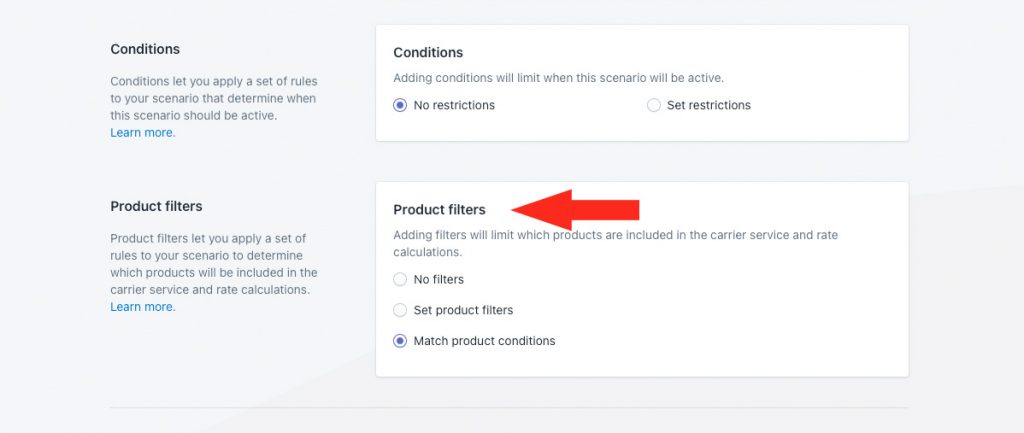
1) Leave Product filters set to Match product conditions.
Product filters determine which products are included in the shipping method rate calculation. Because there are no product conditions in this setup, ‘Match’ is treated the same as ‘No filters’.
Save Your Settings
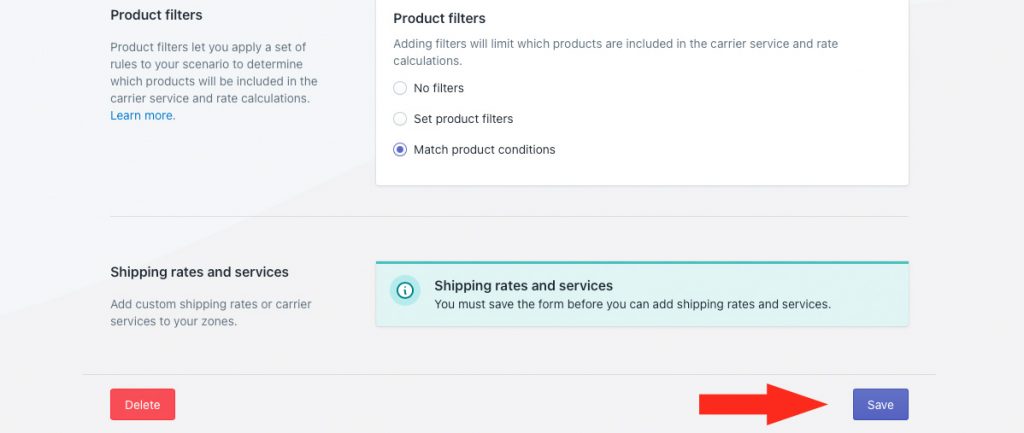
1) Click the Save button to save your same day delivery Scenario.
Add A Same Day Local Delivery Shipping Method
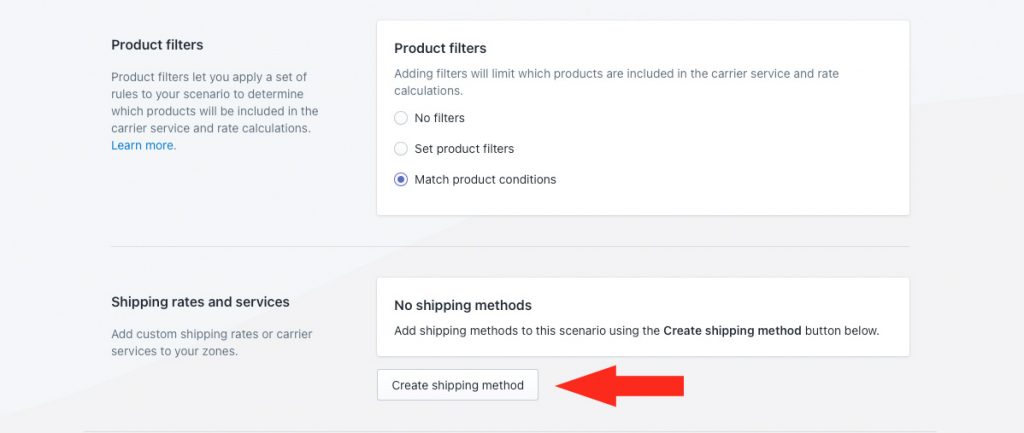
1) Click the Create shipping method button to add same day delivery shipping method.
Select A Local Delivery Service
1) Click the downward arrow beside Local delivery to display a list of options.
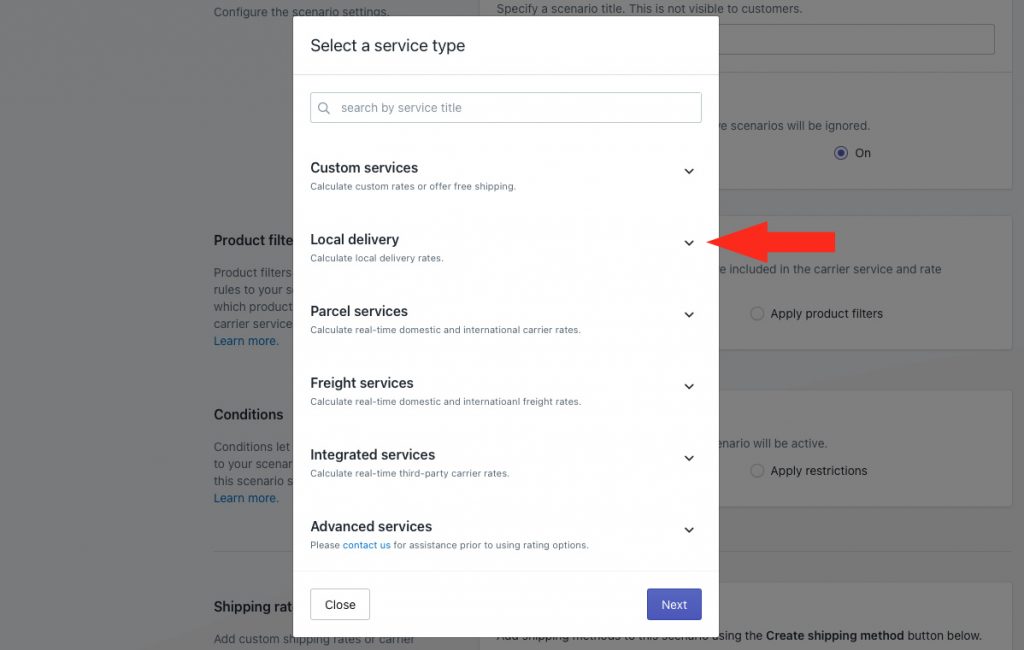
2) Select Local delivery from the list.
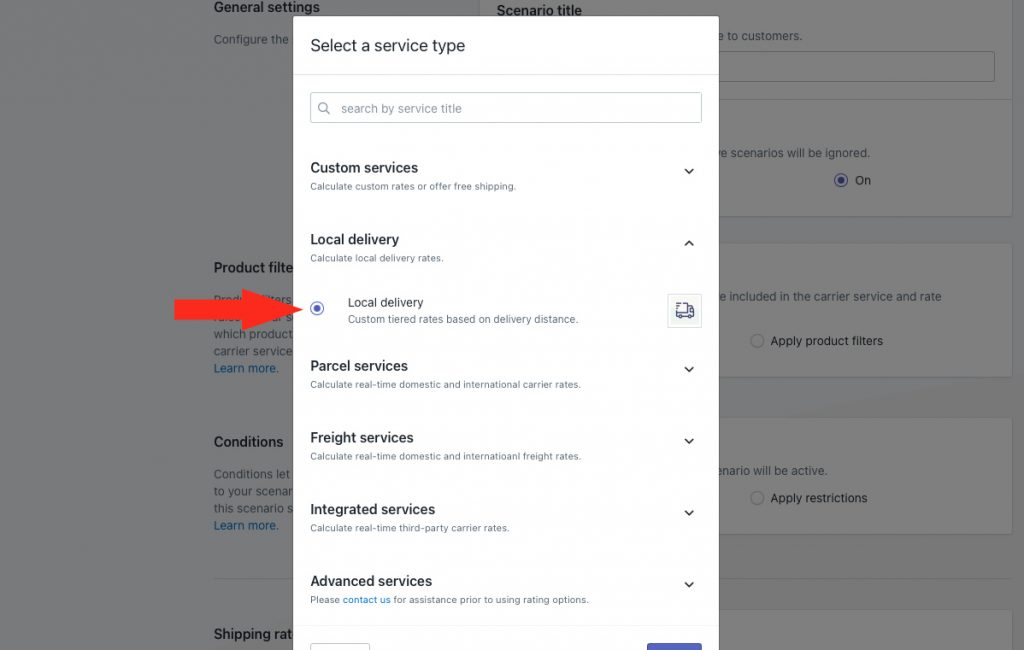
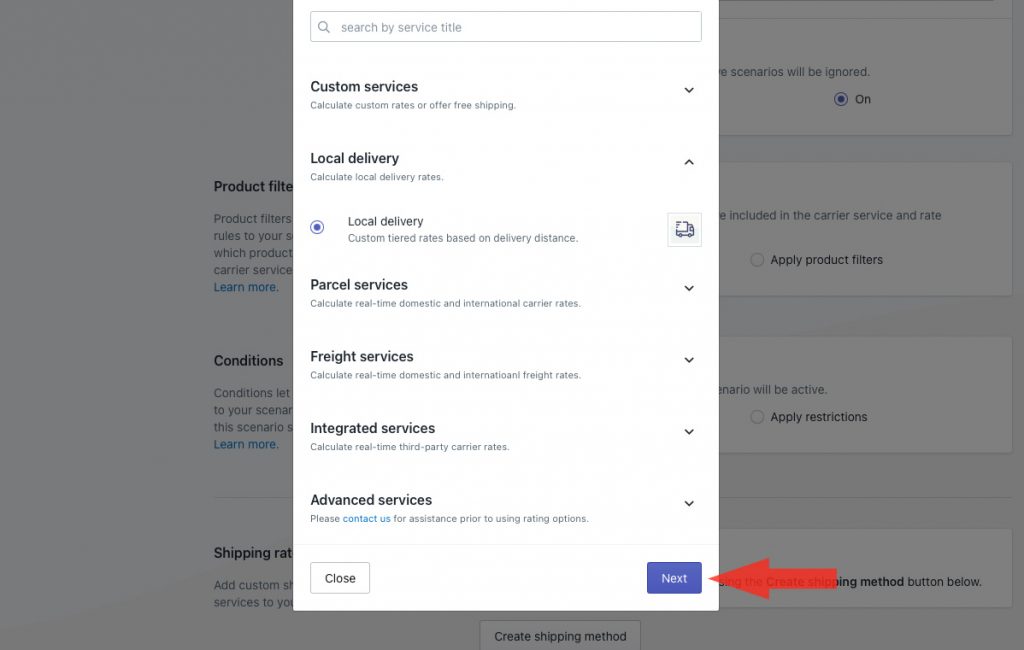
3) Click the Next button.
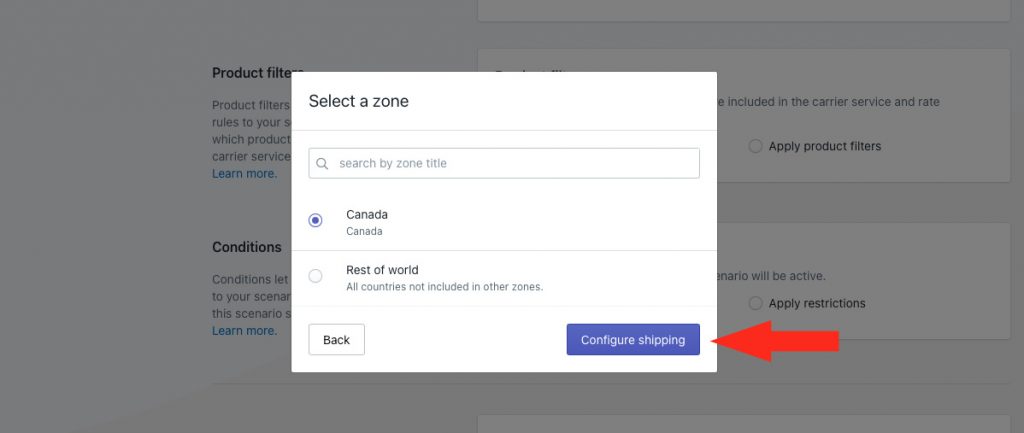
4) Select a Zone.
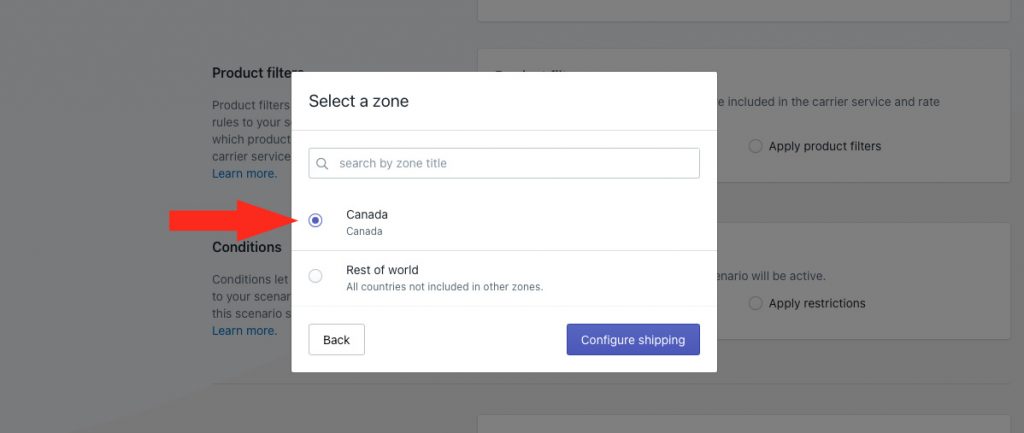
5) Click the Configure shipping button.
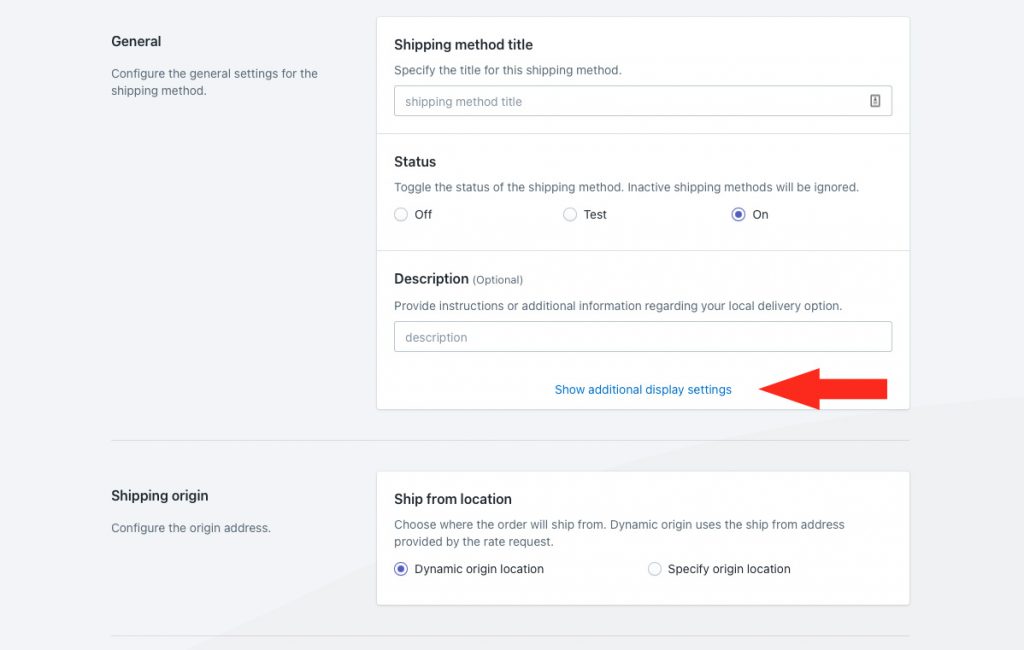
General
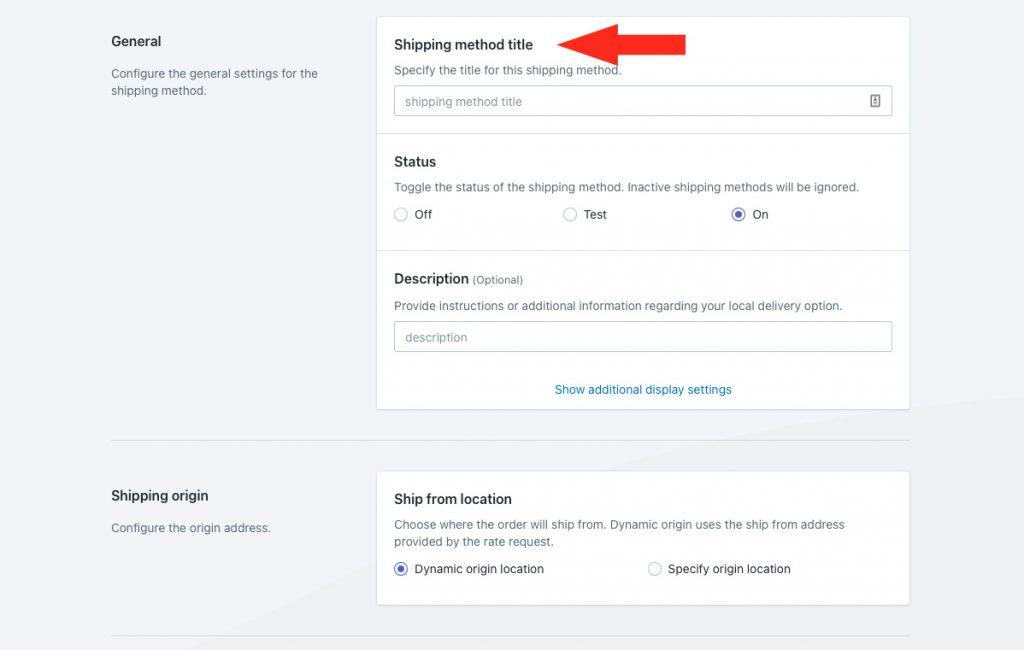
1) Enter a shipping method title, such as ‘Same Day Delivery’. The title entered here will be visible to customers.
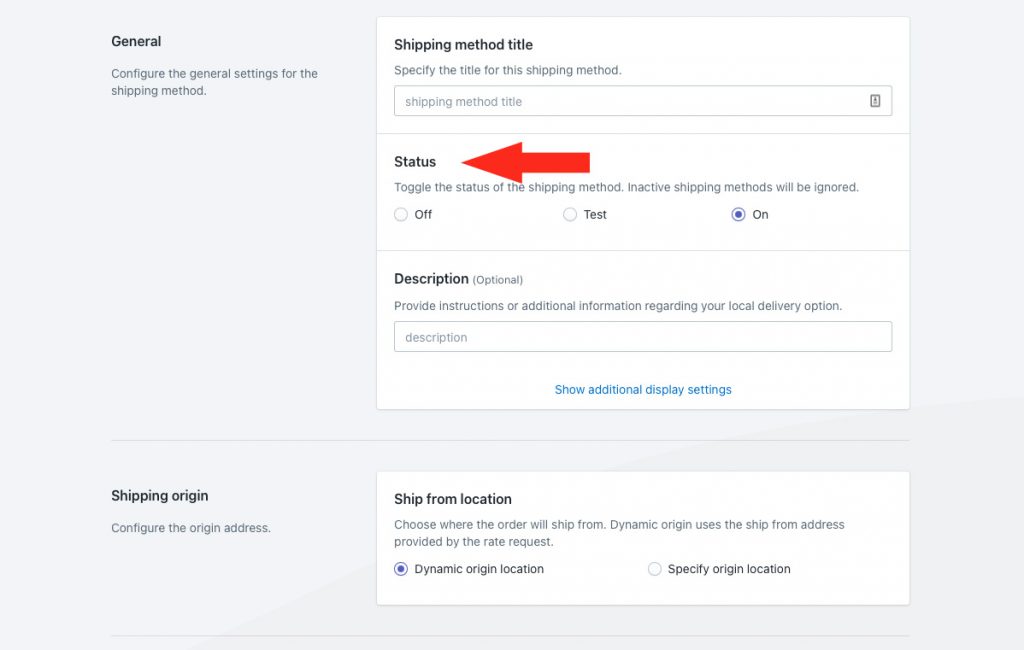
2) If you want the same day delivery option to be available right away, leave the status set to On. If you want to test it first before making it public, set it to Test.
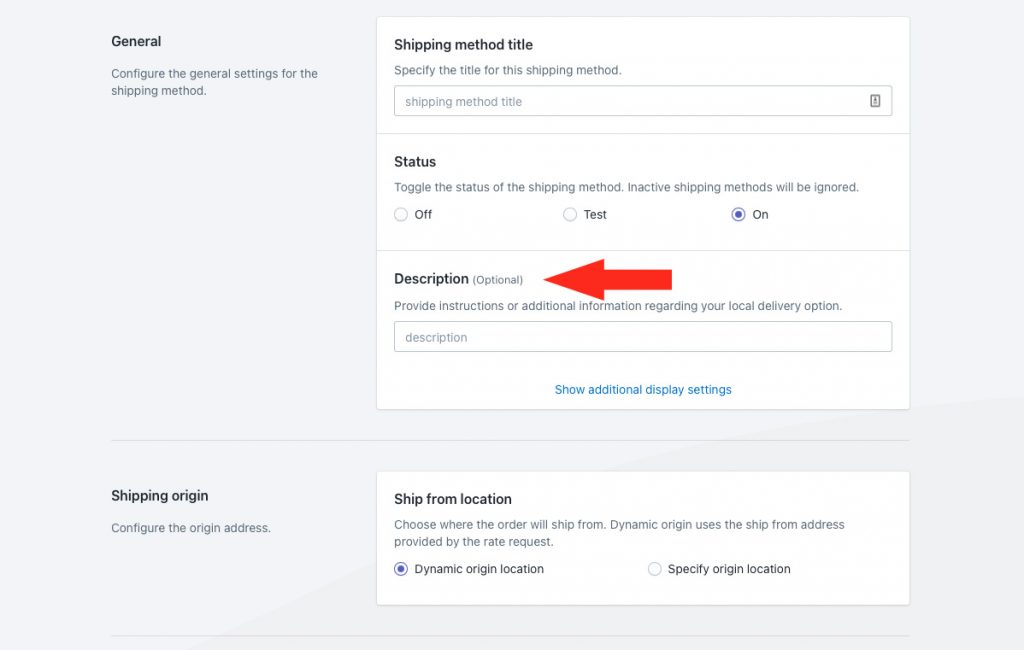
3) If desired, enter a description for your same day shipping method, such as ‘Delivery by 6 PM today’. We recommend limiting your description to 90 characters or less to ensure it displays properly on the checkout page.
Additional display settings are available for delivery times and service codes. Custom delivery time is not necessary for this setup. If you need to create a custom service code for same day deliveries, continue to Step 4. Otherwise, skip ahead to Shipping Origin.
4) Click Show additional display settings, then add a custom service code if desired.
Shipping Origin
Distance can be calculated using the primary location set up in Shopify or a custom ship-from location. This is useful if your same day delivery service is fulfilled by a location other than your primary Shopify store location.
1) Select the ship from location.
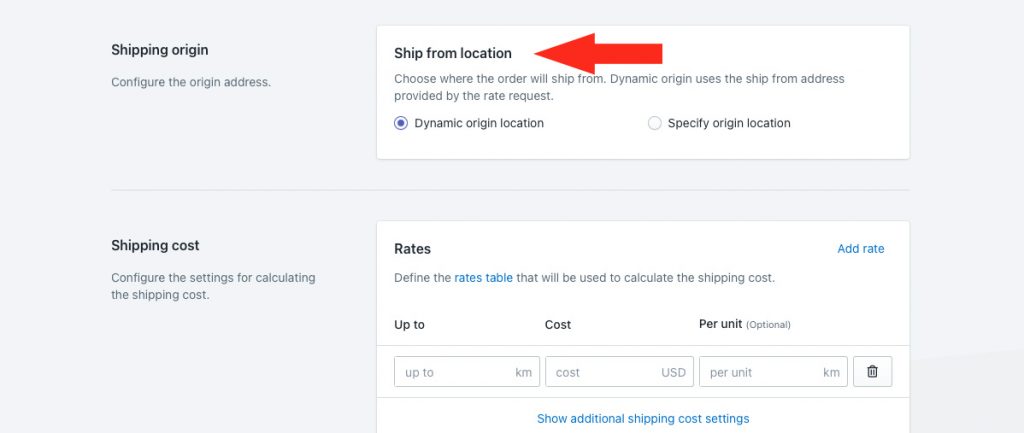
You have two (2) settings to choose from:
Dynamic origin location – same day delivery will be based on the distance between the customer’s address and your primary Shopify location address. This is the default setting.
If you select the ‘Dynamic’ option, skip ahead to Shipping Cost.
Specify origin location – same day delivery will be based on the distance between the customer’s address and the address specified in Step 2.
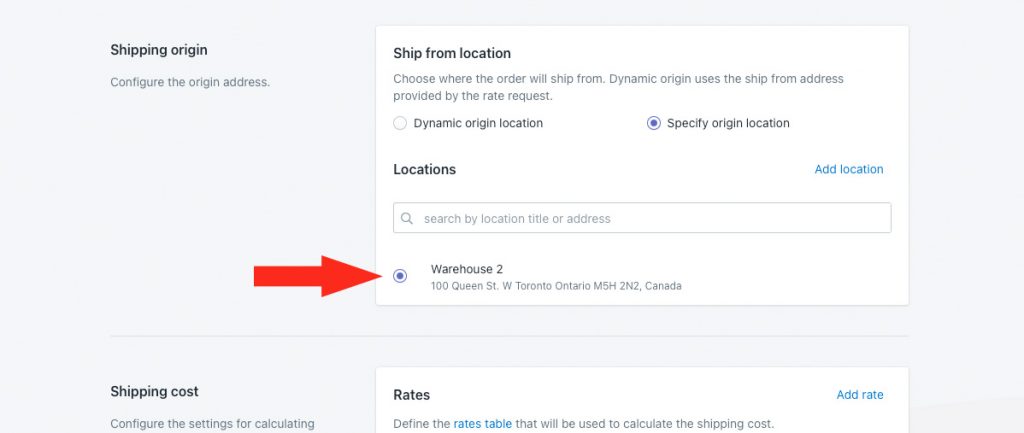
2) If you selected ‘Specify origin location’ in Step 1, select a location. This location will be used as the starting point for distance calculations in this shipping method.
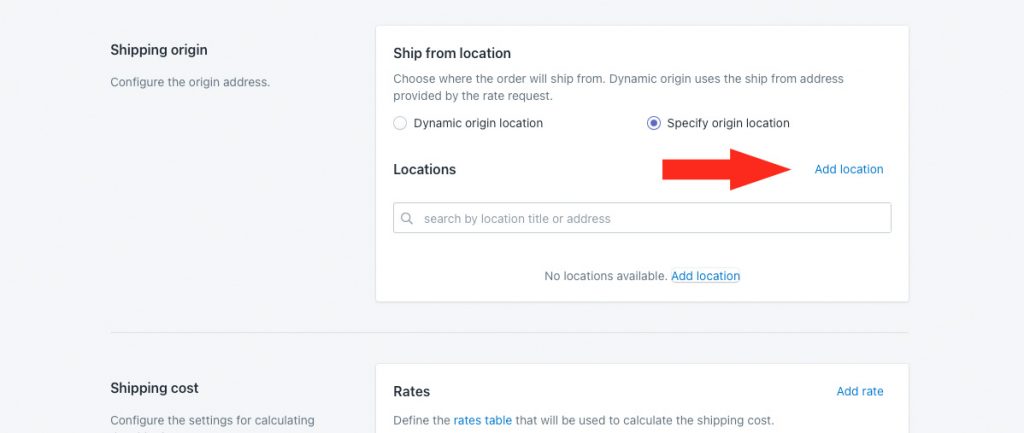
If you have not yet set up a custom origin location, you can add one from the shipping method by clicking Add location.
Shipping Cost
For this example, we’re going to set up a single flat rate for same day delivery. If you prefer to set up a table of rates based on different distances, you can still follow the steps below.
1) Enter the distance limit for your same day delivery service as the Up to limit, such as ’25’ (25 km). Customers with an address outside of this range will not see the same day delivery option displayed at checkout.
If you’re setting up a table of rates based on different distances, enter the upper distance limit for the lowest cost on your rate table, such as ‘5’ (5 km)
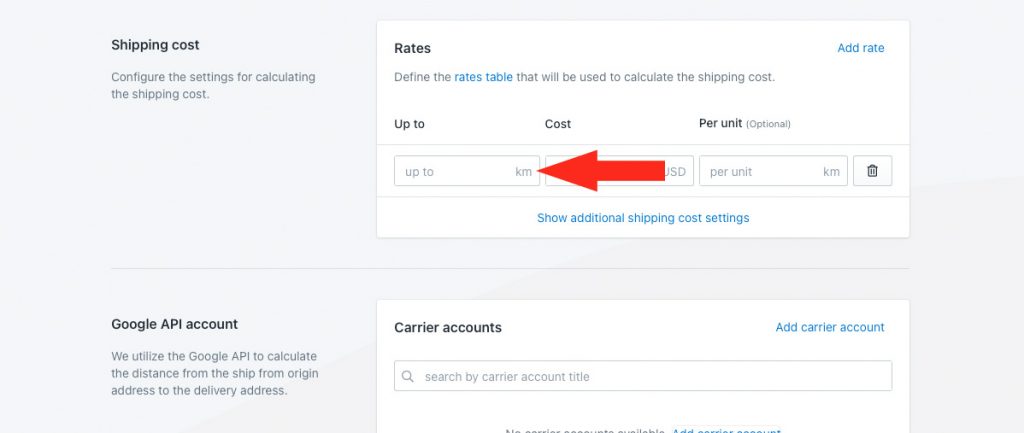
Distance units are configured in your Intuitive Shipping General settings, based on your distance preference – either kilometers or miles.
2) Enter the delivery cost for your same day delivery service.
If you’re setting up a table of rates based on difference distances, enter the lowest cost on your rate table.
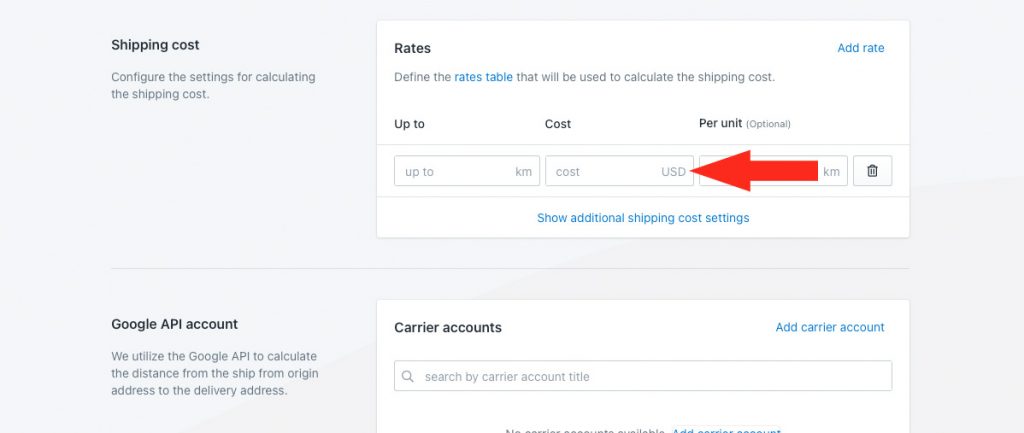
3) If desired, enter a per unit value. For this example, we’re leaving per unit blank, because we want customers to be charged a single flat fee for any distance up to the limit entered in Step 1.
If desired, you can enter a per unit value, such as 5 (5 km).
For example, if you want to set up a same day delivery cost of $3.00 per 5 km, up to a maximum of 30 km, enter ’30’ as the up to limit, ‘3’ as the cost’ and ‘5’ as the per unit value.
A customer who lives anywhere between 11 and 15 km from your shipping origin location will be charged $9.00 for shipping at checkout.
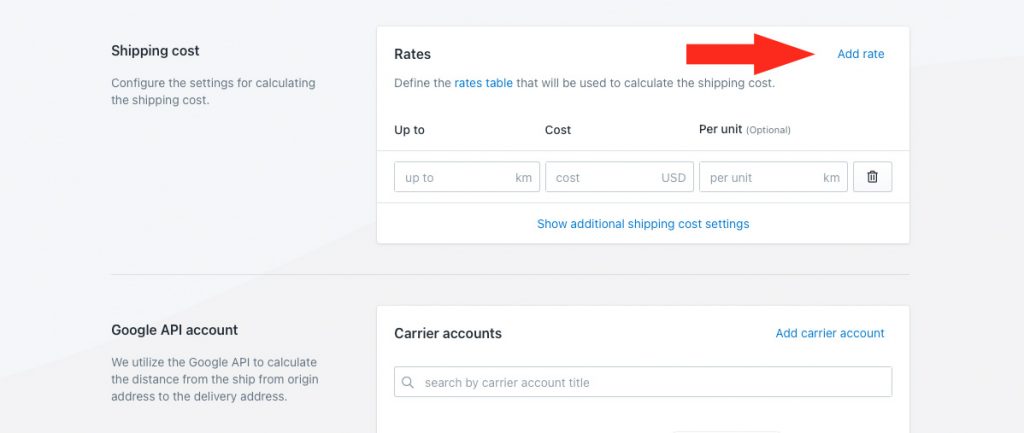
4) If you’re setting up a table of rates based on difference distances, click Add rate, then repeat Steps 1 to 3 for each additional rate.
Additional settings are available for cart splitting and rate table blending. Cart splitting is not recommended for this setup. Rate table blending is intended to be used only with rate tables, and can be used with this setup if desired, and only if you created a table of rates based on different distances.
If you do not need rate table blending, skip ahead to Google API Account. Otherwise, continue to Step 5.
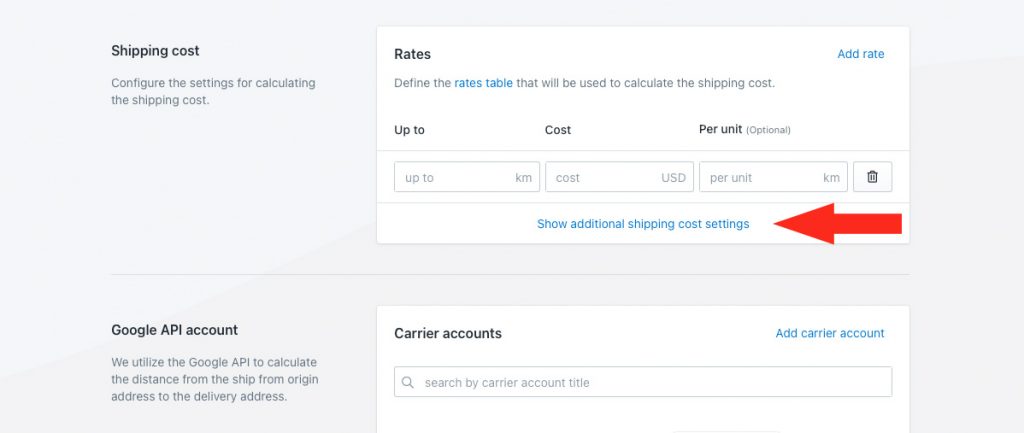
5) Click Show additional shipping cost settings, then configure rate table blending mode as desired.
Google API Account
A Google API account is required to complete this setup. If you don’t have a Google API account connected to Intuitive Shipping, you will be unable complete this setup.
If you have not yet created an API billing account with Google, you must do so before proceeding.
Once your API account has been created, and you have obtained your API key, you can return here to finish connecting your account, starting at Step 1 below.
If you connected your Google API account to Intuitive Shipping prior to starting this setup, skip ahead to Step 5.
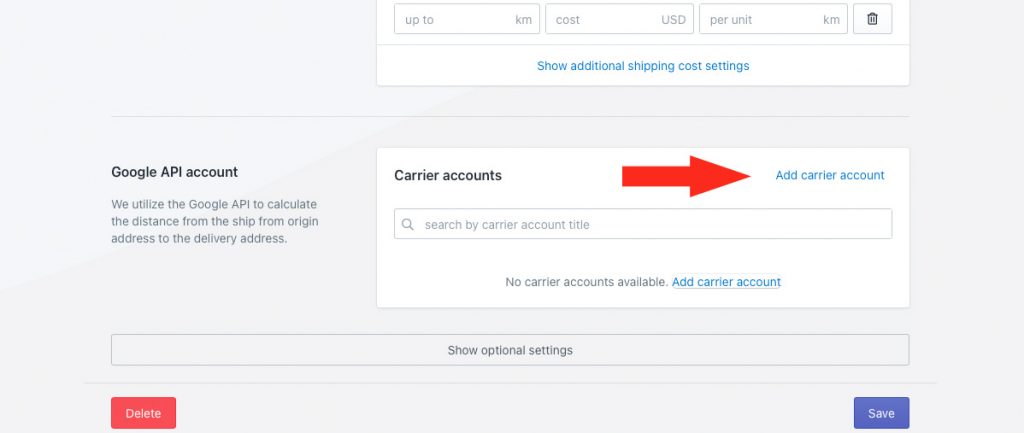
1) Click Add a carrier account.
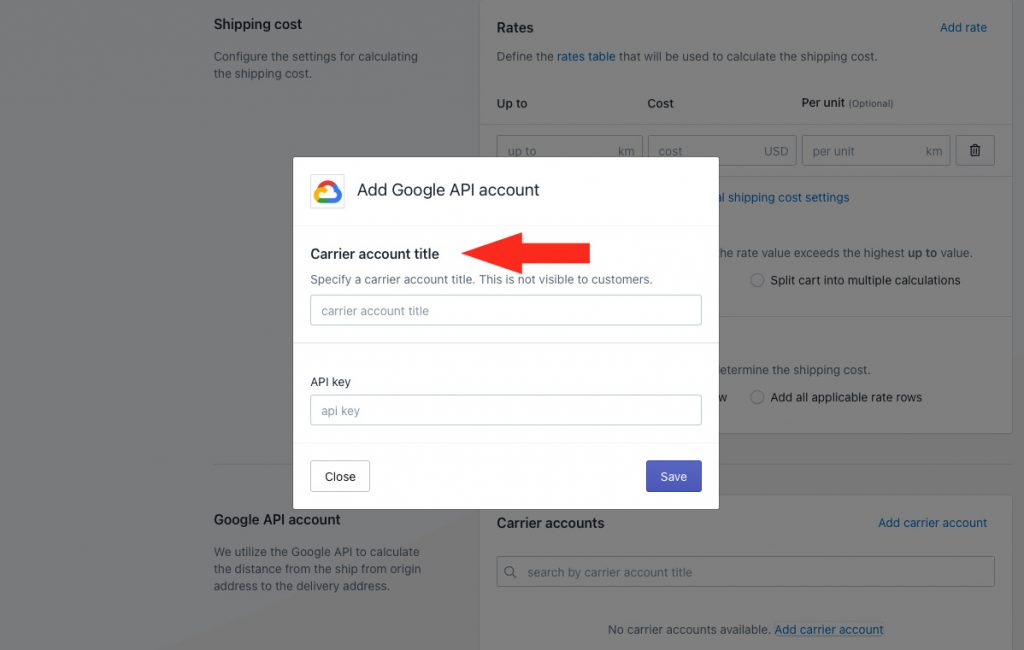
2) Enter a carrier account title, such a ‘Google Distince’ or ‘Google API’.
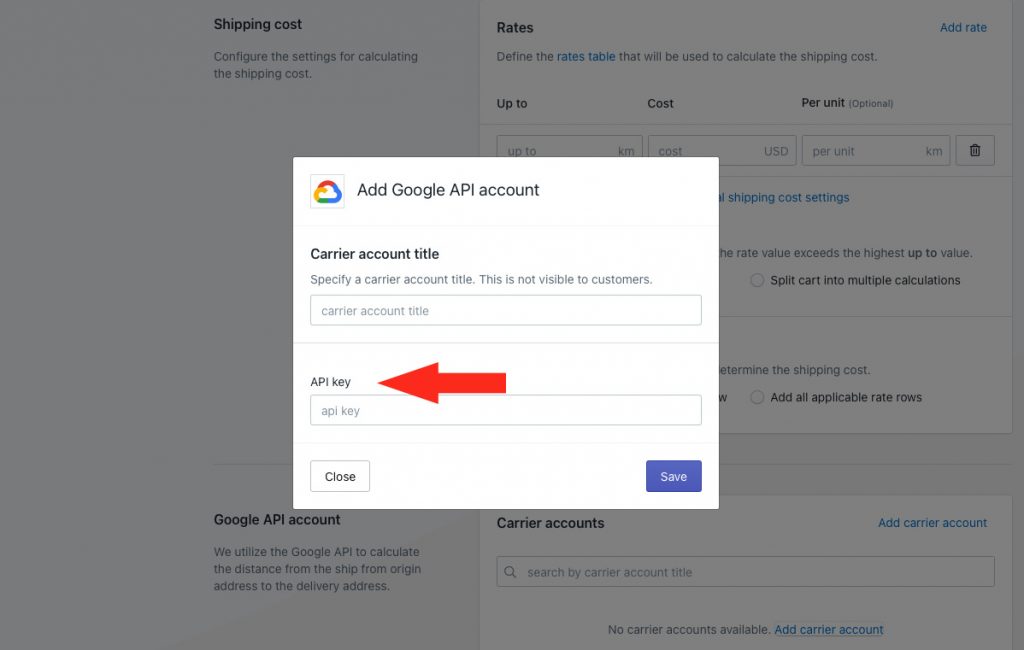
3) Enter your Google API key. This is provided by Google in your API account.
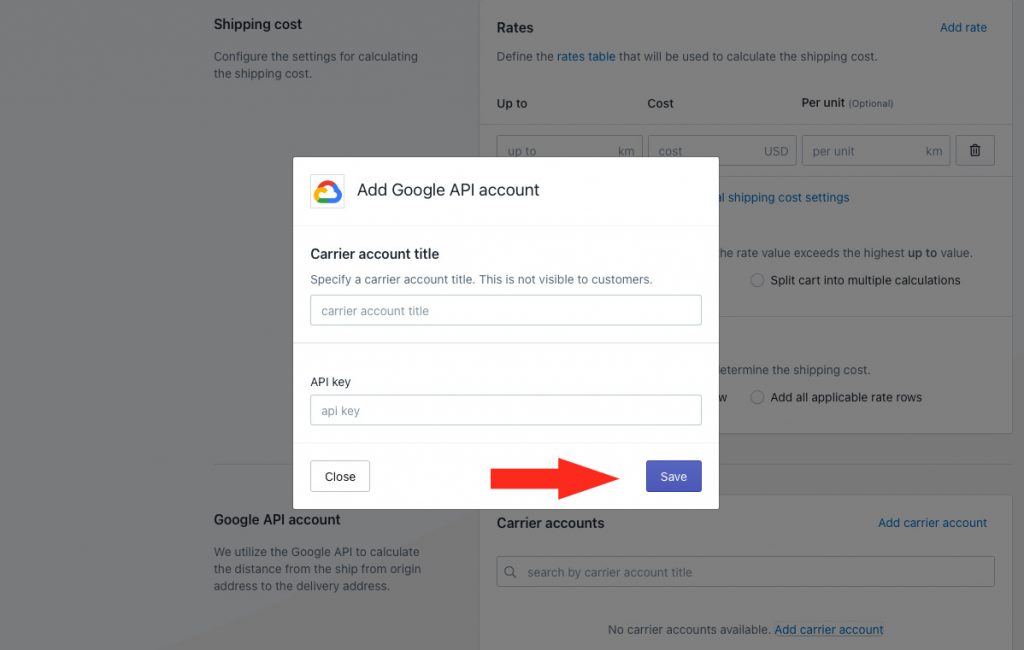
4) Click the Save button.
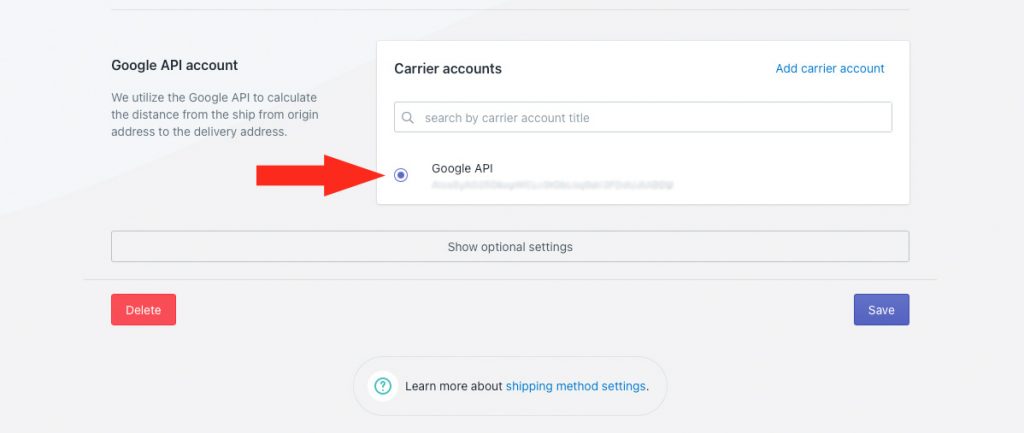
5) Select your Google account.
Optional Settings
Settings for distance calculation type, fallback rate, cost adjustments, free shipping, custom shipping blending and rate blending give you further control of how shipping is calculated at checkout.
For this setup, the optional local delivery distance calculation type is the most relevant optional setting, however the other optional settings can be configured if desired.
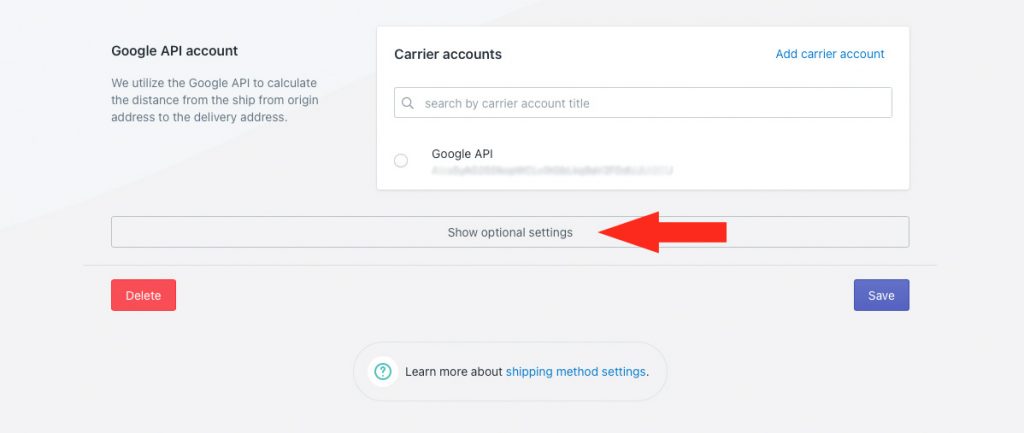
1) Click Show optional settings.
Local Delivery Settings
Intuitive Shipping uses your Google API key to calculate distance between your specified shipping origin and the customer’s address. There are two ways this can be done.
By default, we attempt to calculate distance using your Distance API to get driving directions. If that fails, we attempt to calculate distance using your Geocoding API. If desired, you can configure your distance-based same day delivery option to only use one method or the other.
Distance API uses your shipping origin address and the customer’s address to look up driving directions with Google Maps. This method generally passes about 75% of the time. However, if you live in a region where postal codes are not used, or not recognized by Google Maps, this method will likely fail.
Geocoding API converts your shipping origin address and the customer’s address into geo-coordinates, and measures distance point-to-point (or ‘as the crow flies’). This method almost always passes, except if Google is unable to convert an address into coordinates.
Each method results in one API call to your Google API account. That means, if you select Automatic in Step 1, Intuitive Shipping will make only one API call about 75% of the time, and require two API calls about 25% of the time.
API calls cost $5.00 per 1000 calls. Google provides a $200 USD credit each month for an unlimited time. That’s 40,000 API calls – or roughly 30,000 to 40,000 distance-based rate calculations – per month for free.
1) Select a distance calculation type.
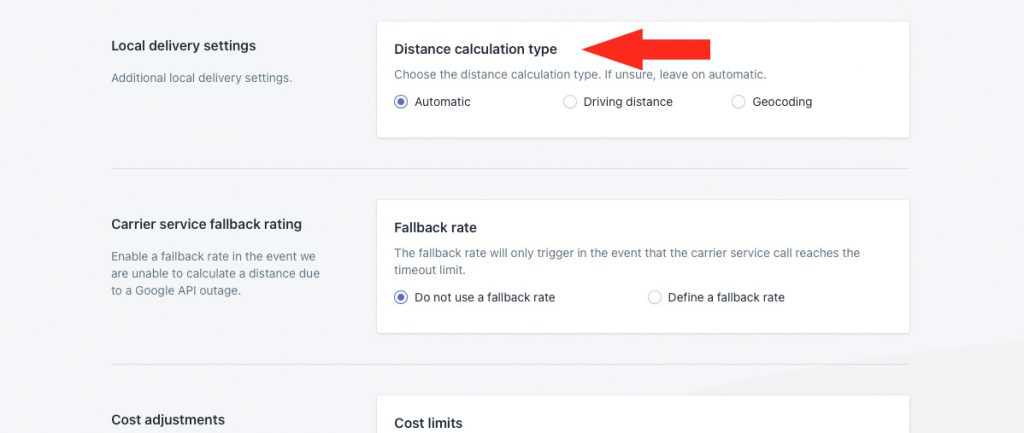
You have three (3) settings to choose from:
Automatic – Intuitive Shipping first attempts to calculate distance using your Distance API. If that fails, we attempt to calculate distance using your Geocoding API. This method may result in up to two API calls per checkout to your Google API account. This is the default setting.
Driving directions – Intuitive Shipping attempts to calculate distance using only your Distance API. This method will result in only one API call per checkout to your Google API account.
If you select this option and it fails, Intuitive Shipping will not fall back to Geocoding. No rate will be returned to the customer.
Geocoding – Intuitive Shipping attempts to calculate distance using only your Geocoding API. This method will result in only one API call per checkout to your Google API account.
If you select this option and it fails, Intuitive Shipping will not fall back on Driving directions. No rate will be returned to the customer.
Carrier Service Fallback Rate
1) Choose if you want a fallback rate to appear at checkout in situations when Google times out. This is useful when Google’s mapping servers are down or when they’re overwhelmed during peak periods.
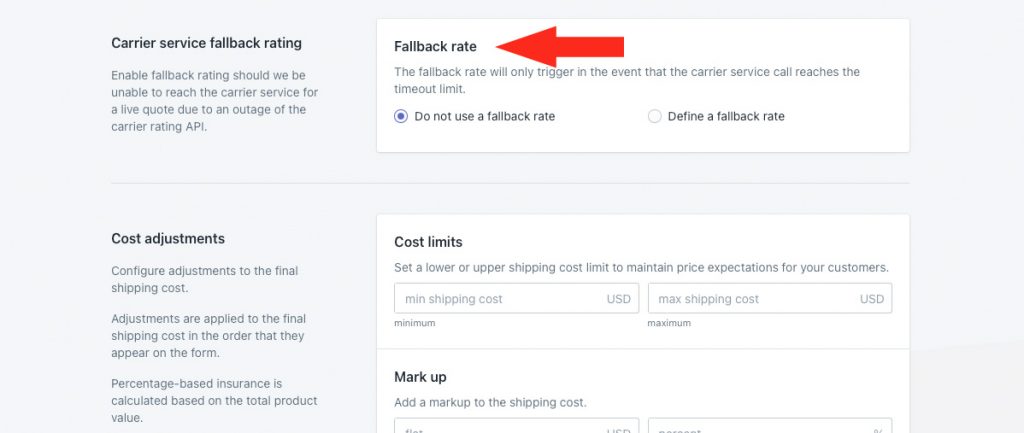
You have two (2) settings to choose from:
Do not use a fallback rate – when Google API calls time out, no shipping rates from this shipping method are displayed at checkout. This is the default setting.
Define a fallback rate – when Google API calls time out, the fallback rate entered in Step 2 is displayed at checkout.
That means the fallback rate won’t be displayed if an error occurs, such as when a customer enters an address that isn’t recognized by Google, or when a postal code isn’t valid or recognized. It only activates when the system times out waiting for a response.
2) If you selected Define a fallback rate in Step 1, enter a fallback shipping cost.
If you’re using a flat rate for same day delivery, enter that cost as the fallback cost. If you’re using a table of rates based on different distances, consider entering the average table cost, or the maximum.
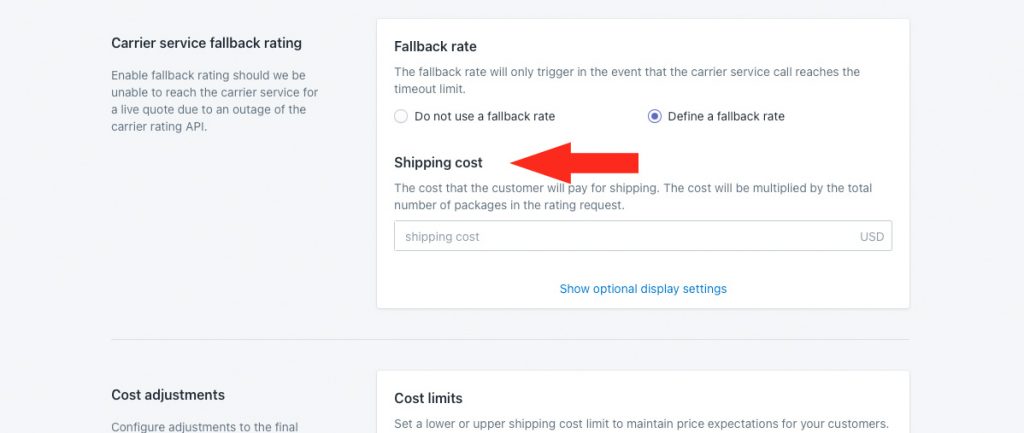
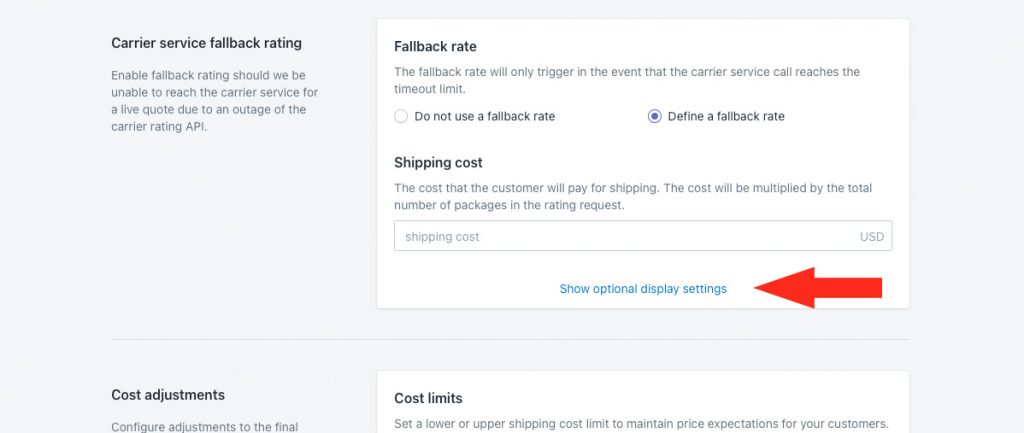
Additional settings are available for fallback rate titles, descriptions, delivery times and service codes. In the event the fallback rate is activated, these settings will override the main settings.
If you do not need to adjust these settings, skip ahead to Cost Adjustments. Otherwise, continue to Step 3.
3) Click Show optional display settings, then edit the fallback rate display settings as needed.
Cost Adjustments
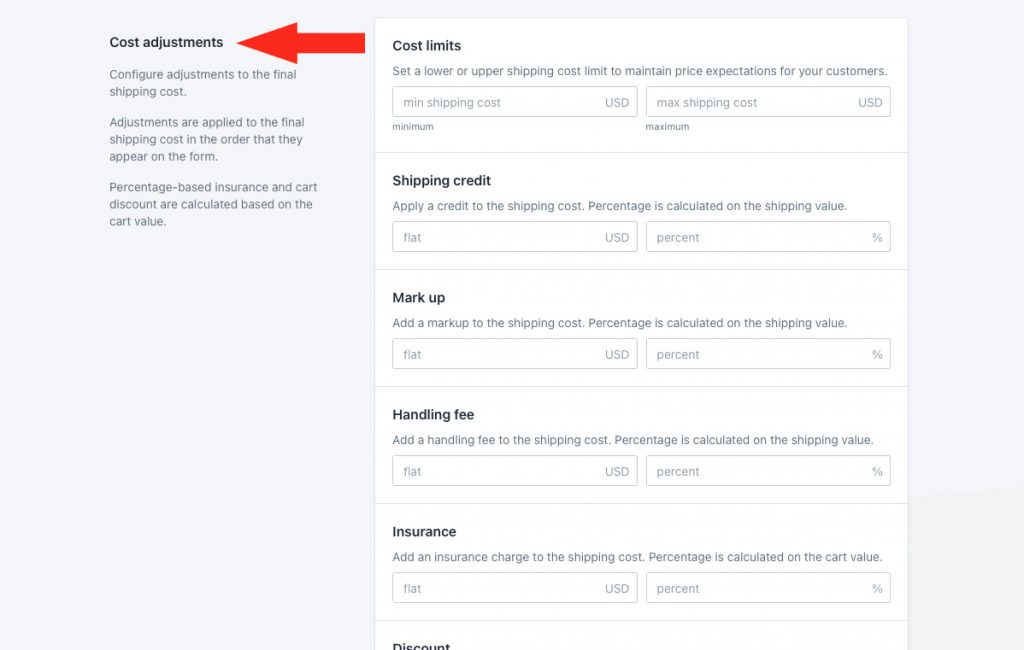
If you want to build extra costs into to your same day delivery shipping method without altering the distance-based rates, you can apply cost adjustments.
Cost adjustments are applied in the order they are listed in the app: cost limits first, then shipping credits, then mark ups, then handling, then insurance, then discounts, then rounding.
If you do not need to apply cost adjustments to your same day shipping method, skip ahead to Free Shipping. Otherwise, continue to Step 1.
1) If desired, add cost adjustments.
Free Shipping
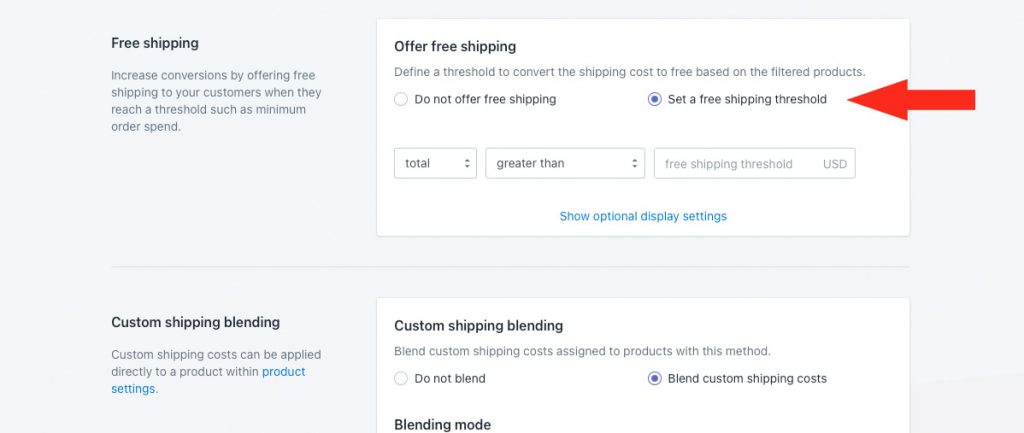
Activate free shipping when the customer’s cart crosses a threshold limit. This is useful if you want to offer free same day delivery only when customers order a minimum amount, or if you offer free same day delivery in general, but want your paid rate to apply after a certain cart weight is exceeded.
If you don’t need a free shipping threshold, skip ahead to Custom Shipping Blending. Otherwise, continue to Step 1.
1) If desired, select Set a free shipping threshold and edit the settings as needed.
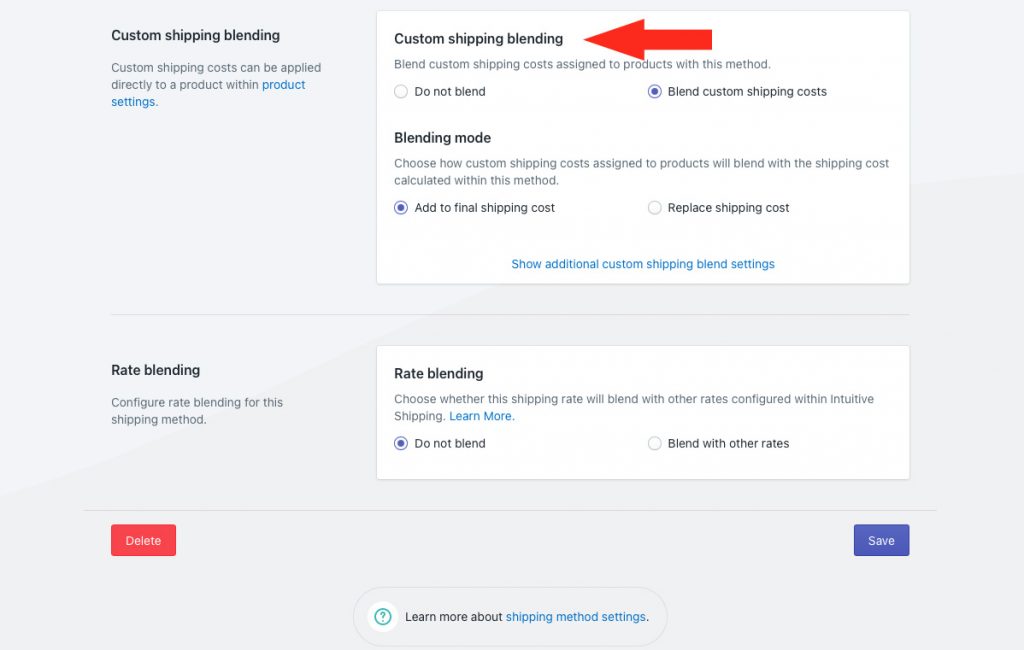
Custom Shipping Blending
If you have products with custom shipping costs, those special costs can be blended with your local delivery rates.
Let’s say you have a product with a $100.00 custom shipping cost. That means you don’t delivery it locally, and it always costs you $100.00 to ship, regardless of what else is in the cart. When a customer orders one of these products along with products that do qualify for local delivery, and your same day shipping method generates a delivery cost of $15.00, the customer will be charged $115.00 for shipping at checkout.
Custom shipping prices can be added to Intuitive Shipping in your product settings.
For situations like this, we recommend that you include a note in your same day delivery description (General Step 3.), such as ‘oversized items cannot be delivered same day’.
If you don’t have products with custom shipping costs, these settings are ignored regardless of how they are configured, and you can skip ahead to Rate Blending. Otherwise, continue to Step 1.
1) If desired, adjust the custom shipping blending settings as needed.
Rate Blending
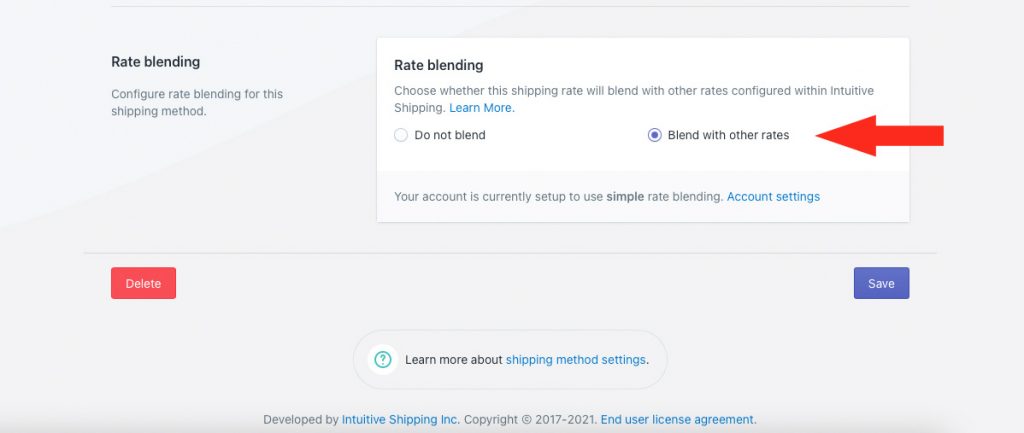
If you have multiple Scenarios – perhaps you have different same day delivery rates depending on the product – you can decide if those rates should be blended together or not.
For example, if one product type has a flat rate local delivery cost of $10.00 and another product type has a per km cost of $2.50 per km, rate blending can add those two costs together when a customer orders both product types.
If you don’t have rates that need to be blended, leave rate blending set to the default ‘Do not blend’, and skip ahead to Save Your Settings. Otherwise, continue to Step 1.
1) If desired, select Blend with other rates, then configure rate blending settings as needed.
Save Your Settings
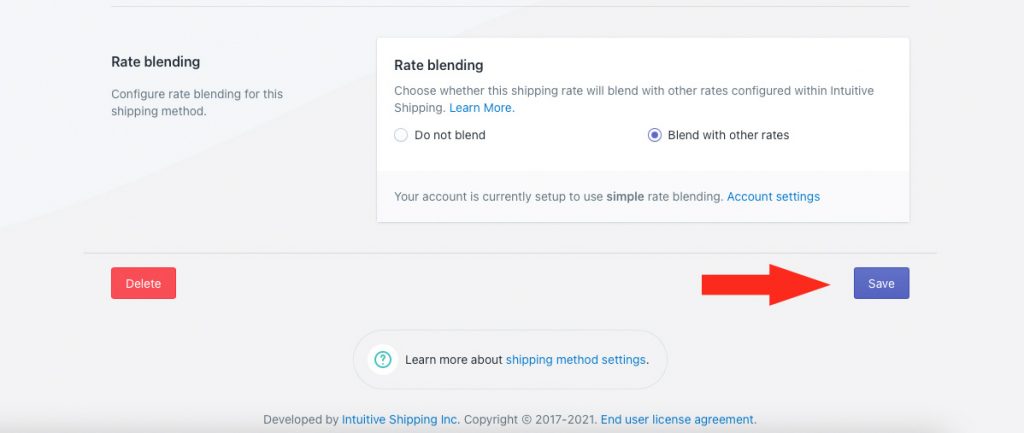
1) Click the Save button to save your same day delivery shipping method.
Add A Next Day Scenario
To simplify the process, you can create a duplicate of your Same Day Scenario and make changes to it rather than starting over from scratch.
1) Click Shipping on the sidebar menu, then select Scenarios from the drop-down list.

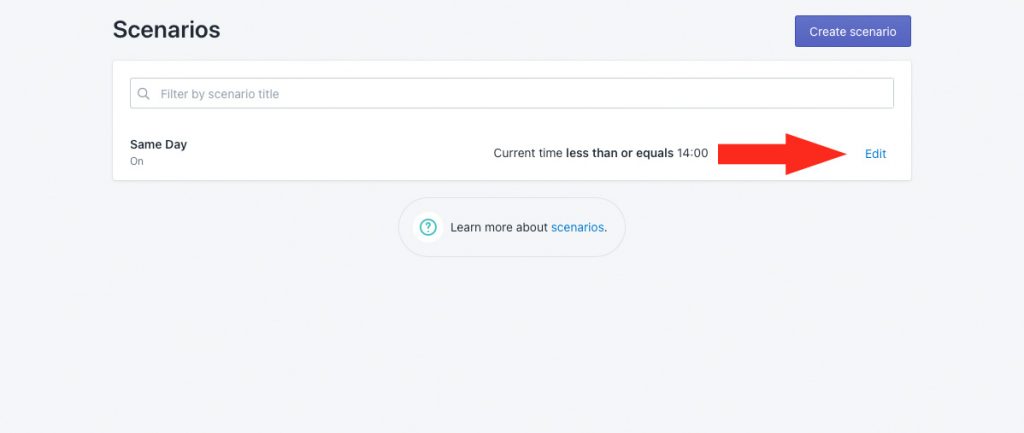
2) Click Edit beside your Same Day Scenario.
3) Click Duplicate below the Scenario heading. This will create an exact copy of your Same Day Scenario, including the local delivery shipping method.
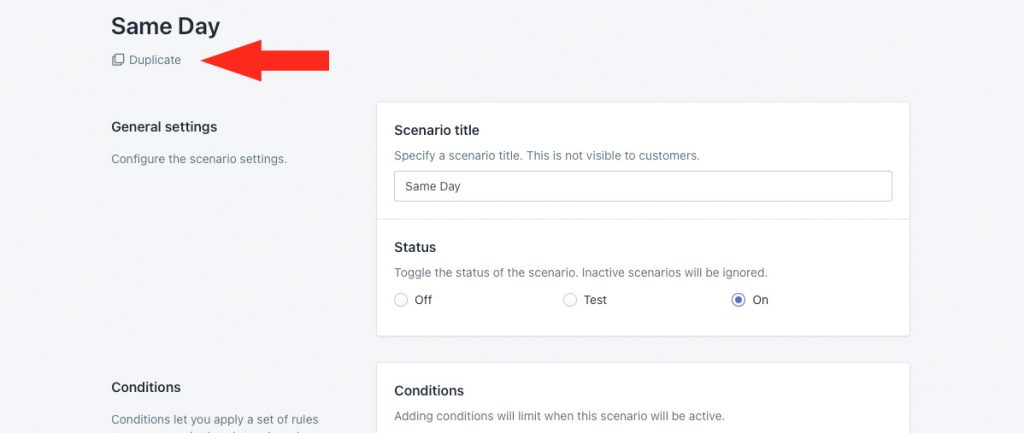
General Settings
1) Change the title from ‘Copy of [original title]’ to something else, like ‘Next Day’.

2) Leave the status set to On.

Conditions
1) Leave Condition match set to All conditions.

2) Leave the condition type set to Current time.

3) Change the condition logic.
For this example, we’ll change it to greater than, since we want the next day option to appear after the same day cut-off time. If you used less than in your Same Day Scenario, we recommend changing the logic to greater than or equals.
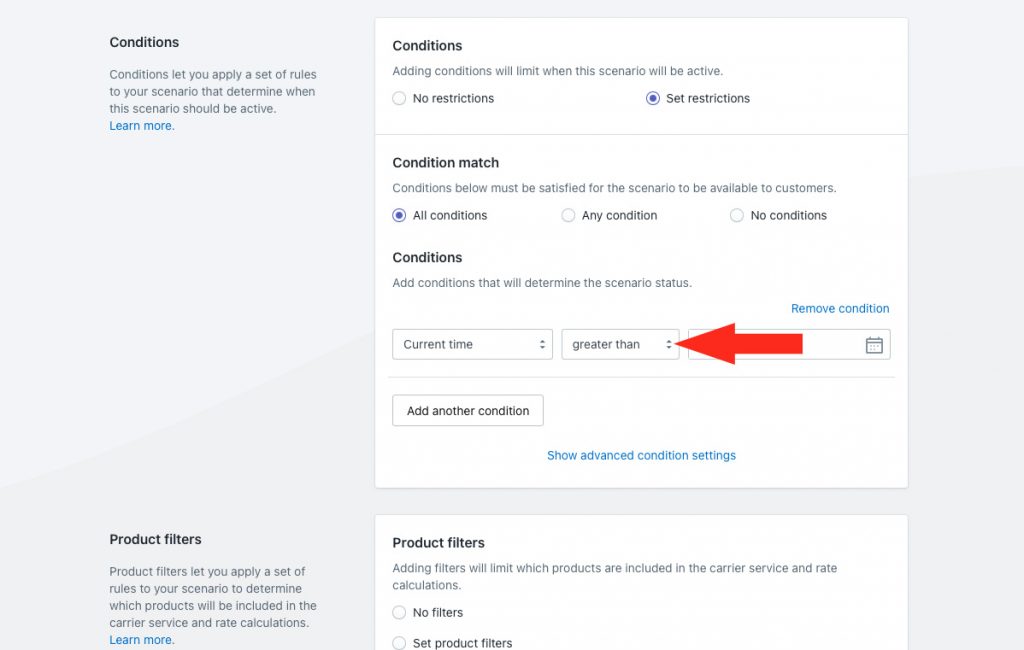
4) Leave the time set to the same cut-off time used in your Same Day Scenario. This will ensure that the next day delivery option is displayed at checkout as soon as the same day option is no longer available.

Save Your Settings
1) Click the Save button to save your Next Day Scenario.
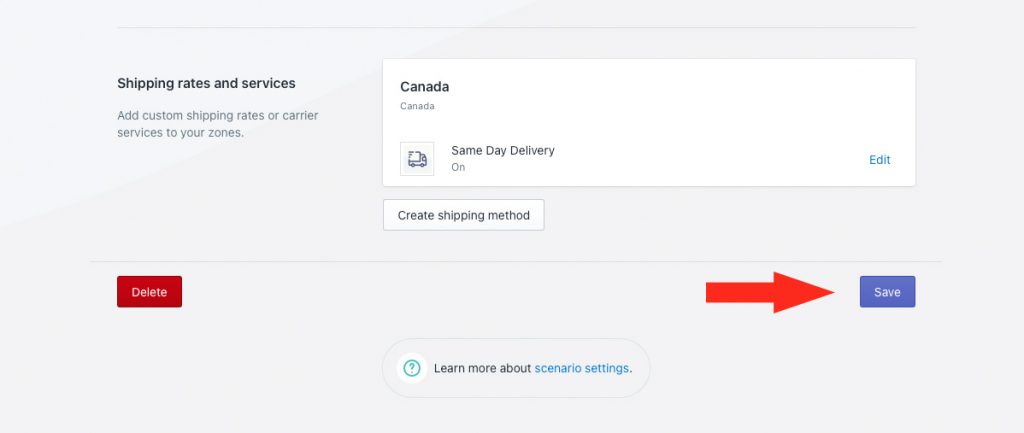
Edit The Next Day Local Delivery Shipping Method
When you duplicated the Same Day Scenario, it included a copy of the same day delivery shipping method. Unless you are using a generic shipping method title for both options, you will likely need to change the title. You can also make other changes as needed.
1) Click Edit beside the same day delivery shipping method.
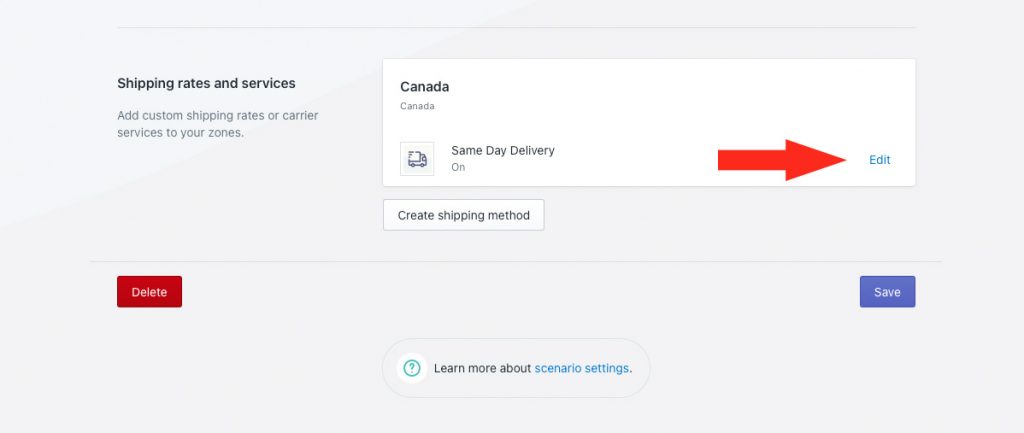
General
1) If needed, change the shipping method title to something like ‘Next Day Delivery’. The title entered here will be visible to customers.

2) If you want the next day delivery option to be available right away, leave the status set to On. If you want to test it first before making it public, set it to Test.

3) If desired, change the description for your next day shipping method, such as ‘Delivery by 11 AM tomorrow’. We recommend limiting your description to 90 characters or less to ensure it displays properly on the checkout page.

4) If desired, click Show additional display settings, then adjust the additional display settings.

Shipping Origin
If you manage same day and next day deliveries from different locations, you can change the shipping origin as needed.
1) If desired, change the ship from location, or leave it unchanged from your same day delivery shipping method.

You have two (2) settings to choose from:
Dynamic origin location – next day delivery will be based on the distance between the customer’s address and your primary Shopify location address. This is the default setting.
If you select the ‘Dynamic’ option, skip ahead to Shipping Cost.
Specify origin location – next day delivery will be based on the distance between the customer’s address and the address specified in Step 2.
2) If you selected ‘Specify origin location’ in Step 1, select a location if different from your same day delivery location. This location will be used as the starting point for distance calculations in this shipping method.

If you have not yet set up a custom origin location – or, if you want to add another one – you can add one from the shipping method by clicking Add location.

Shipping Cost
For this example, we’re going to use a single flat rate like we used for same day delivery. If you prefer to set up a table of rates based on different distances, you can still follow the steps below.
1) Leave the Up to value set to whatever you used in your same day delivery shipping method, or edit it if the delivery radius for next day service is different than your same day service. Customers with an address outside of this range will not see the local pickup option displayed at checkout.
If you’re setting up a table of rates based on different distances, enter or edit the upper distance limit for the lowest cost on your rate table, such as ‘5’ (5 km).

Distance units are configured in your Intuitive Shipping General settings, based on your distance preference – either kilometers or miles.
2) Leave the delivery cost set to whatever you used in your same day delivery shipping method, or edit it if the cost for your next day service is different than your same day service.
If you’re setting up a table of rates based on difference distances, enter or edit the lowest cost on your rate table.

3) If desired, enter a per unit value. For this example, we’re leaving per unit blank, because we want customers to be charged a single flat fee for any distance up to the limit entered in Step 1.
If desired, you can enter per unit value, such as 5 (5 km).
For example, if you want to set up a next day delivery cost of $3.00 per 5 km, up to a maximum of 30 km, enter ’30’ as the up to limit, ‘3’ as the cost’ and ‘5’ as the per unit value.
A customer who lives anywhere between 11 and 15 km from your shipping origin location will be charged $9.00 for shipping at checkout.
4) If you’re setting up a table of rates based on difference distances, edit each row copied over from your same day delivery shipping method.
To add more cost rows to the table, click Add rate, then repeat Steps 1 to 3 for each additional rate.

To remove any excess rows, click the trash can icon beside the corresponding row.
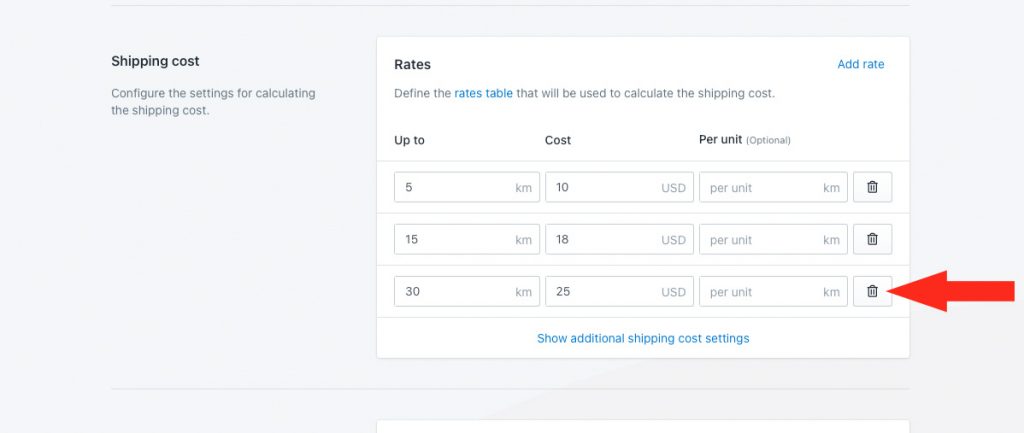
Additional settings are available for cart splitting and rate table blending. Cart splitting is not recommended for this setup. Rate table blending is intended to be used only with rate tables, and can be used with this setup if desired, and only if you created a table of rates based on different distances.
If you do not need rate table blending, skip ahead to Google API Account. Otherwise, continue to Step 5.
5) Click Show additional shipping cost settings, then configure or edit rate table blending mode as desired.

Google API Account
1) Ensure that your Google account was copied over from your same day shipping method, and is selected. Your Google API account is required to complete this setup.

Optional Settings
If you don’t need to configure optional settings for next day delivery, or if you don’t need to edit any of the settings that were copied over from your same day shipping method, you can skip ahead to Save Your Settings. If you need to make changes, continue to Step 1.
1) Click Show optional settings, then edit your settings as needed.

Save Your Settings
1) Click the Save button to save your next day delivery shipping method.

Limit Either/Or Setup To Certain Days
If you need an either/or setup, like the one above, but you want to limit those options to be displayed only on certain days of the week, you can add another condition to both the Same Day and Next Day Scenarios.
If you have already completed the previous Either/Or Same Day and Next Day setup and you’d like to add a Day of the Week condition, continue to Step 1. Otherwise, complete the previous setup first, then return to this guide.
Edit The Same Day Scenario
1) Click Shipping on the sidebar menu, then select Scenarios from the drop-down list.

2) Click Edit beside your Same Day Scenario.
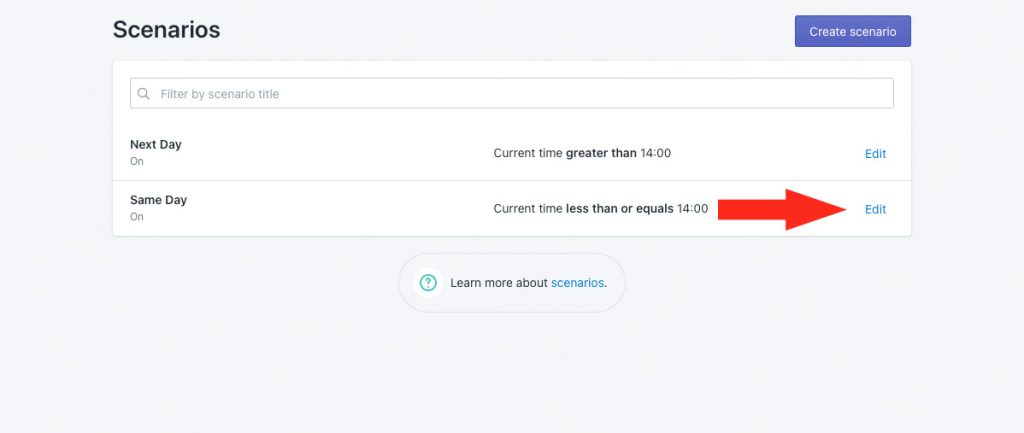
Conditions
1) Click the Add another condition button.
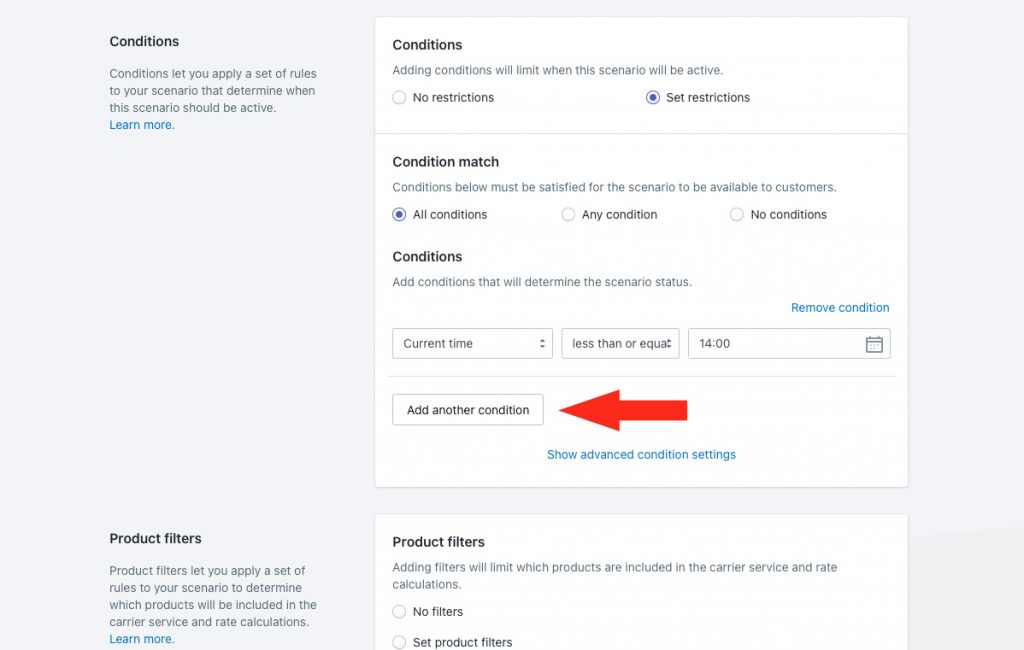
2) Select the Current day of the week condition type.
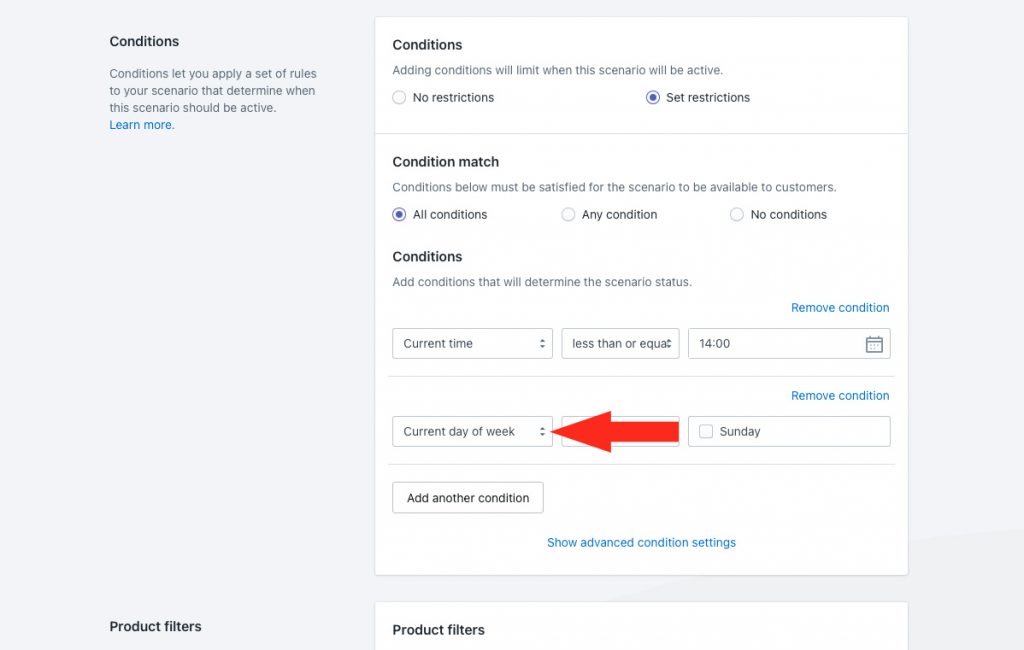
3) Set the condition logic.
For this example, we’ll leave it set to equals, since we want the same day delivery option to be available on the days selected in Step 4.
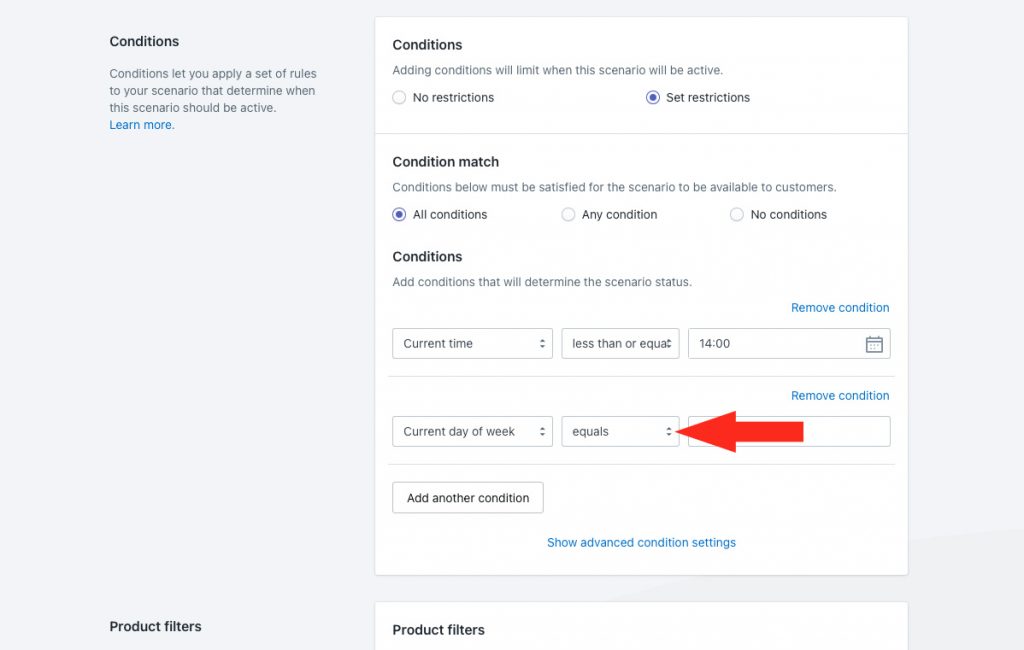
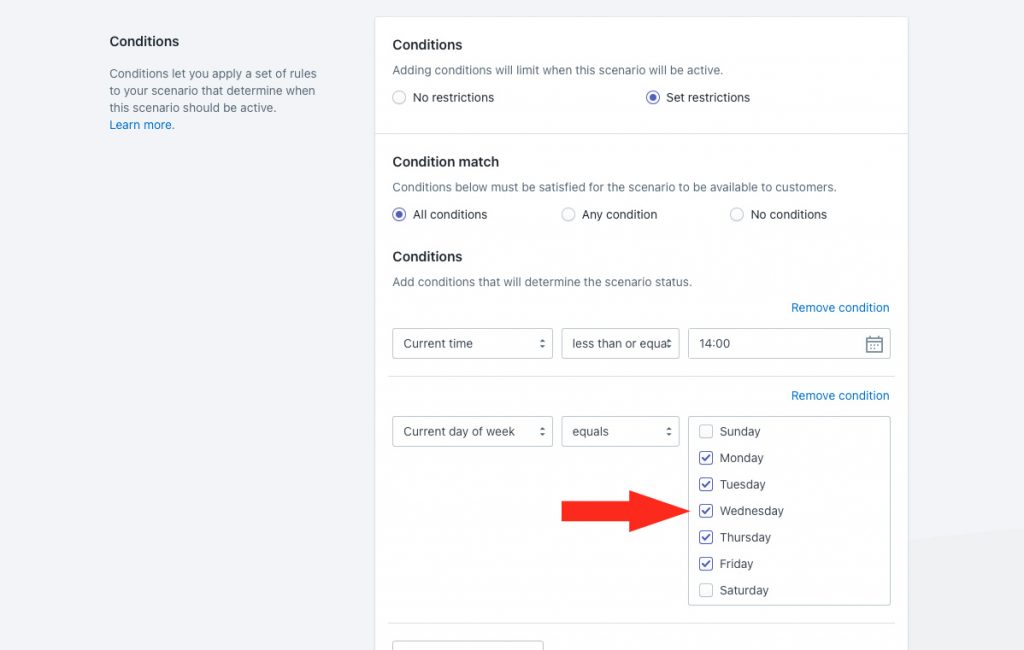
4) Select each day of the week you want to offer same day delivery.
For this example, we’ll select Monday through Friday. The same day delivery option will only be available on these days, because those are the days we deliver.
Save Your Settings
1) Click the Save button to save your updated Same Day Scenario.

Edit The Next Day Scenario
1) Click Shipping on the sidebar menu, then select Scenarios from the drop-down list.

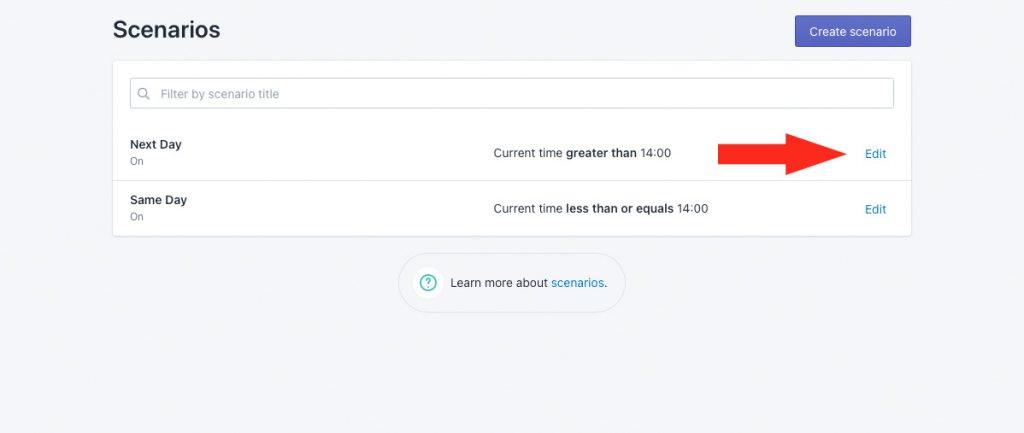
2) Click Edit beside your Next Day Scenario.
Conditions
1) Click the Add another condition button.
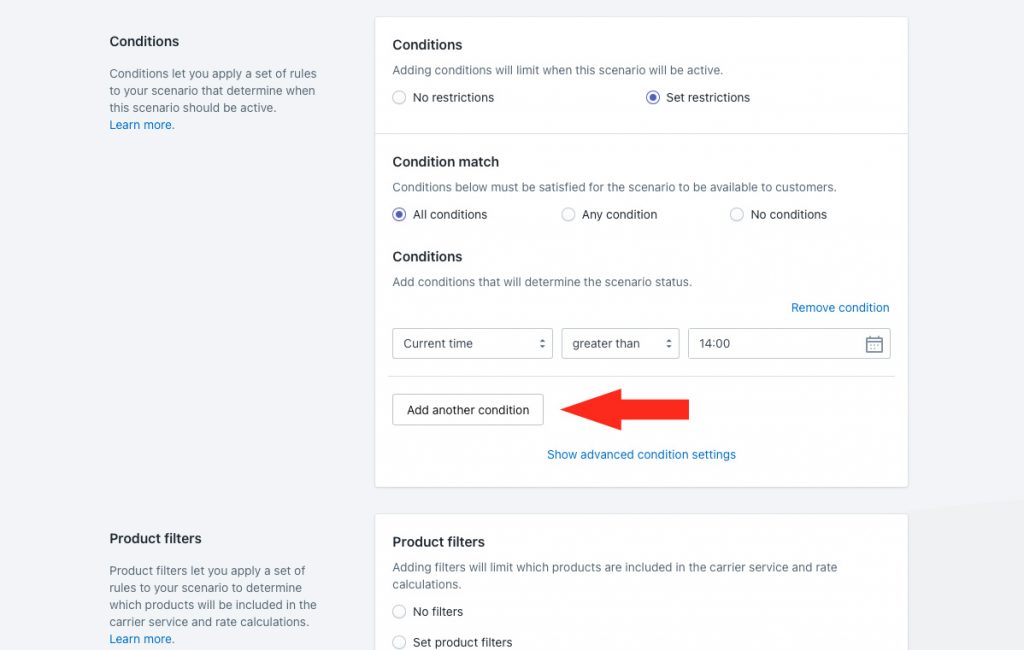
2) Select the Current day of the week condition type.
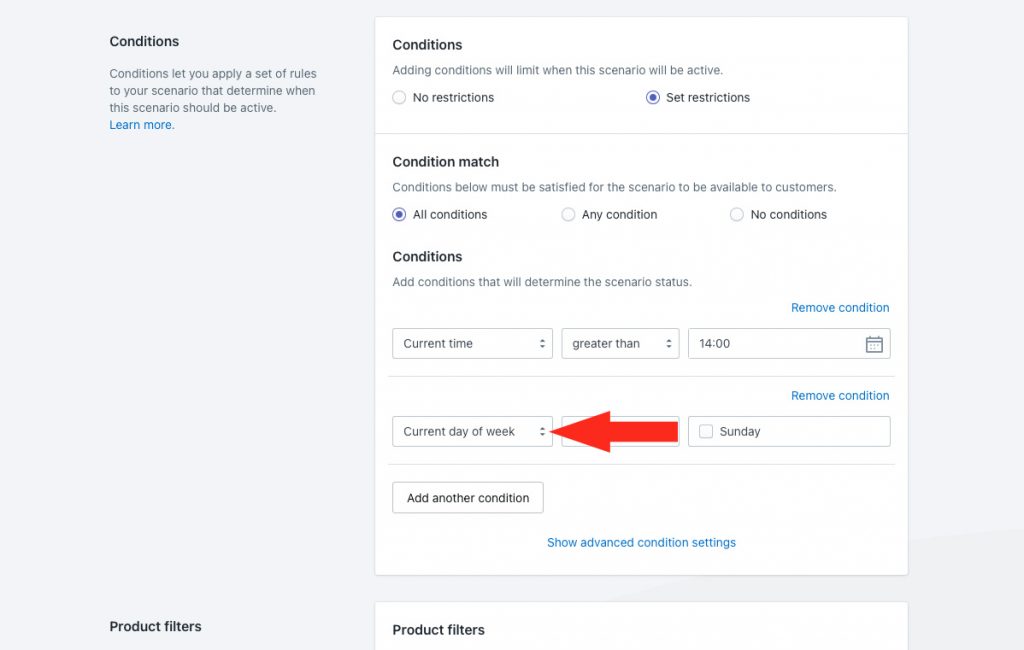
3) Set the condition logic.
For this example, we’ll leave it set to equals, since we want the next day delivery option to be available on the days selected in Step 4.

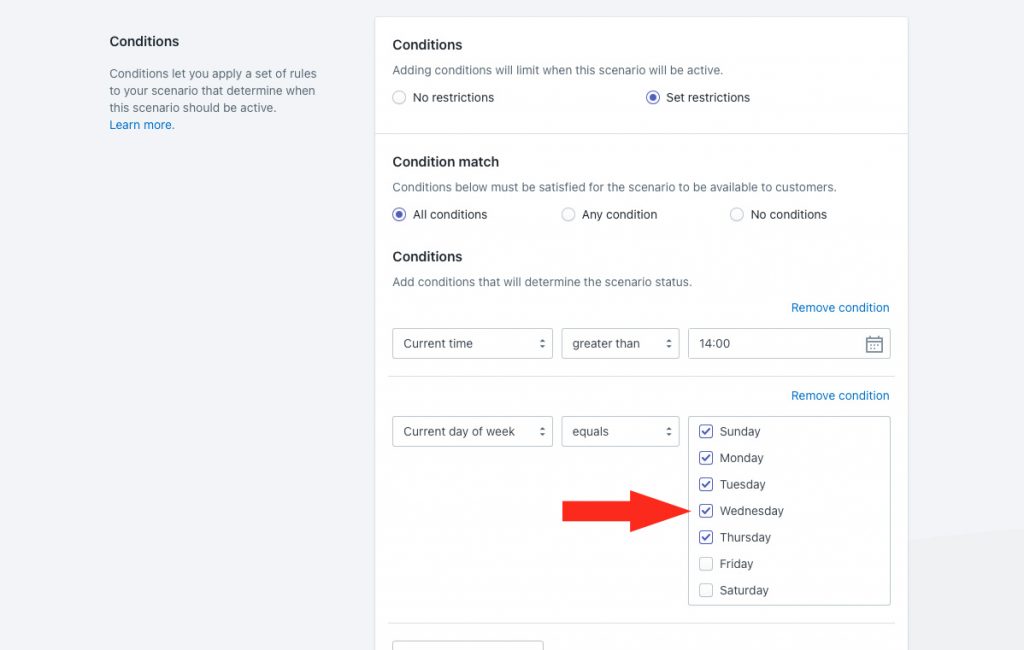
4) Select each day of the week you want to offer next day delivery.
For this example, we’ll select Sunday through Thursday. The next day delivery option will only be available on these days, because we only deliver on Monday through Friday.
Save Your Settings
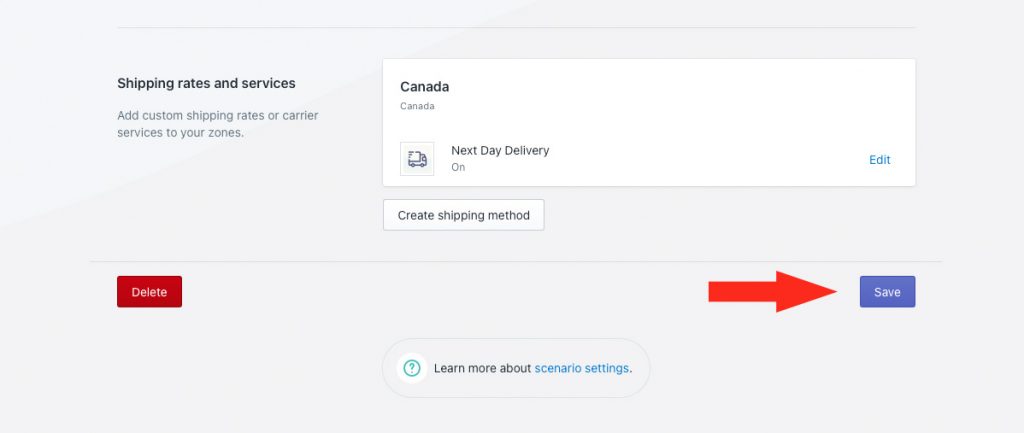
1) Click the Save button to save your updated Next Day Scenario.
Create A Same-Day and Next-Day Optional Setup
This guide will show you how to set up two separate delivery services for same-day and next-day deliveries where both options will appear if the customer orders before the same-day cut-off time and only the next-day option will appear if the cut-off time is missed.
This setup is useful if you want to allow your customer to choose – time permitting – between same-day delivery or next-day delivery.
Add A Same Day Scenario
1) Click Shipping on the sidebar menu, then select Scenarios from the drop-down list.

2) Click the Create scenario button.

General Settings
1) Enter a Scenario title, like ‘Same Day’.

2) Leave the status set to On.

Conditions
1) Select Set restrictions.

2) Leave Condition match set to All conditions.

3) Select the Current time condition type.

4) Select the condition logic.
For this example, we’ll change it to less than or equals, since we want the same day option to appear before or at the time entered in Step 5. If you prefer to have it only appear before (but not at) the time entered in Step 5, change it to less than.

5) Click the calendar icon to select a cut-off time, or manually enter a time as the value.
Selectable times are every hour on the hour. If, for example, you prefer to set a time of 10:30, you must enter it manually.

For example, if your cut-off time is 10:30 AM, enter ’10:30′. If the cut-off time is 2:00 PM, enter or select ’14:00′.
Product Filters
1) Leave Product filters set to Match product conditions.
Product filters determine which products are included in the shipping method rate calculation. Because there are no product conditions in this setup, ‘Match’ is treated the same as ‘No filters’.

Save Your Settings
1) Click the Save button to save your same day delivery Scenario.

Add A Same Day Local Delivery Shipping Method
1) Click the Create shipping method button to add same day delivery shipping method.

Select A Local Delivery Service
1) Click the downward arrow beside Local delivery to display a list of options.

2) Select Local delivery from the list.

3) Click the Next button.

4) Select a Zone.

5) Click the Configure shipping button.

General
1) Enter a shipping method title, such as ‘Same Day Delivery’. The title entered here will be visible to customers.

2) If you want the same day delivery option to be available right away, leave the status set to On. If you want to test it first before making it public, set it to Test.

3) If desired, enter a description for your same day shipping method, such as ‘Delivery by 6 PM today’. We recommend limiting your description to 90 characters or less to ensure it displays properly on the checkout page.

Additional display settings are available for delivery times and service codes. Custom delivery time is not necessary for this setup. If you need to create a custom service code for same day deliveries, continue to Step 4. Otherwise, skip ahead to Shipping Origin.
4) Click Show additional display settings, then add a custom service code if desired.

Shipping Origin
Distance can be calculated using the primary location set up in Shopify or a custom ship-from location. This is useful if your same day delivery service is fulfilled by a location other than your primary Shopify store location.
1) Select the ship from location.

You have two (2) settings to choose from:
Dynamic origin location – same day delivery will be based on the distance between the customer’s address and your primary Shopify location address. This is the default setting.
If you select the ‘Dynamic’ option, skip ahead to Shipping Cost.
Specify origin location – same day delivery will be based on the distance between the customer’s address and the address specified in Step 2.
2) If you selected ‘Specify origin location’ in Step 1, select a location. This location will be used as the starting point for distance calculations in this shipping method.

If you have not yet set up a custom origin location, you can add one from the shipping method by clicking Add location.

Shipping Cost
For this example, we’re going to set up a single flat rate for same day delivery. If you prefer to set up a table of rates based on different distances, you can still follow the steps below.
1) Enter the distance limit for your same day delivery service as the Up to limit, such as ’25’ (25 km). Customers with an address outside of this range will not see the same day delivery option displayed at checkout.
If you’re setting up a table of rates based on different distances, enter the upper distance limit for the lowest cost on your rate table, such as ‘5’ (5 km)

Distance units are configured in your Intuitive Shipping General settings, based on your distance preference – either kilometers or miles.
2) Enter the delivery cost for your same day delivery service.
If you’re setting up a table of rates based on difference distances, enter the lowest cost on your rate table.

3) If desired, enter a per unit value. For this example, we’re leaving per unit blank, because we want customers to be charged a single flat fee for any distance up to the limit entered in Step 1.
If desired, you can enter a per unit value, such as 5 (5 km).
For example, if you want to set up a same day delivery cost of $3.00 per 5 km, up to a maximum of 30 km, enter ’30’ as the up to limit, ‘3’ as the cost’ and ‘5’ as the per unit value.
A customer who lives anywhere between 11 and 15 km from your shipping origin location will be charged $9.00 for shipping at checkout.
4) If you’re setting up a table of rates based on difference distances, click Add rate, then repeat Steps 1 to 3 for each additional rate.

Additional settings are available for cart splitting and rate table blending. Cart splitting is not recommended for this setup. Rate table blending is intended to be used only with rate tables, and can be used with this setup if desired, and only if you created a table of rates based on different distances.
If you do not need rate table blending, skip ahead to Google API Account. Otherwise, continue to Step 5.
5) Click Show additional shipping cost settings, then configure rate table blending mode as desired.

Google API Account
A Google API account is required to complete this setup. If you don’t have a Google API account connected to Intuitive Shipping, you will be unable complete this setup.
If you have not yet created an API billing account with Google, you must do so before proceeding.
Once your API account has been created, and you have obtained your API key, you can return here to finish connecting your account, starting at Step 1 below.
If you connected your Google API account to Intuitive Shipping prior to starting this setup, skip ahead to Step 5.
1) Click Add a carrier account.

2) Enter a carrier account title, such a ‘Google Distince’ or ‘Google API’.

3) Enter your Google API key. This is provided by Google in your API account.

4) Click the Save button.

5) Select your Google account.

Optional Settings
Settings for distance calculation type, fallback rate, cost adjustments, free shipping, custom shipping blending and rate blending give you further control of how shipping is calculated at checkout.
For this setup, the optional local delivery distance calculation type is the most relevant optional setting, however the other optional settings can be configured if desired.
1) Click Show optional settings.

Local Delivery Settings
Intuitive Shipping uses your Google API key to calculate distance between your specified shipping origin and the customer’s address. There are two ways this can be done.
By default, we attempt to calculate distance using your Distance API to get driving directions. If that fails, we attempt to calculate distance using your Geocoding API. If desired, you can configure your distance-based same day delivery option to only use one method or the other.
Distance API uses your shipping origin address and the customer’s address to look up driving directions with Google Maps. This method generally passes about 75% of the time. However, if you live in a region where postal codes are not used, or not recognized by Google Maps, this method will likely fail.
Geocoding API converts your shipping origin address and the customer’s address into geo-coordinates, and measures distance point-to-point (or ‘as the crow flies’). This method almost always passes, except if Google is unable to convert an address into coordinates.
Each method results in one API call to your Google API account. That means, if you select Automatic in Step 1, Intuitive Shipping will make only one API call about 75% of the time, and require two API calls about 25% of the time.
API calls cost $5.00 per 1000 calls. Google provides a $200 USD credit each month for an unlimited time. That’s 40,000 API calls – or roughly 30,000 to 40,000 distance-based rate calculations – per month for free.
1) Select a distance calculation type.

You have three (3) settings to choose from:
Automatic – Intuitive Shipping first attempts to calculate distance using your Distance API. If that fails, we attempt to calculate distance using your Geocoding API. This method may result in up to two API calls per checkout to your Google API account. This is the default setting.
Driving directions – Intuitive Shipping attempts to calculate distance using only your Distance API. This method will result in only one API call per checkout to your Google API account.
If you select this option and it fails, Intuitive Shipping will not fall back to Geocoding. No rate will be returned to the customer.
Geocoding – Intuitive Shipping attempts to calculate distance using only your Geocoding API. This method will result in only one API call per checkout to your Google API account.
If you select this option and it fails, Intuitive Shipping will not fall back on Driving directions. No rate will be returned to the customer.
Carrier Service Fallback Rate
1) Choose if you want a fallback rate to appear at checkout in situations when Google times out. This is useful when Google’s mapping servers are down or when they’re overwhelmed during peak periods.

You have two (2) settings to choose from:
Do not use a fallback rate – when Google API calls time out, no shipping rates from this shipping method are displayed at checkout. This is the default setting.
Define a fallback rate – when Google API calls time out, the fallback rate entered in Step 2 is displayed at checkout.
That means the fallback rate won’t be displayed if an error occurs, such as when a customer enters an address that isn’t recognized by Google, or when a postal code isn’t valid or recognized. It only activates when the system times out waiting for a response.
2) If you selected Define a fallback rate in Step 1, enter a fallback shipping cost.
If you’re using a flat rate for same day delivery, enter that cost as the fallback cost. If you’re using a table of rates based on different distances, consider entering the average table cost, or the maximum.

Additional settings are available for fallback rate titles, descriptions, delivery times and service codes. In the event the fallback rate is activated, these settings will override the main settings.
If you do not need to adjust these settings, skip ahead to Cost Adjustments. Otherwise, continue to Step 3.
3) Click Show optional display settings, then edit the fallback rate display settings as needed.

Cost Adjustments
If you want to build extra costs into to your same day delivery shipping method without altering the distance-based rates, you can apply cost adjustments.
Cost adjustments are applied in the order they are listed in the app: cost limits first, then shipping credits, then mark ups, then handling, then insurance, then discounts, then rounding.
If you do not need to apply cost adjustments to your same day shipping method, skip ahead to Free Shipping. Otherwise, continue to Step 1.
1) If desired, add cost adjustments.

Free Shipping
Activate free shipping when the customer’s cart crosses a threshold limit. This is useful if you want to offer free same day delivery only when customers order a minimum amount, or if you offer free same day delivery in general, but want your paid rate to apply after a certain cart weight is exceeded.
If you don’t need a free shipping threshold, skip ahead to Custom Shipping Blending. Otherwise, continue to Step 1.
1) If desired, select Set a free shipping threshold and edit the settings as needed.

Custom Shipping Blending
If you have products with custom shipping costs, those special costs can be blended with your local delivery rates.
Let’s say you have a product with a $100.00 custom shipping cost. That means you don’t delivery it locally, and it always costs you $100.00 to ship, regardless of what else is in the cart. When a customer orders one of these products along with products that do qualify for local delivery, and your same day shipping method generates a delivery cost of $15.00, the customer will be charged $115.00 for shipping at checkout.
Custom shipping prices can be added to Intuitive Shipping in your product settings.
For situations like this, we recommend that you include a note in your same day delivery description (General Step 3.), such as ‘oversized items cannot be delivered same day’.
If you don’t have products with custom shipping costs, these settings are ignored regardless of how they are configured, and you can skip ahead to Rate Blending. Otherwise, continue to Step 1.
1) If desired, adjust the custom shipping blending settings as needed.

Rate Blending
If you have multiple Scenarios – perhaps you have different same day delivery rates depending on the product – you can decide if those rates should be blended together or not.
For example, if one product type has a flat rate local delivery cost of $10.00 and another product type has a per km cost of $2.50 per km, rate blending can add those two costs together when a customer orders both product types.
If you don’t have rates that need to be blended, leave rate blending set to the default ‘Do not blend’, and skip ahead to Save Your Settings. Otherwise, continue to Step 1.
1) If desired, select Blend with other rates, then configure rate blending settings as needed.

Save Your Settings
1) Click the Save button to save your same day delivery shipping method.

Add A Next Day Scenario
To simplify the process, you can create a duplicate of your Same Day Scenario and make changes to it rather than starting over from scratch.
1) Click Shipping on the sidebar menu, then select Scenarios from the drop-down list.

2) Click Edit beside your same day Scenario.

3) Click Duplicate below the Scenario heading. This will create an exact copy of your Same Day Scenario, including the local delivery shipping method.

General Settings
1) Change the title from ‘Copy of [original title]’ to something else, like ‘Next Day’.

2) Leave the status set to On.

Conditions
1) Click Remove condition above the Current time condition that was copied over from your Same Day Scenario.
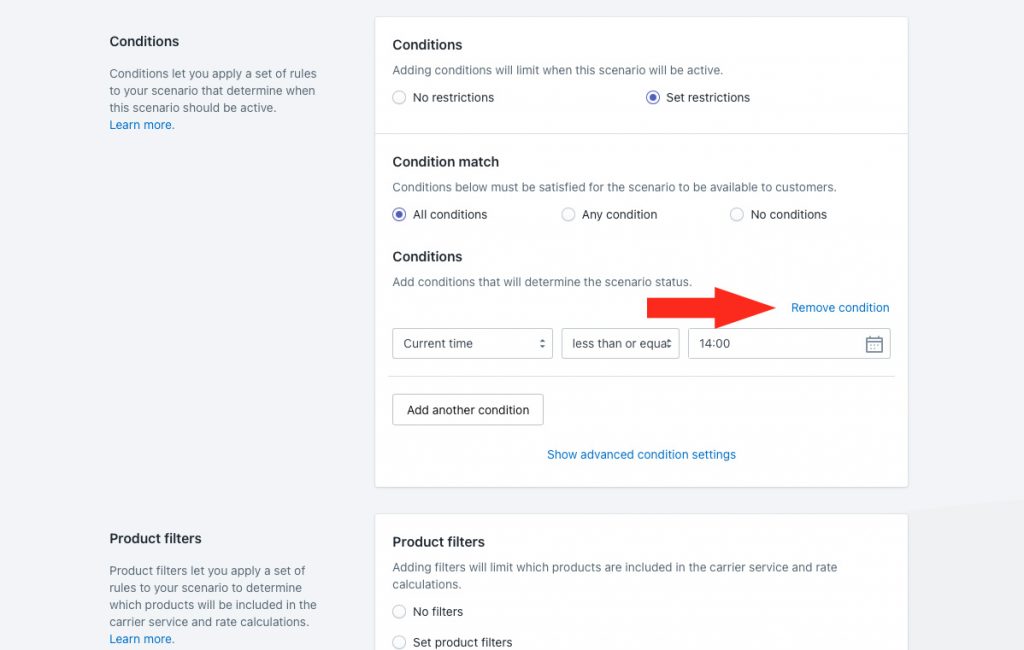
This will allow your next-day shipping method to always be displayed, regardless of the time of day. It will be displayed along with the same-day shipping method if the current time is before the same-day cut-off time. It will be the only option displayed if the current time is after the same-day cut-off time.
Save Your Settings
1) Click the Save button to save your Next Day Scenario.

Edit The Next Day Local Delivery Shipping Method
When you duplicated the Same Day Scenario, it included a copy of the same day delivery shipping method. Unless you are using a generic shipping method title for both options, you will likely need to change the title. You can also make other changes as needed.
1) Click Edit beside the same day delivery shipping method.

General
1) If needed, change the shipping method title to something like ‘Next Day Delivery’. The title entered here will be visible to customers.

2) If you want the next day delivery option to be available right away, leave the status set to On. If you want to test it first before making it public, set it to Test.

3) If desired, change the description for your next day shipping method, such as ‘Delivery by 11 AM tomorrow’. We recommend limiting your description to 90 characters or less to ensure it displays properly on the checkout page.

4) If desired, click Show additional display settings, then adjust the additional display settings.

Shipping Origin
If you manage same day and next day deliveries from different locations, you can change the shipping origin as needed.
1) If desired, change the ship from location, or leave it unchanged from your same day delivery shipping method.

You have two (2) settings to choose from:
Dynamic origin location – next day delivery will be based on the distance between the customer’s address and your primary Shopify location address. This is the default setting.
If you select the ‘Dynamic’ option, skip ahead to Shipping Cost.
Specify origin location – next day delivery will be based on the distance between the customer’s address and the address specified in Step 2.
2) If you selected ‘Specify origin location’ in Step 1, select a location if different from your same day delivery location. This location will be used as the starting point for distance calculations in this shipping method.

If you have not yet set up a custom origin location – or, if you want to add another one – you can add one from the shipping method by clicking Add location.

Shipping Cost
For this example, we’re going to use a single flat rate like we used for same day delivery. If you prefer to set up a table of rates based on different distances, you can still follow the steps below.
1) Leave the Up to value set to whatever you used in your same day delivery shipping method, or edit it if the delivery radius for next day service is different than your same day service. Customers with an address outside of this range will not see the local pickup option displayed at checkout.
If you’re setting up a table of rates based on different distances, enter or edit the upper distance limit for the lowest cost on your rate table, such as ‘5’ (5 km).

Distance units are configured in your Intuitive Shipping General settings, based on your distance preference – either kilometers or miles.
2) Leave the delivery cost set to whatever you used in your same day delivery shipping method, or edit it if the cost for your next day service is different than your same day service.
If you’re setting up a table of rates based on difference distances, enter or edit the lowest cost on your rate table.

3) If desired, enter a per unit value. For this example, we’re leaving per unit blank, because we want customers to be charged a single flat fee for any distance up to the limit entered in Step 1.
If desired, you can enter per unit value, such as 5 (5 km).
For example, if you want to set up a next day delivery cost of $3.00 per 5 km, up to a maximum of 30 km, enter ’30’ as the up to limit, ‘3’ as the cost’ and ‘5’ as the per unit value.
A customer who lives anywhere between 11 and 15 km from your shipping origin location will be charged $9.00 for shipping at checkout.
4) If you’re setting up a table of rates based on difference distances, edit each row copied over from your same day delivery shipping method.
To add more cost rows to the table, click Add rate, then repeat Steps 1 to 3 for each additional rate.

To remove any excess rows, click the trash can icon beside the corresponding row.

Additional settings are available for cart splitting and rate table blending. Cart splitting is not recommended for this setup. Rate table blending is intended to be used only with rate tables, and can be used with this setup if desired, and only if you created a table of rates based on different distances.
If you do not need rate table blending, skip ahead to Google API Account. Otherwise, continue to Step 5.
5) Click Show additional shipping cost settings, then configure or edit rate table blending mode as desired.

Google API Account
1) Ensure that your Google account was copied over from your same day shipping method, and is selected. Your Google API account is required to complete this setup.

Optional Settings
If you don’t need to configure optional settings for next day delivery, or if you don’t need to edit any of the settings that were copied over from your same day shipping method, you can skip ahead to Save Your Settings. If you need to make changes, continue to Step 1.
1) Click Show optional settings, then edit your settings as needed.

Save Your Settings
1) Click the Save button to save your next day delivery shipping method.

If desired, you can combine this setup, which displays both same day and next day delivery options, depending on the time of day, with the additional ‘Current day of the week’ condition described here. This will let you display both options, depending on the time of day and the day of the week.
As with the ‘Either/Or’ setup, when you add a ‘Current day of the week’ condition to both Same Day and Next Day scenarios, you may need to have a third Scenario that displays a shipping option on days not included in your same day and next day services.
Check out more common setups or look at additional setups.
