If you are shipping any hazardous (HAZMAT), perishable goods, or controlled items, you can use Intuitive Shipping to create a Shipping Method that restricts where and how those materials are shipped.
For this example, let’s say the restricted products or hazardous goods can only be shipped by ground and only within the continental United States.
If a product cannot ship to one of your Shipping Zones at all, click here for this simplified setup.
Add A Controlled Scenario
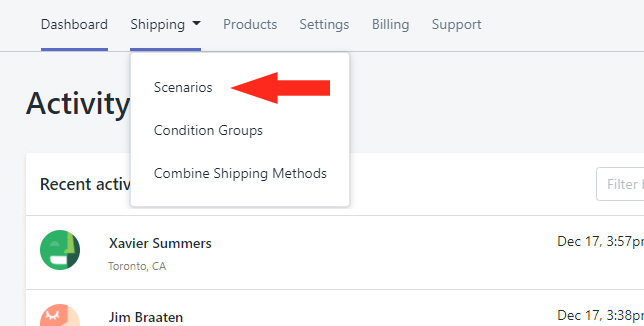
1) Click Shipping on the main menu, then select Scenarios from the drop-down list.
2) Add a Shipping Scenario.

3) Set Visibility to On.
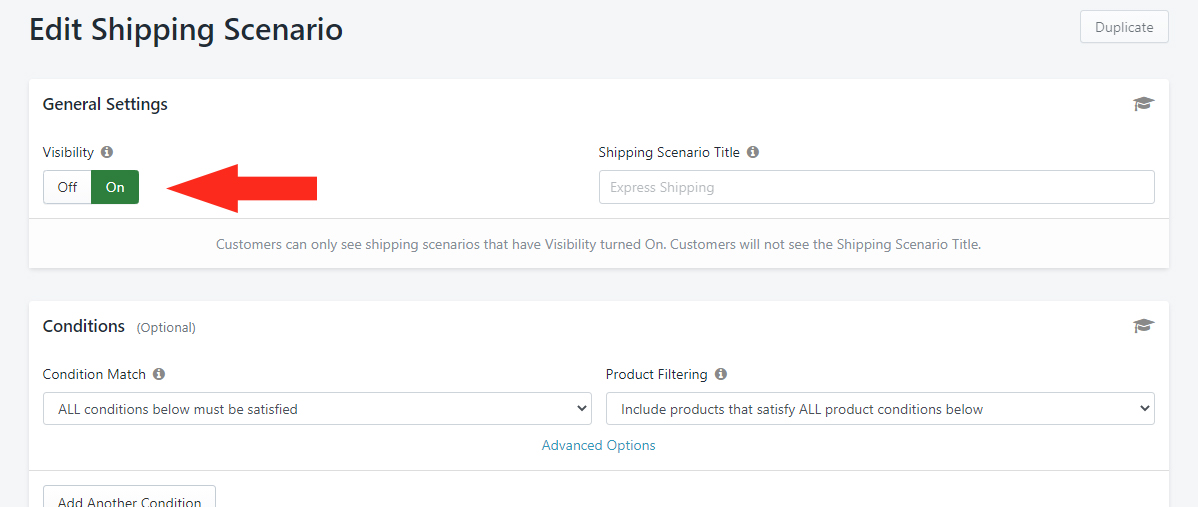
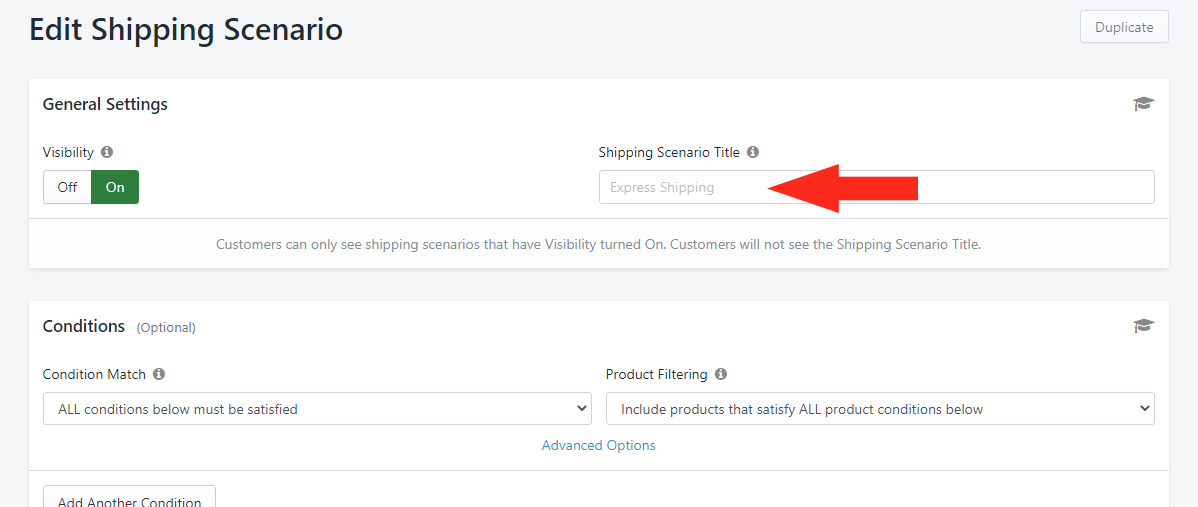
4) Enter the Shipping Scenario Title – e.g. ‘Restricted’ or ‘Controlled’.
Set The Controlled Shipping Scenario Condition
1) Leave the settings under Condition Match, Product Filtering, and Advanced Options on their Default settings.
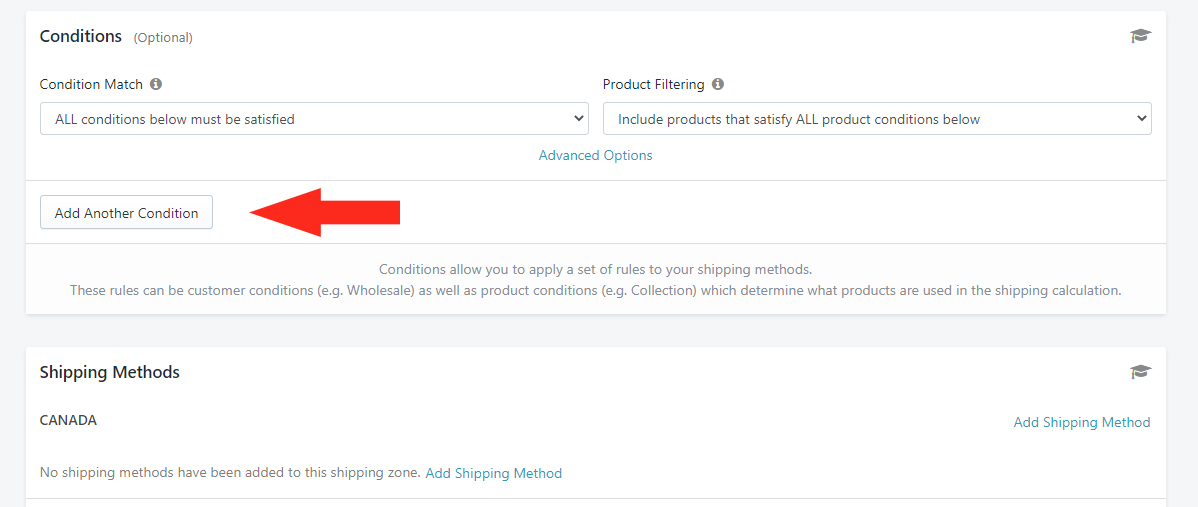
2) Click the Add Another Condition button.
For this example, we’ll set the Condition to be based on a Product Tag. You can also set the Condition to be based on Product Name, Type or SKU.
3) Click the Condition field, then select Tag from the Per Product Conditions section.
4) Set the Condition logic to Equals.
5) Enter the Value as the Tag name you assigned to your controlled products – e.g. ‘Controlled’.

6) Leave the setting below the Tag value set to ‘ANY product must satisfy this condition’. This will ensure that the Controlled Shipping Method is triggered as long as there is at least one controlled product in the cart.
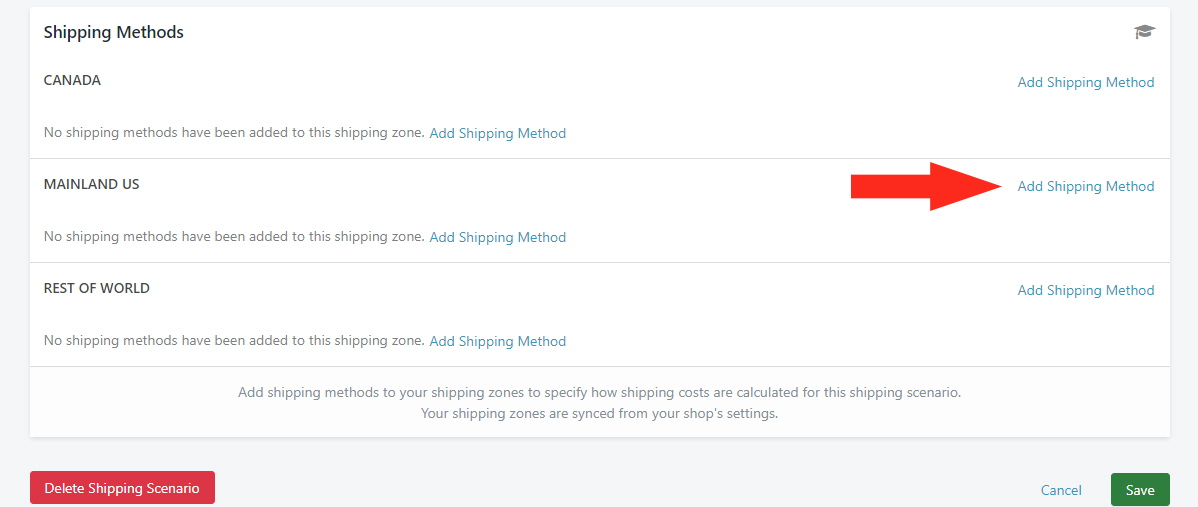
Add A Shipping Method
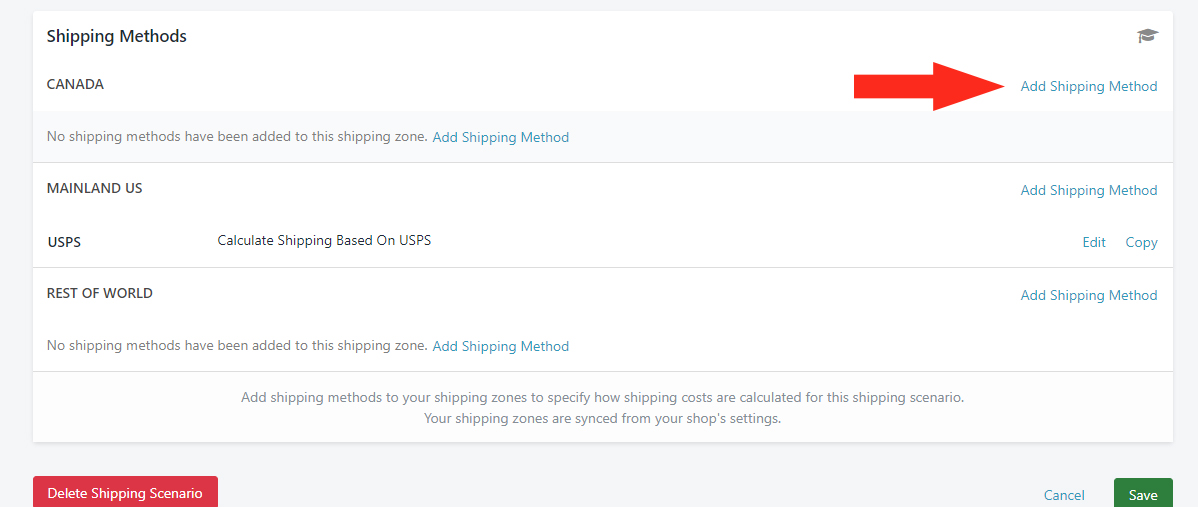
1) In the Shipping Methods section, click Add Shipping Method beside the Shipping Zone that permits the controlled products – e.g ‘Mainland US’.
2) Enter a Title for your Shipping Method – e.g. ‘Ground’.

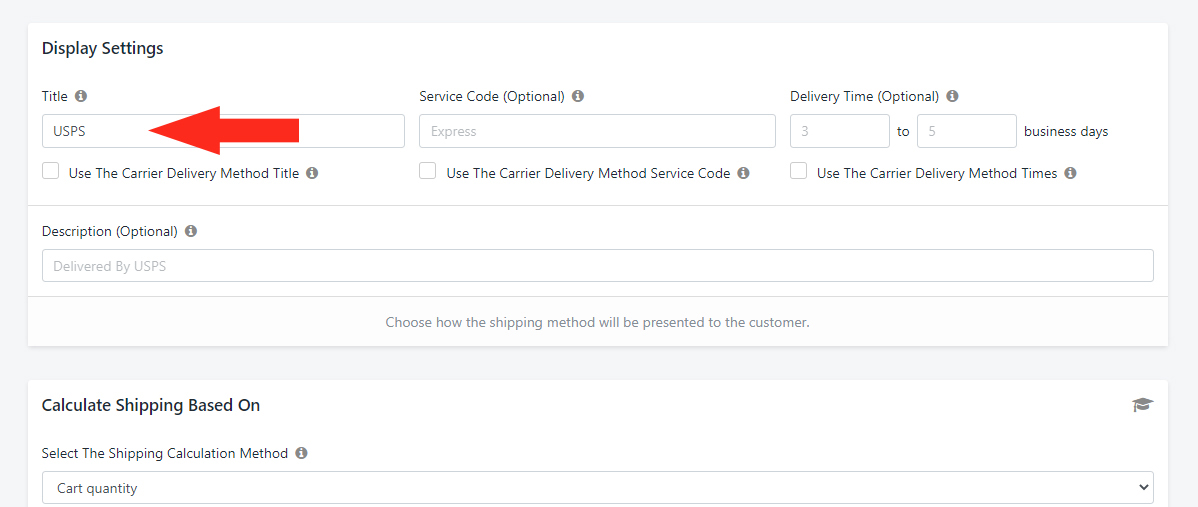
3) If desired, check the box beside Use The Carrier Delivery Method Title. This will display the actual service title provided by the carrier at checkout. If unchecked, the Shipping Method Title entered in Step 2 – e.g. ‘Ground’ – will be displayed at checkout.
4) If desired, enter a custom delivery time or range under Delivery Time (Optional).
5) Or, if desired, leave Delivery Time blank and check the box beside Use The Carrier Delivery Method Times. This will display the actual estimated delivery time provided by the carrier at checkout.
Let’s say it takes you 2 business days to process your controlled product orders. If you enter ‘2’ in the lower range (the left box) under Delivery Time (Optional), and the carrier returns an estimated delivery time of 3 days, the Shipping Method will be displayed at checkout with a total delivery time of 5 business days.
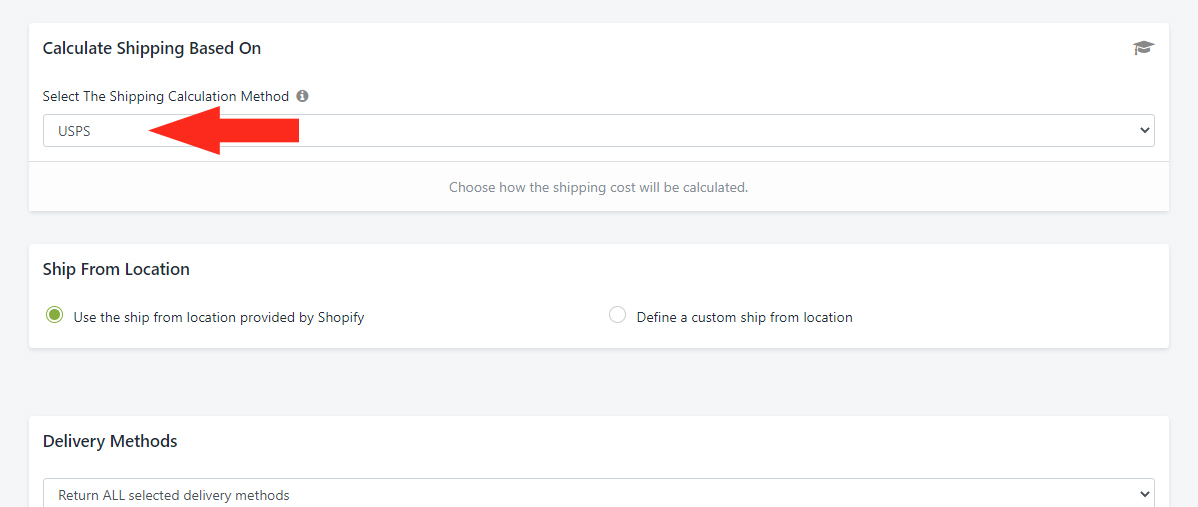
Select The Shipping Calculation Method
1) In the Calculate Shipping Based On section, choose the desired Shipping Carrier from the Live Rates section of the drop-down list. For a list of which Shipping Carriers are supported by Intuitive Shipping, click here. For this example, we’ll choose United States Postal Service (USPS).
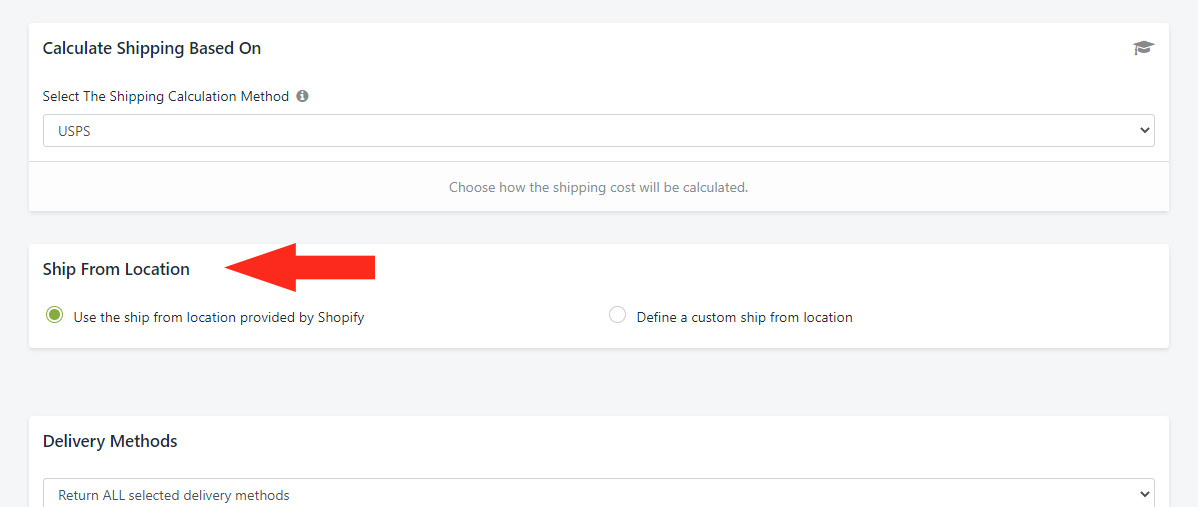
Set the Shipping Origin Address
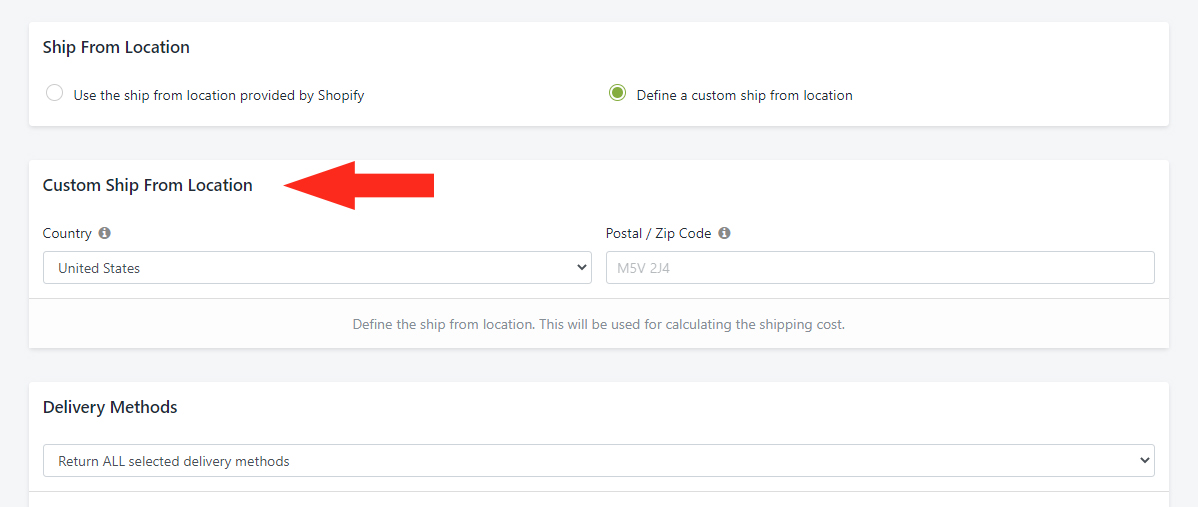
1) In the Ship From Location section, select whether your location will be the one provided by Shopify or if you will define a custom ship from location.
2) If you selected Define a custom ship from location in Step 1, the Custom Ship From Location section will appear on the screen. Enter the Country and Postal/ ZIP Code for your custom location in this section.
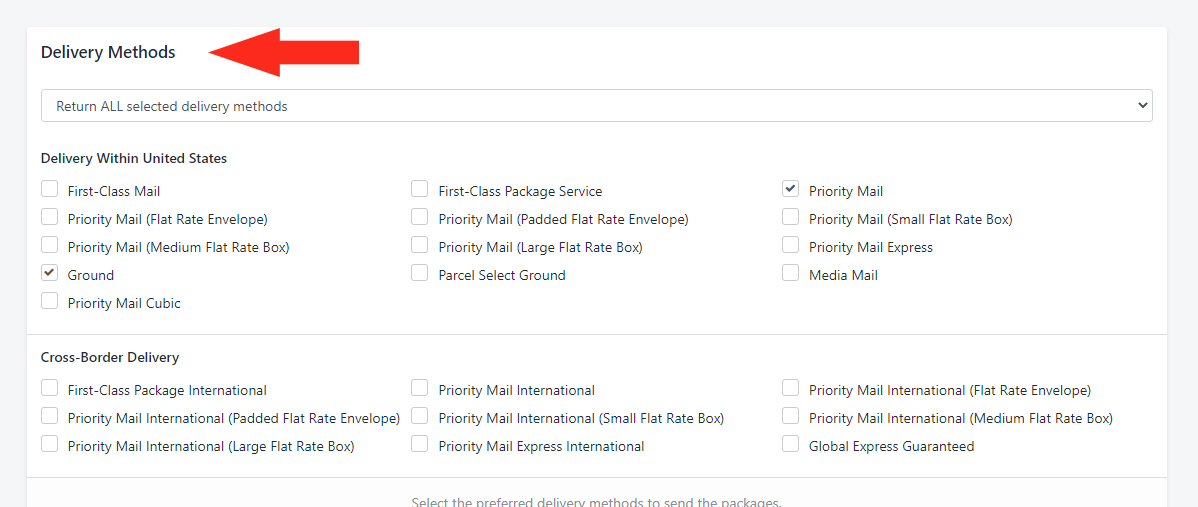
Select the Delivery Method
1) In the Delivery Methods section, select the applicable Ground delivery methods provided by your preferred carrier.
Add Fallback Cost (Optional)
The Carrier Service Fallback Rate allows you to set up a flat, fallback shipping rate that is displayed to your customer in the event that the rate request sent to the carrier times out.
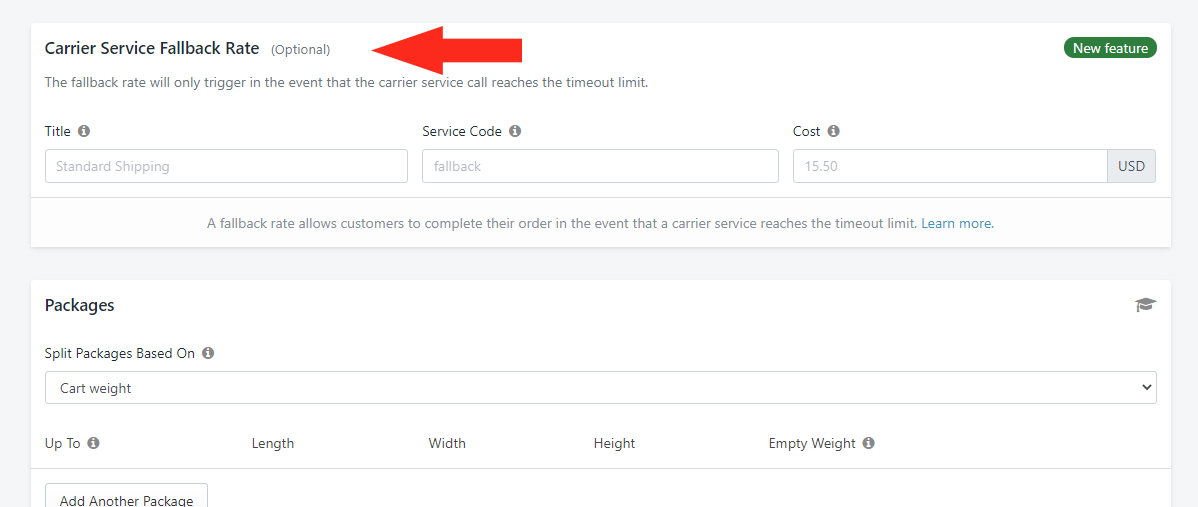
For example, if rates fail due to an error with account credentials or if the order exceeds the carrier’s size restrictions, the Carrier Service Fallback Rate will not be displayed.
Learn more about how the Carrier Service Fallback Rate setting works here.
Enter Package Details
1) In the Packages section, select how you would like your packages to be split – e.g. by Cart Weight. Learn more about splitting packages here.
2) Click the Add Another Package button for each package.

3) Enter the Up To value that will be used to determine when packages will be split.
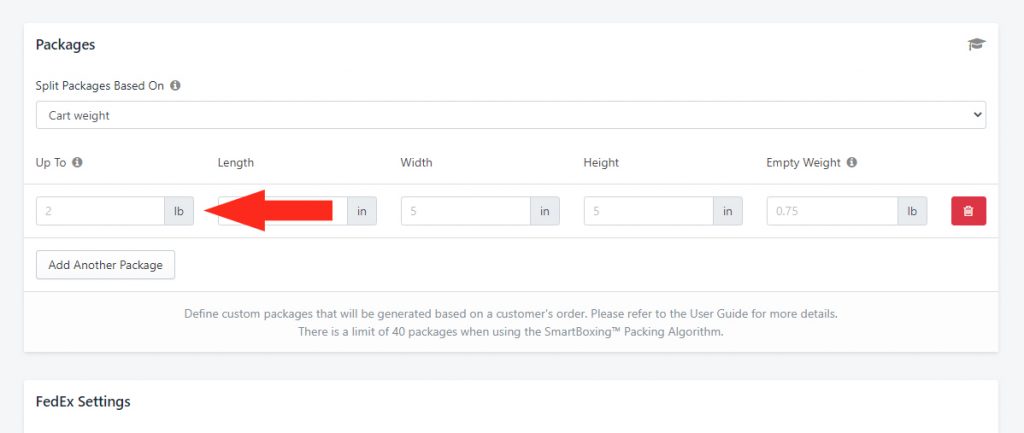
4) Enter the Length (or Depth), Width and Height dimensions for your first package.
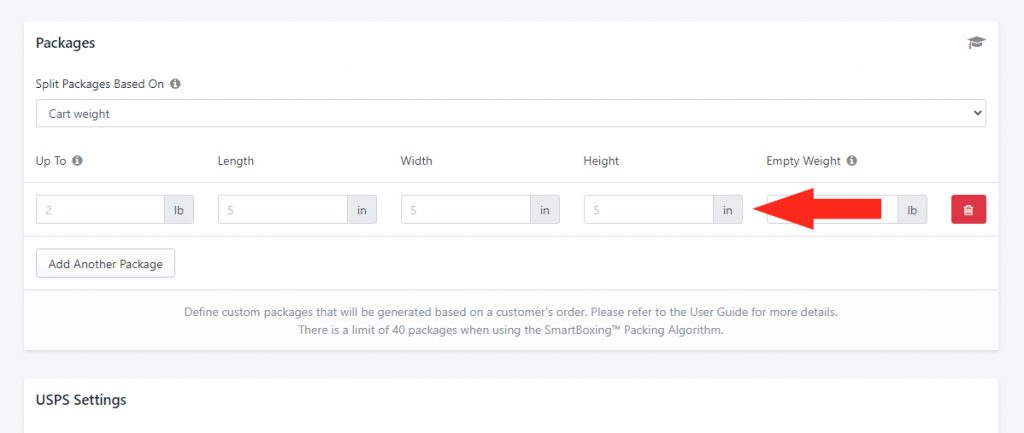
5) If desired, enter a value for the Empty Weight of the package. When present, this weight will be added to the total weight of the products in the package.
6) Repeat Steps 1 to 5 to add as many packages as you need.
Carrier Settings (Optional)
1) If you have an account with one of our carrier partners, enter your account credentials to access your negotiated rates.
Most carriers do not require an account to access rates. If you do not have an account with a carrier, leave the Carrier Settings blank. When the Shipping Method is triggered, rates will be calculated using the carriers’ standard retail rates when possible.

Adjust The Final Shipping Cost (Optional)
Intuitive Shipping gives you complete control of your shipping rates. Even with Live Rates, you have the final say on how your rates are displayed to the customer at checkout.
For more detailed information on how to adjust the final shipping cost, click here.
Cost Limits
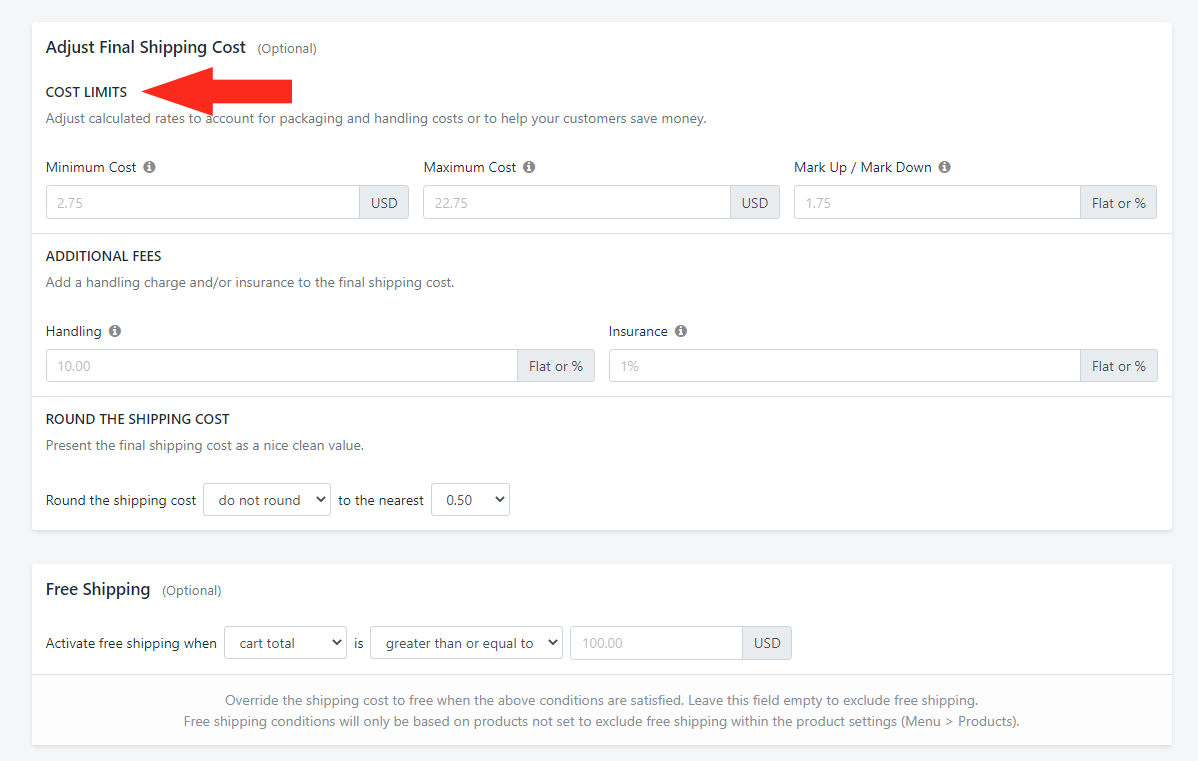
1If desired, enter a Minimum Cost. If the actual shipping cost is less than this value, it will be adjusted up to the Minimum Cost. For example, if the actual calculated rate is $7.25, and you’ve put $10.00 as the Minimum Cost, the customer will be shown $10.00 at checkout.
2) If desired, enter a Maximum Cost. If the actual shipping cost is greater than this value, it will be adjusted down to the Maximum Cost. For example, if the actual calculated rate is $32.50, and you’ve put $20.00 as the Maximum Cost, the customer will be shown $20.00 at checkout.
3) If desired, enter an amount of Mark Up or Mark Down to be applied to the final shipping cost. The final shipping cost (after any Handling Fees – see below) will be marked up or marked down by this amount.
Additional Fees
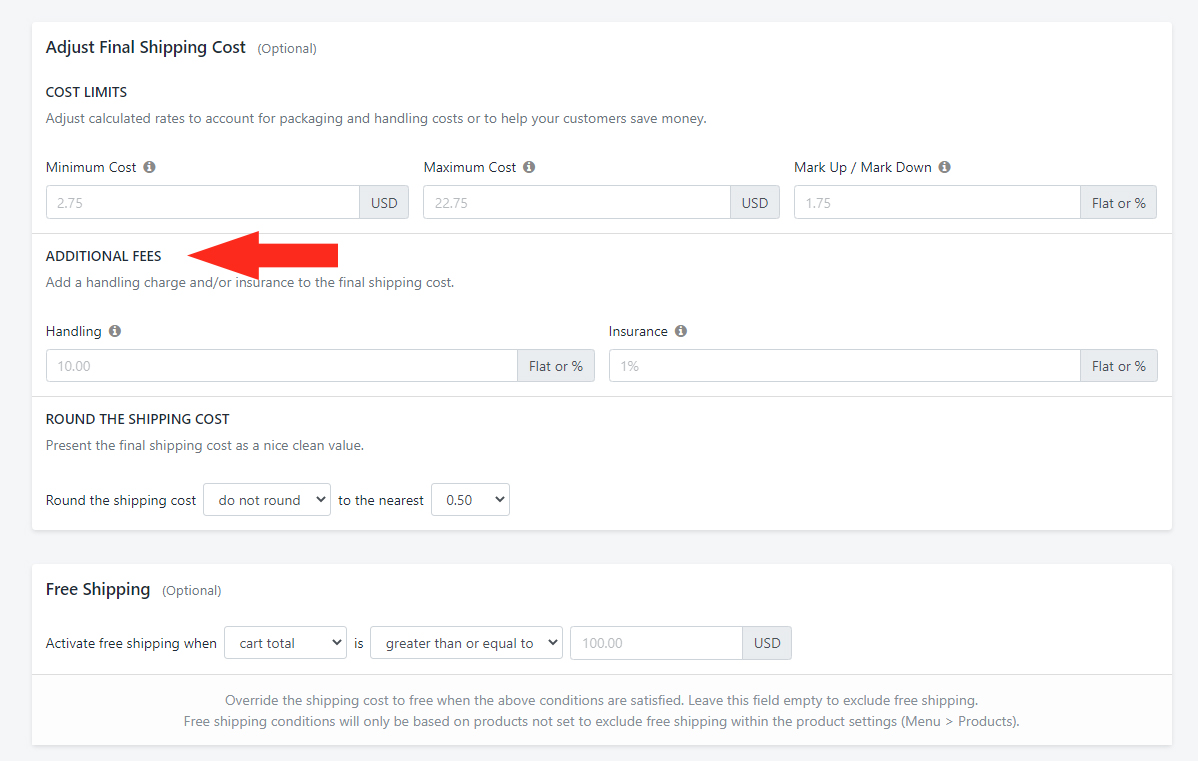
1) If desired, enter any miscellaneous Handling costs – e.g. packaging material costs. Handling is applied to the shipping cost before Mark Up or Mark Down. For example, if the calculated live rate is $100.00 and you add a 10% handling fee, the total shipping cost will be $110.00.
2) If desired, enter any Insurance fees. Insurance fees as a percentage are based on the whole cart amount. For example, if the whole cart amount is $50.00 and the shipping cost is $100.00 – then you add a 10% insurance fee – the total shipping cost will be $105.00 (10% of $50.00 = $5.00; $100.00 + $5.00 = $105.00).
Round The Shipping Cost
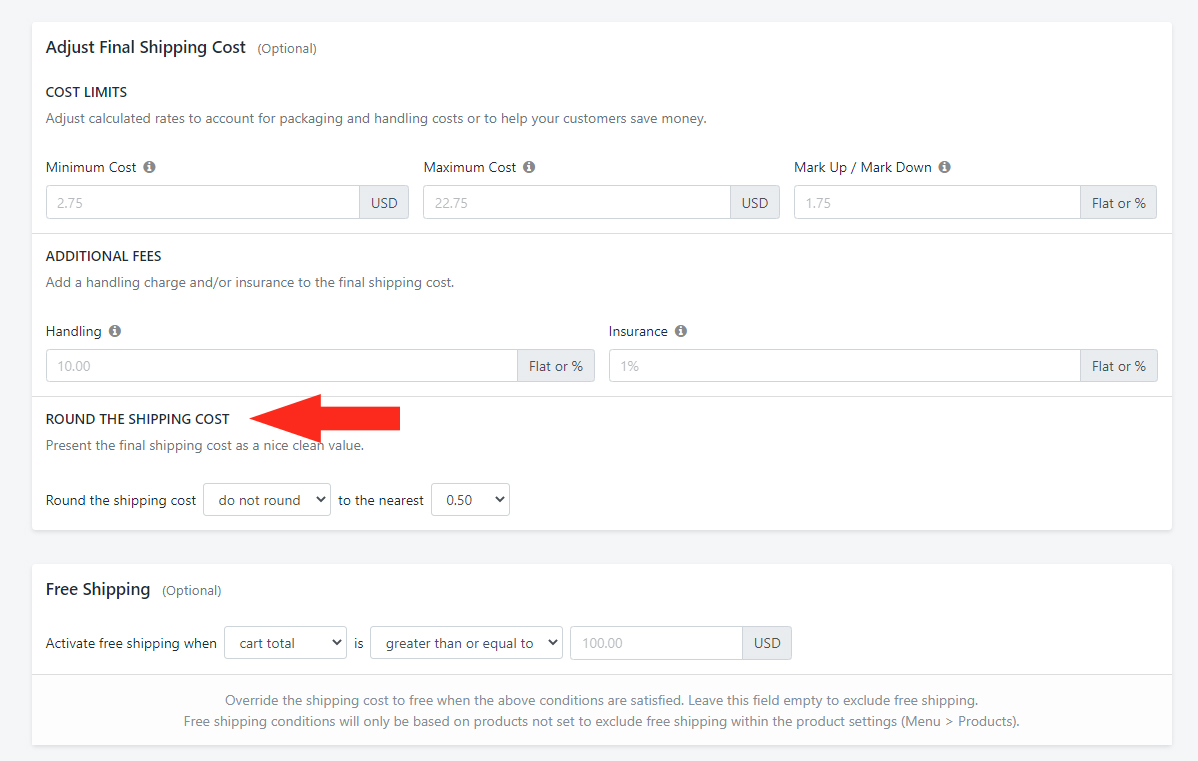
1) If desired, select whether or not to Round the Shipping Cost Up or Down. By default, this is set to ‘do not round’. You can choose to only round up, only round down, or round up or down (whichever is closer to the rounding amount).
2) If you chose to Round in Step 1, select the amount of rounding from the drop-down. You can round to the nearest $0.50, $1.00, $5.00 or $10.00. For example, if the calculated rate is $3.53 and you choose to round up the nearest $0.50, the rate will be rounded to and displayed as $4.00. If you choose to round up or down, the same rate will be rounded down and displayed as $3.50.
Free Shipping
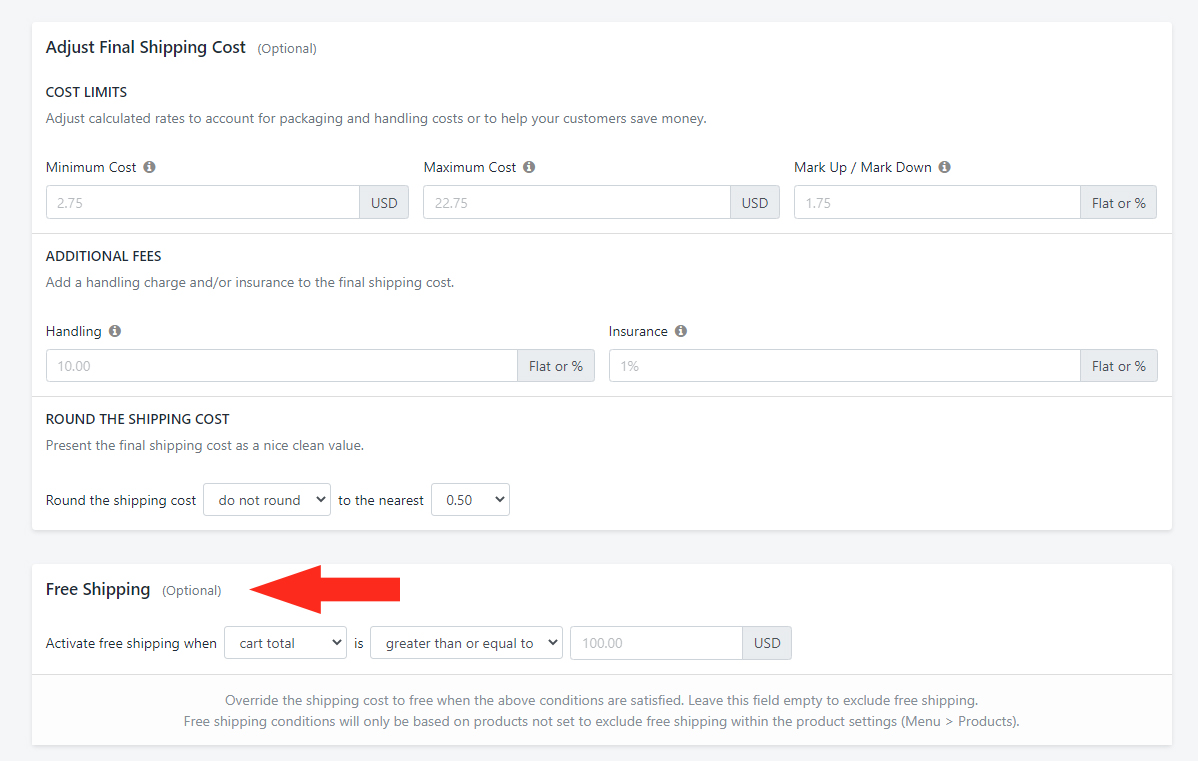
1) If desired, select the conditions that must be satisfied for Free Shipping to be activated. Or, leave blank to exclude Free Shipping.
Blend Per Product Custom Shipping Charges
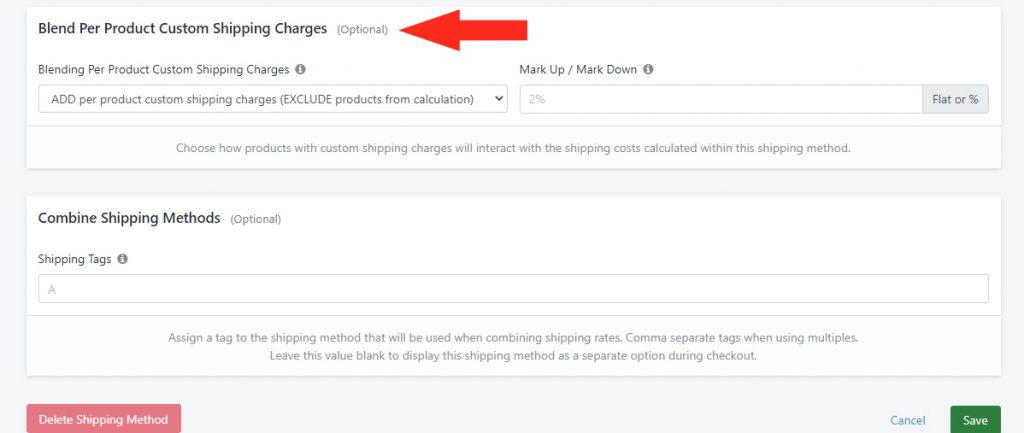
1) If you have any products with custom shipping charges, you can determine how those charges will be blended with the rates from this Shipping Method.
For more detailed information on how to Blend Per Product Custom Shipping Charges, click here.
2) If desired, enter a percentage Mark Up or Mark Down on the blending option.
Save Your Shipping Method
Click the Save button! This Shipping Method will be used to calculate the shipping cost as long as there is at least one ‘Controlled’ product in the cart.
Save Your Settings
When you return to the Edit Shipping Scenario screen, click the Save button!
Exclude Controlled Items From Existing Standard Shipping Scenario
If you have an existing ‘Standard’ Shipping Scenario (or Scenarios) for products that are not controlled and can ship by any delivery method, continue with these steps. If you haven’t yet set up a ‘Standard’ Shipping Scenario for all other products, skip this section and go to Exclude Controlled Items From New Standard Shipping Scenario.
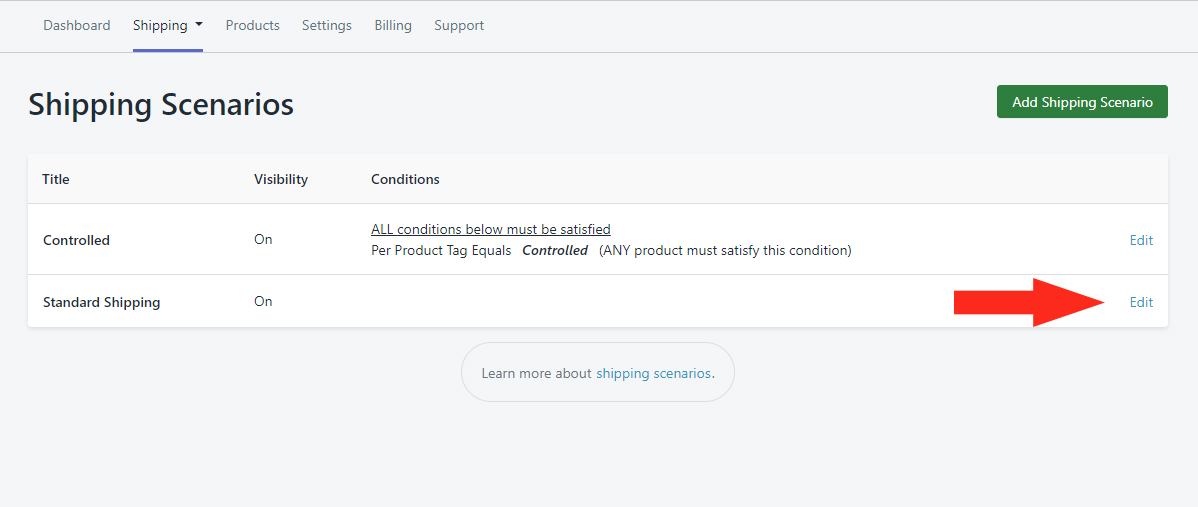
1) Click Shipping on the main menu, then select Scenarios from the drop-down list.
2) Click Edit beside your existing Scenario that includes standard shipping for all products that are not controlled.
3) Leave any existing Conditions as-is. If you didn’t have any existing Conditions set up, that’s ok!
4) Either way, click the Add Another Condition button.
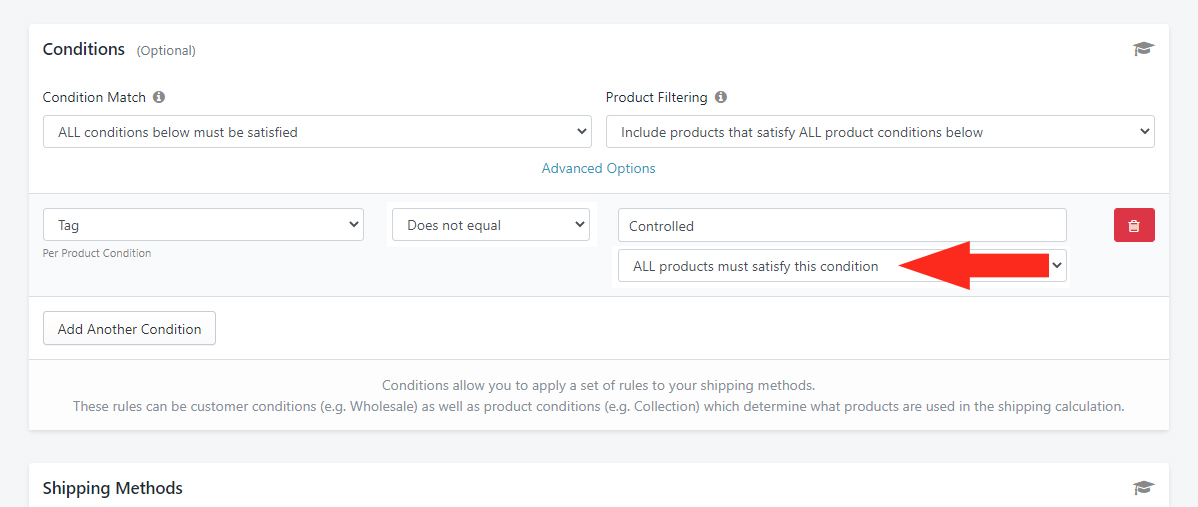
For this example, we’ll set the Condition to be based on a Product Tag to be consistent with the Controlled Scenario. You can also set the Condition to be based on Product Name, Type or SKU as long as it’s consistent with your Controlled Scenario.
5) Click the Condition field, then select Tag from the Per Product Conditions section.
6) Set the Condition logic to Does not equal.
7) Enter the Value as the Tag name you assigned to your controlled products – e.g. ‘Controlled’.

8) Change the setting below the Tag value to ‘ALL products must satisfy this condition’. This will ensure that the Standard Shipping Method is triggered only when there are no controlled products in the cart.
9) Leave any Shipping Methods in your Standard Scenario as-is. They will now be displayed at checkout only when there are no controlled products in the customer’s cart.
Save Your Settings
Click the Save button!
Exclude Controlled Items From New Standard Shipping Scenario
If you haven’t yet set up a ‘Standard’ Shipping Scenario for all other products, you will need to create one.
To simplify the process, you can make a Duplicate of your Controlled Scenario, then make minor adjustments to the Condition and Shipping Methods, rather than creating a new Scenario from scratch.
If you’re still on the Edit Shipping Scenario screen from setting up your Controlled Scenario, skip ahead to Step 3. Otherwise, begin at Step 1.
1) Click Shipping on the main menu, then select Scenarios from the drop-down list.
2) Click Edit beside your Controlled Scenario.

3) Click the Duplicate button in the top right. This will create an exact copy of the Controlled Scenario, including any Shipping Methods.
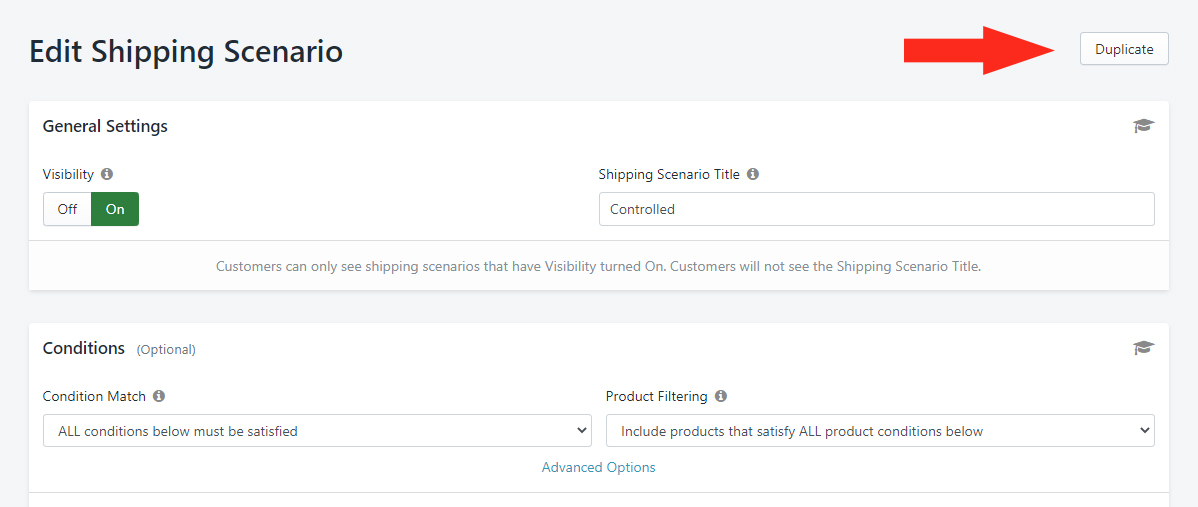
4) Confirm Visibility is set to On.
5) Change the Shipping Scenario Title from ‘Copy of Controlled’ to whatever you want to call your Scenario – e.g. ‘Standard’.
Set The Condition
1) Leave the settings under Condition Match, Product Filtering, and Advanced Options on their Default settings.
2) Leave the Condition type set to Tag from the Per Product Conditions group.
For this example, we’ll keep the Condition based on a Product Tag to be consistent with the Controlled Scenario. No matter what type of Condition you used in your Controlled Scenario, leave it as-is.
3) Change the Condition logic to Does not equal.
4) Leave the Value as whatever Tag name you assigned to your controlled products – e.g. ‘Controlled’.
5) Change the setting below the Tag value to ‘ALL products must satisfy this condition’. This will ensure that the Standard Shipping Method is triggered only when there are no controlled products in the cart.
Update Standard Shipping Methods
When you created a Duplicate of the Controlled Scenario, it included an exact copy of the Shipping Method you added to your Controlled Scenario.
For your Standard Scenario, you will need to edit the Shipping Method that was copied from your Controlled Scenario.
Additionally, you may wish to add new Shipping Methods from scratch to other Shipping Zones where your uncontrolled products can be shipped.
Edit Shipping Method
If you want to use a similar Shipping Method in your Standard Scenario, and only add additional delivery methods – e.g. ‘First Class’, ‘Priority’, etc. – you can simply edit the Shipping Method that was copied from your Controlled Scenario.
1) Click Edit beside the Shipping Method.
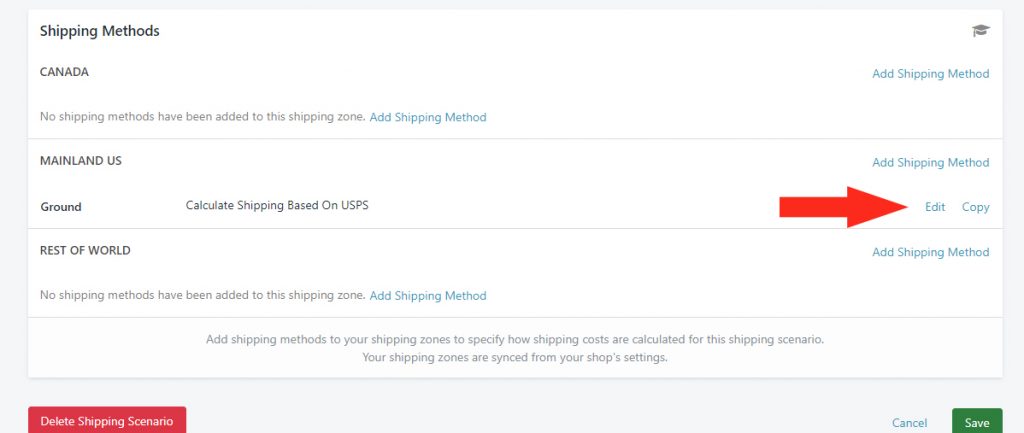
2) Change the Title from ‘Ground’ to the carrier’s name – e.g. ‘USPS’.
3) If desired, check the box beside Use The Carrier Delivery Method Title. This will display the actual Delivery Method Title provided by the carrier at checkout. If unchecked, the Shipping Method Title entered in Step 2 – e.g. ‘USPS’ – will be displayed at checkout.
If you do not check the box beside ‘Use The Carrier Delivery Method Title’ box and you select multiple Delivery Method types (see Select the Delivery Method below), each delivery method will be named after the Shipping Method Title. That means, if you select USPS delivery methods ‘First Class Package Service’, ‘Priority Mail Express’, ‘Priority Mail (Large Flat Rate Box)’ ‘Parcel Select Ground’ and ‘Ground’, Intuitive Shipping will title them all ‘USPS’. Shopify will consider them all duplicate titles and only display the cheapest method to your customer at checkout.
4) If desired, check the box beside Use The Carrier Delivery Method Times. This will display the actual estimated delivery time provided by the carrier at checkout.
If you do not check the box beside ‘Use The Carrier Delivery Method Times’, estimated delivery times provided by the carrier will not be displayed at checkout.
Let’s say it takes you 2 business days to process your controlled product orders. If you enter ‘2’ in the lower range (the left box) under Delivery Time (Optional), and the carrier returns an estimated delivery time of 1 day, the Shipping Method will be displayed at checkout with a total delivery time of 3 business days.
5) Leave the settings for Calculate Shipping Based On and Ship From Location as-is.
Select the Delivery Method
1) In the Delivery Methods section, select the applicable delivery methods provided by your preferred carrier.

If you want your standard products to have a Ground option, even when there are no controlled products in the cart, leave ‘Ground checked. Otherwise, remove the check beside ‘Ground’.
Adjust Other Settings As Needed
1) If desired, make changes to Carrier Service Fallback Rate, Packages, Adjust Final Shipping Costs and all other optional settings if different from your Controlled Shipping Method.
2) Leave Carrier Settings the same.
Save Your Shipping Method
Click the Save button! This Shipping Method will as long as there is at least one ‘Controlled’ product in the cart.
Add New Shipping Method
If your uncontrolled products can be shipped to other Shipping Zones, you can add ‘standard’ Shipping Methods to those zones.
1) Click ‘Add Shipping Method’ beside a different Shipping Zone – e.g. ‘Canada’
2) Completed the Display Settings as desired.
3) In the Calculate Shipping Based On section, select from the list of Cart Values, Product Values or Carrier Services to complete either a Custom Shipping Method or Live Rate Shipping Method for this Shipping Zone, then finish setting up the Shipping Method as desired.
4) Repeat Steps 1 to 3 for any other Shipping Zones that require a ‘standard’ Shipping Method for uncontrolled products.
Save Your Settings
When you return to the Edit Shipping Scenario screen, click the Save button!
What’s Next: Test Your Setup or check out Additional Setups