ShipStation gives you instant access to many major carriers and lets you manage them all from one central location. You can connect your own carrier accounts to ShipStation or access their negotiated rates.
Intuitive Shipping lets you quickly and easily connect your ShipStation account so you can access all of your rates from ShipStation.
And, Intuitive Shipping automatically pushes the package information from the completed order to your ShipStation account for a seamless experience.
If you don’t have an account with ShipStation, go here to start your free trial.
Be sure to complete this guide and test your ShipStation setup to ensure carrier rates are working as expected.
Connect A ShipStation Account
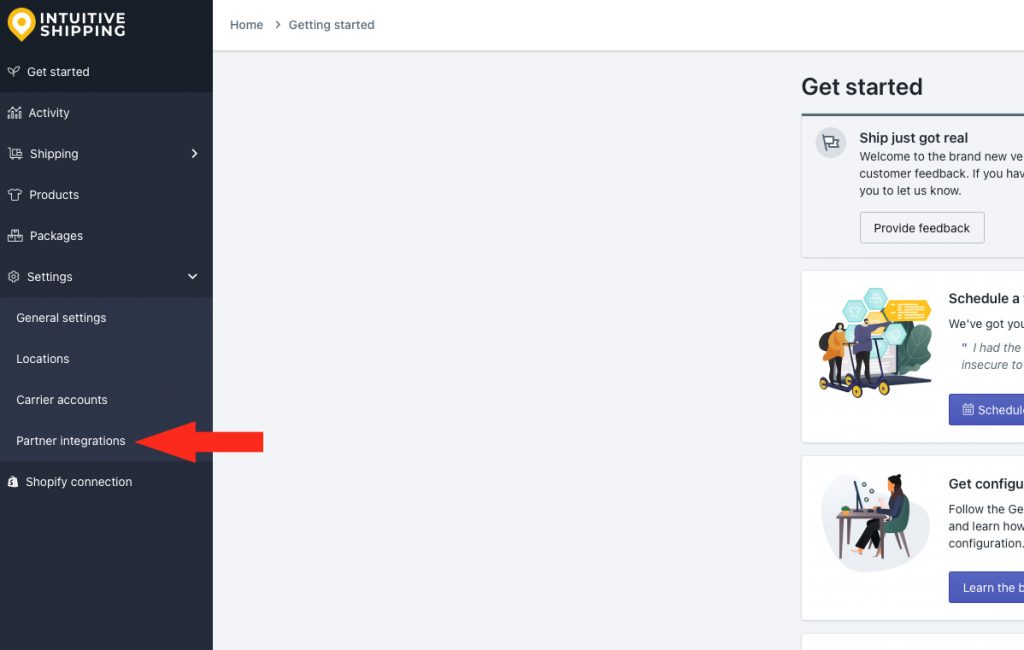
1) Click Settings on the sidebar menu, then select Partner integrations from the drop-down list.
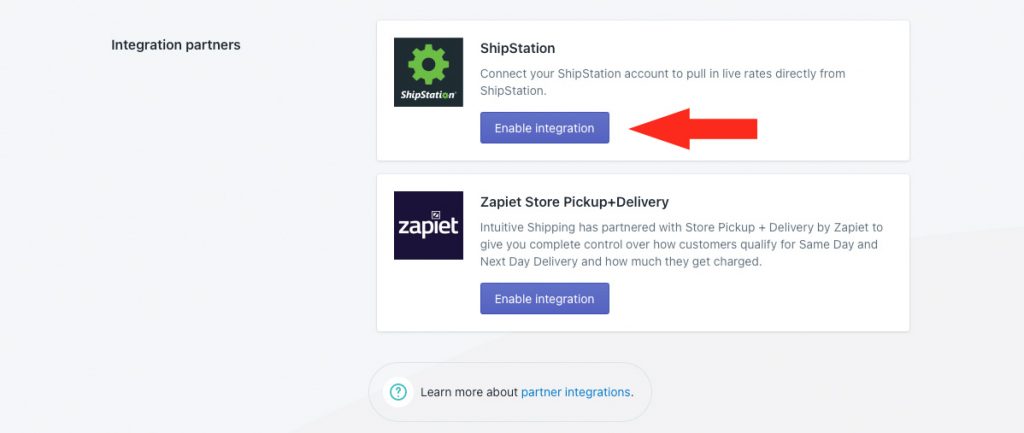
2) Click the Enable integration button on the ShipStation card in the Integration partners section.
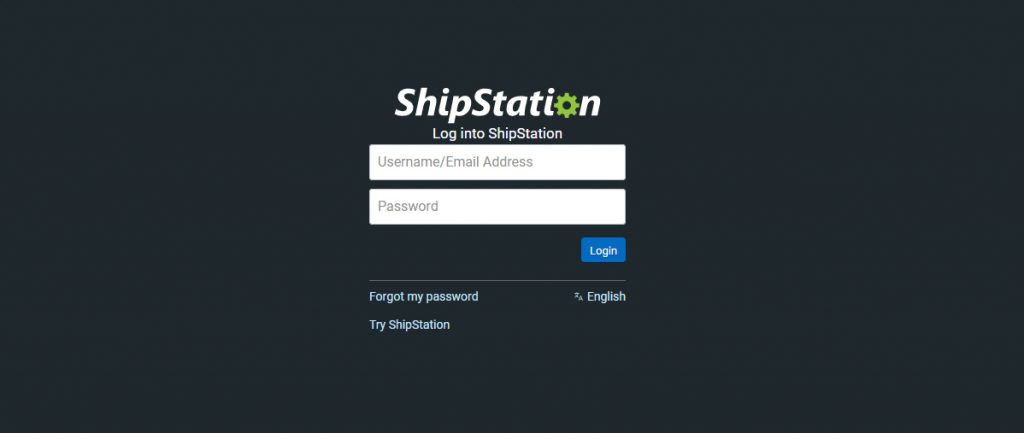
3) When prompted, enter your ShipStation username and password, then click the Login button.
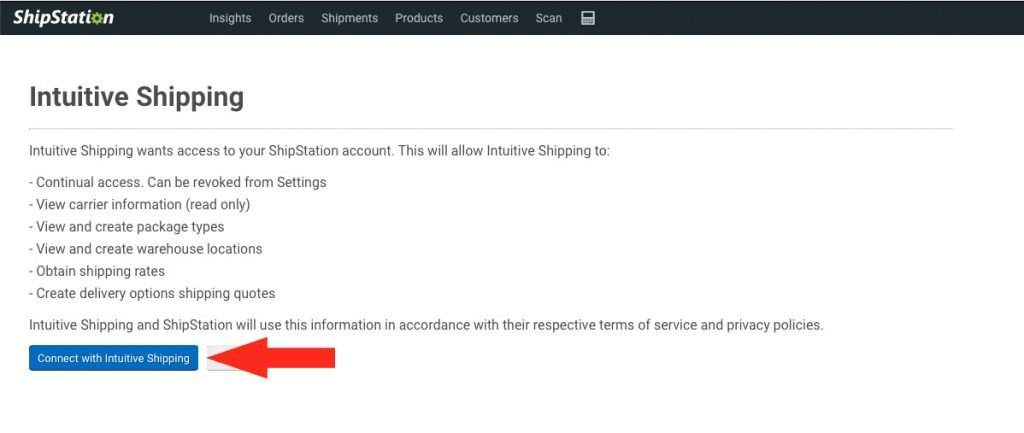
After successfully logging in, you will be redirected to an access permission screen.
4) Review the details provided on the access permission screen, then click the Connect with Intuitive Shipping button.
Once connected, you’ll briefly be shown a ‘success’ page, then you will be redirected back to Intuitive Shipping.
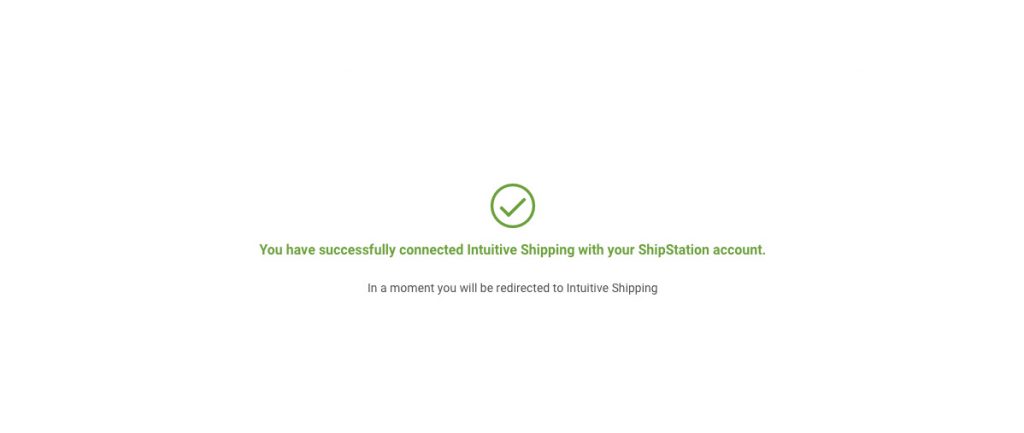
If your connection experience is different from what is shown above or if you have any difficulty connecting your ShipStation account to Intuitive Shipping, please contact us for assistance.
Create A Shipping Method with ShipStation
Once you have connected your account to Intuitive Shipping, you can set up an integrated service shipping method with ShipStation as the carrier.
If you have made any changes to carriers or carrier services connected to your ShipStation since you enabled the integration, go to Edit Settings first, then return to this section.
If you do not want Intuitive Shipping to pass package information from the rate calculation to your ShipStation account, go to Edit Settings first, then return to this section.
Otherwise, continue to Step 1.
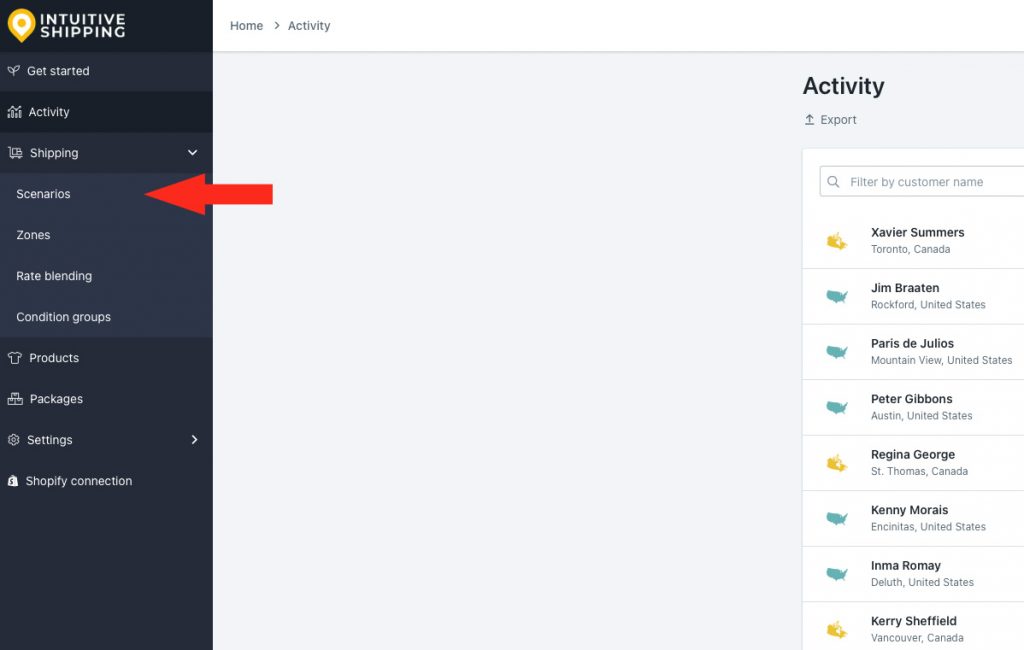
1) Click Shipping on the sidebar menu, then select Scenarios from the drop-down list.
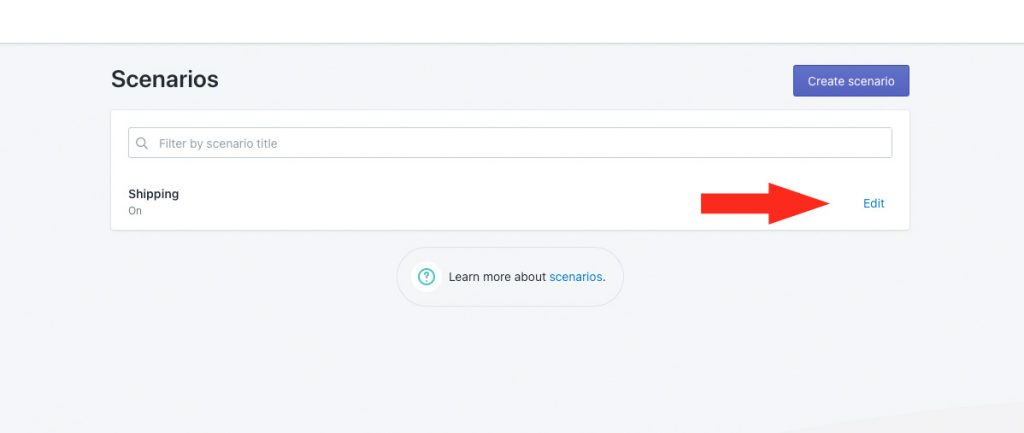
2) Click Edit beside an existing Scenario or click the Create scenario button to create a new one.
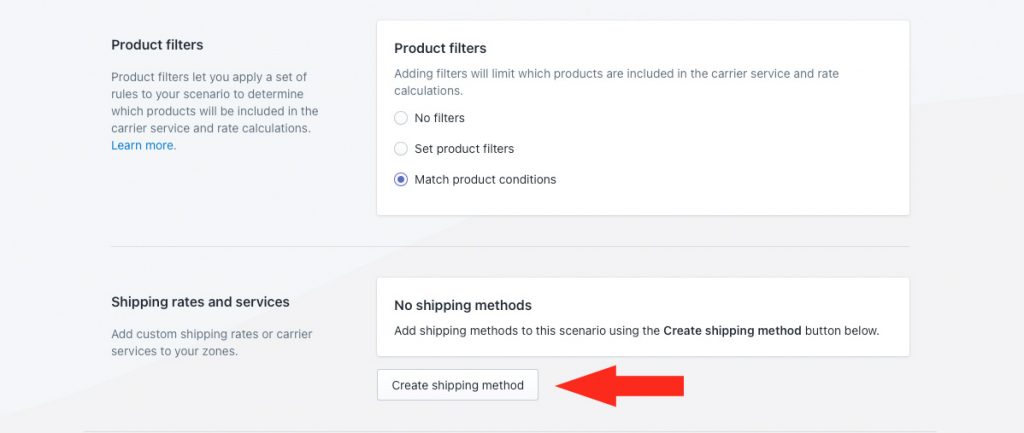
3) Scroll down to the Shipping rates and services section, then click the Create shipping method button.
Select An Integrated Service
1) Click the downward arrow beside Integrated services to display a list of integrated service partners.
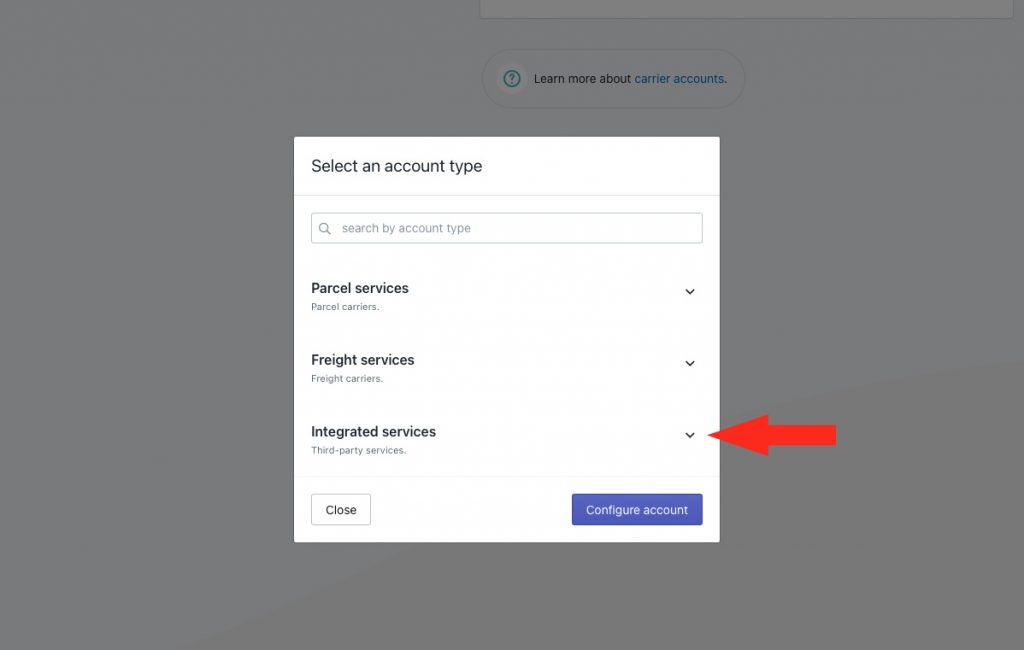
2) Select ShipStation from the list.
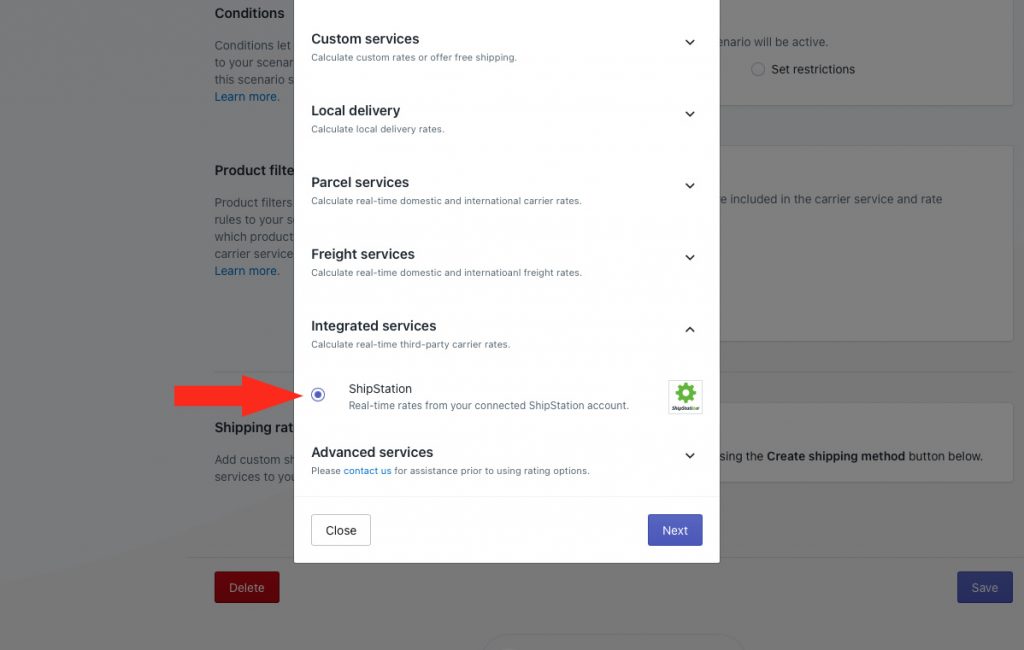
3) Click the Next button.
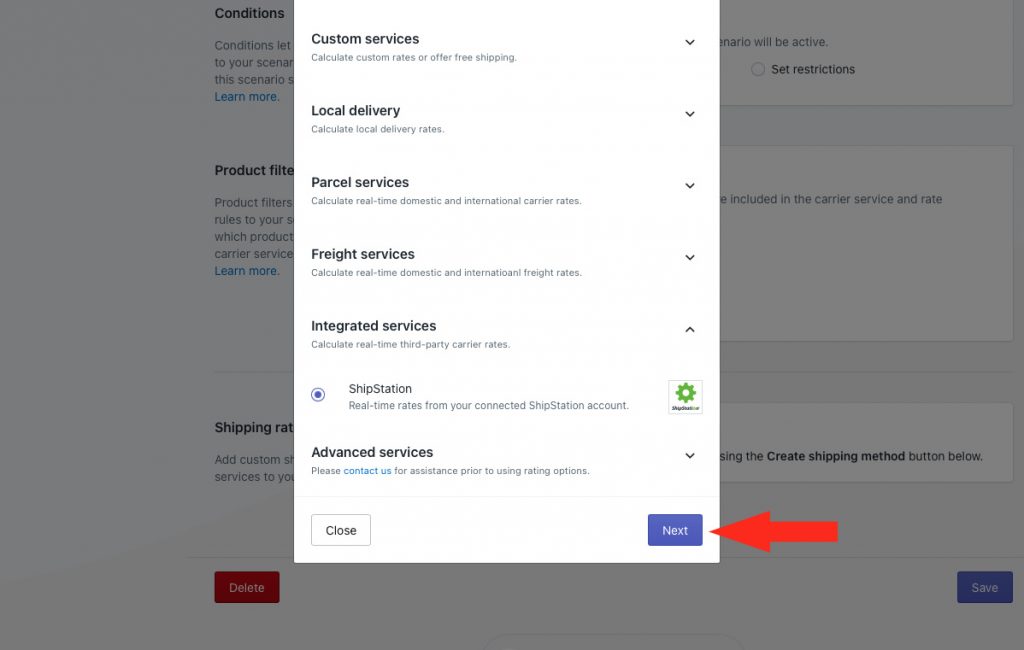
4) Select a zone.
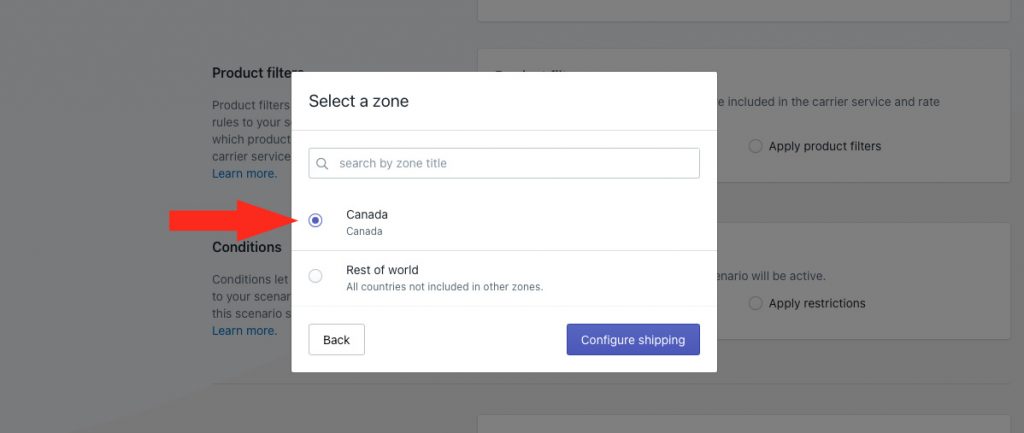
5) Click the Configure shipping button.
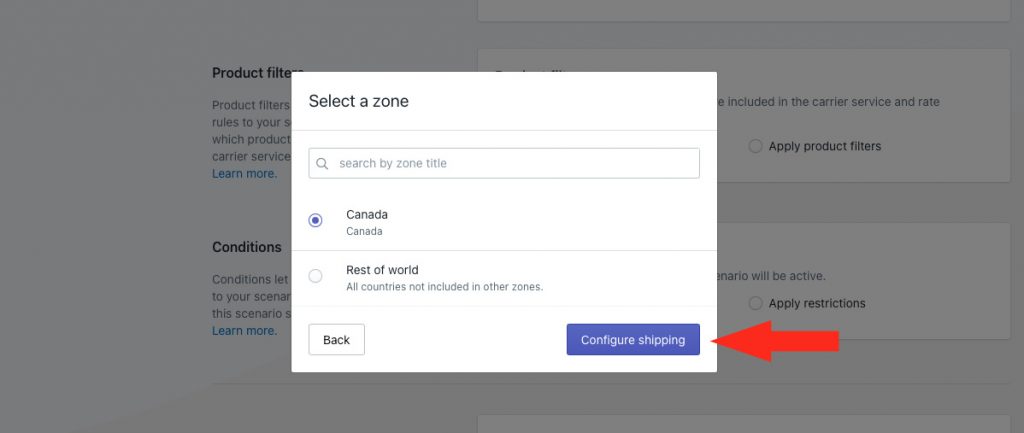
If you have previously set up a parcel service shipping method, setting up a ShipStation shipping method is very similar.
General
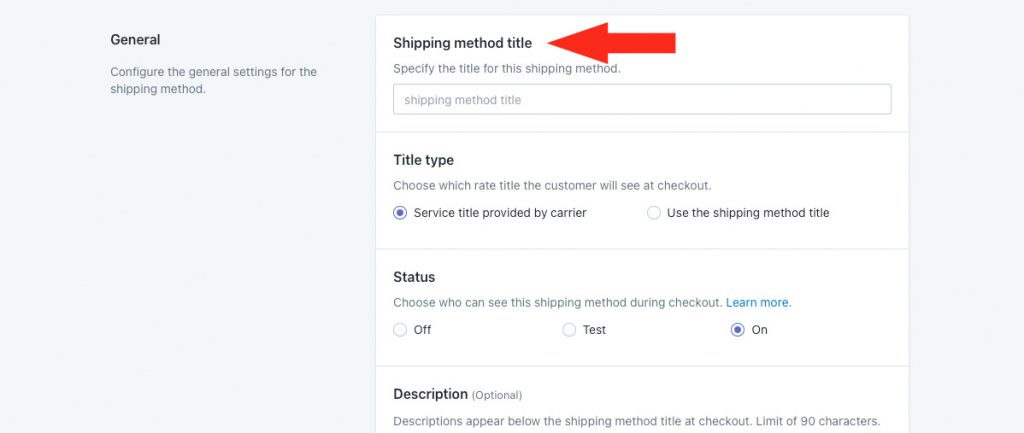
1) Enter a shipping method title, like ‘ShipStation’. This title will not be displayed to customers (see Step 2).
2) Leave the title type set to Service title provided by carrier.
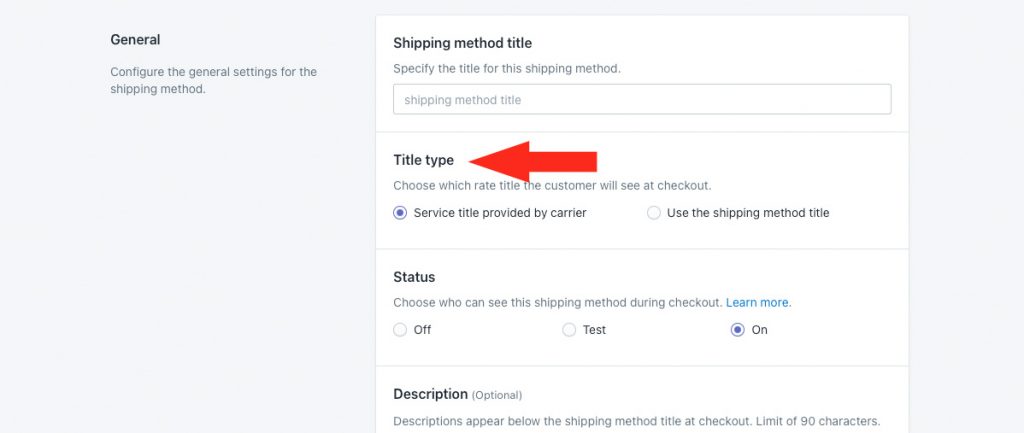
This setting ensures that the service title (or titles) provided by your ShipStation carrier services, such as ‘FedEx Ground’ or ‘FedEx 2Day’, will be displayed as the shipping method title (or titles) at checkout.
If you selected ‘Use the shipping title’ instead, the shipping method title entered in Step 1 will be displayed at checkout. That means, when you select multiple carrier service options, all of the service titles provided by every carrier are replaced with the shipping method title.
3) Choose the shipping method status.
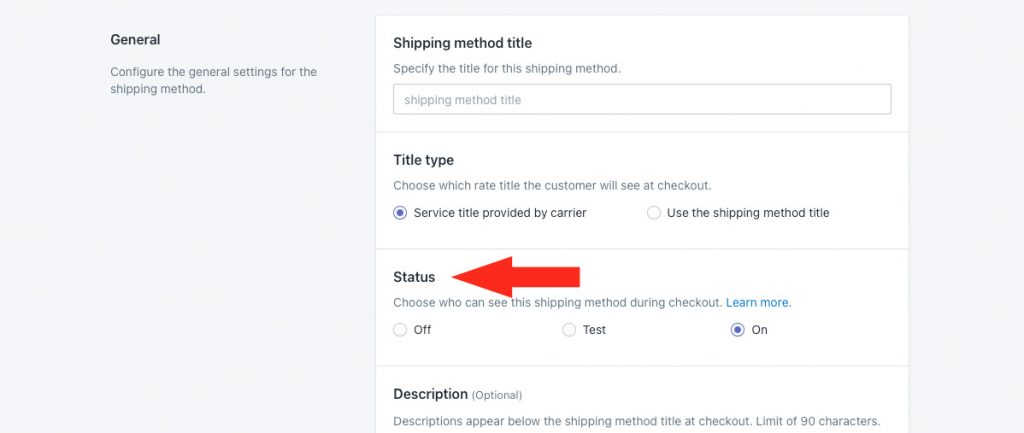
You have three (3) settings to choose from:
Off – The shipping method will be ignored by the Scenario it is assigned to, even if the Scenario conditions are met. The shipping method will not be displayed at checkout, even in Sandbox mode.
Test – The shipping method will only be visible at checkout when you use the word ‘Intuitive’ as either the customer’s first or last name.
On – The shipping method will be visible to customers. If the Scenario conditions are met, the shipping method will be displayed at checkout. This is the default setting.
4) If desired, enter a description for your shipping method. We recommend limiting your description to 90 characters or less to ensure it displays properly on the checkout page.
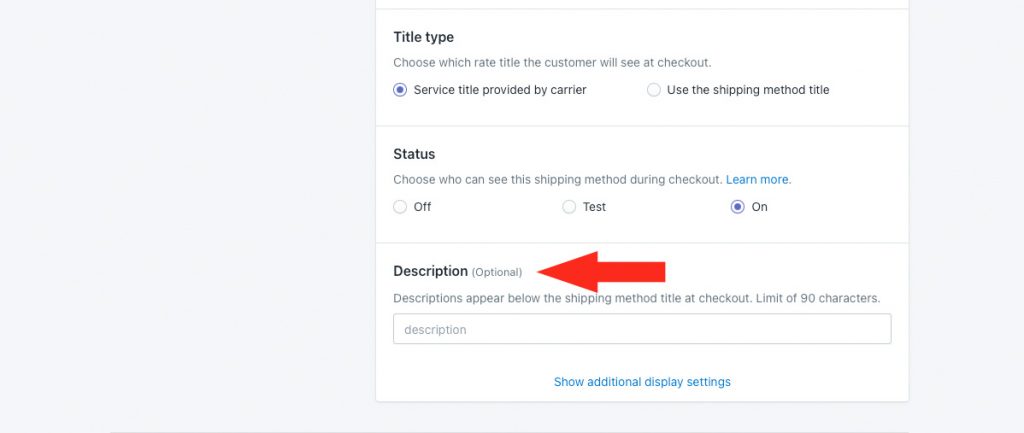
Additional display settings are available for delivery times, order processing times and service codes. If you do need to adjust these settings, skip ahead to Packages. Otherwise, continue to Step 5.
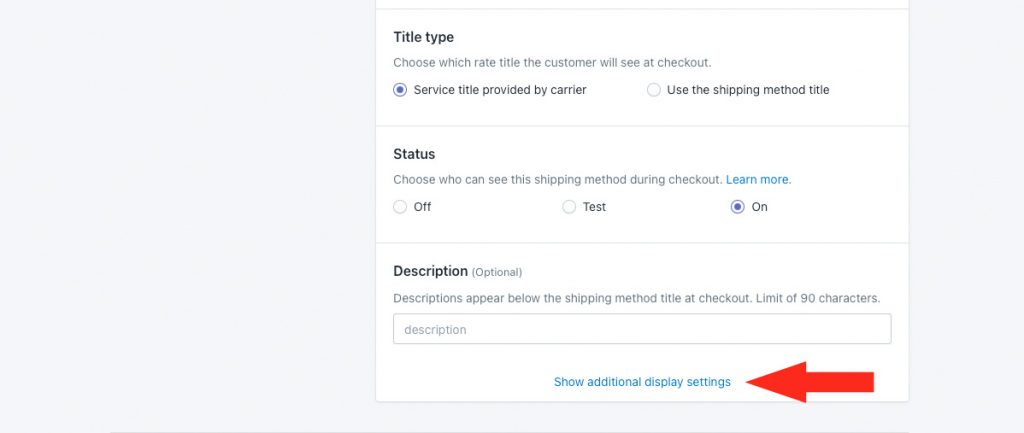
5) Click Show additional display settings.
6) Choose whether or not you wish to have a delivery time displayed at checkout along with the rate. Delivery times are shown at checkout by default.
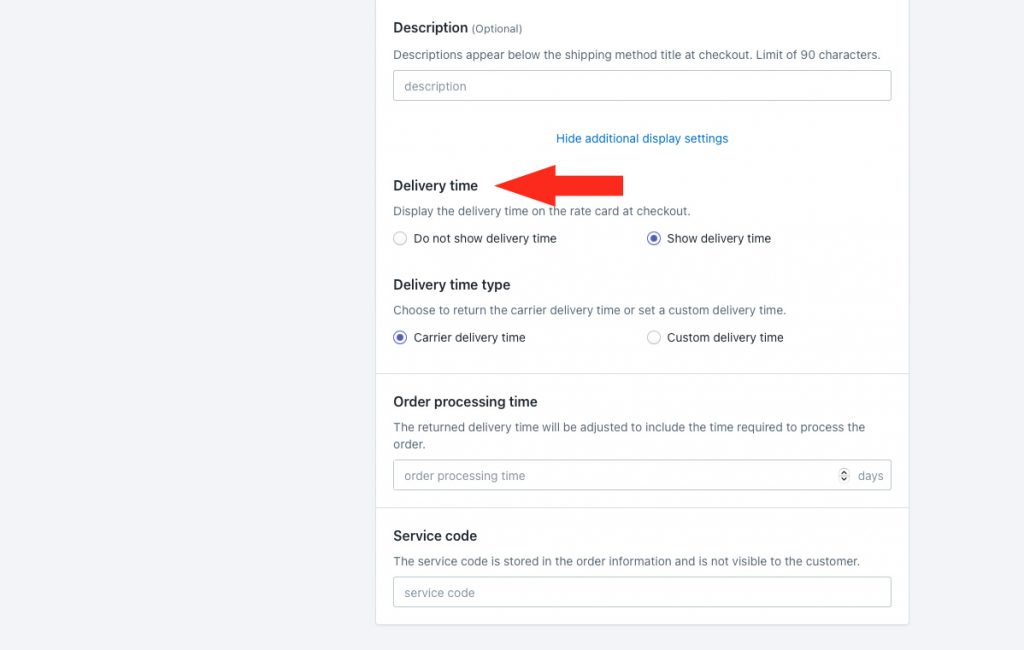
If you selected ‘Do not show delivery time’ in Step 6, skip ahead to Step 9. Otherwise, continue to Step 7.
7) If you’re planning to show delivery times, choose the type of delivery time you wish to have displayed at checkout.
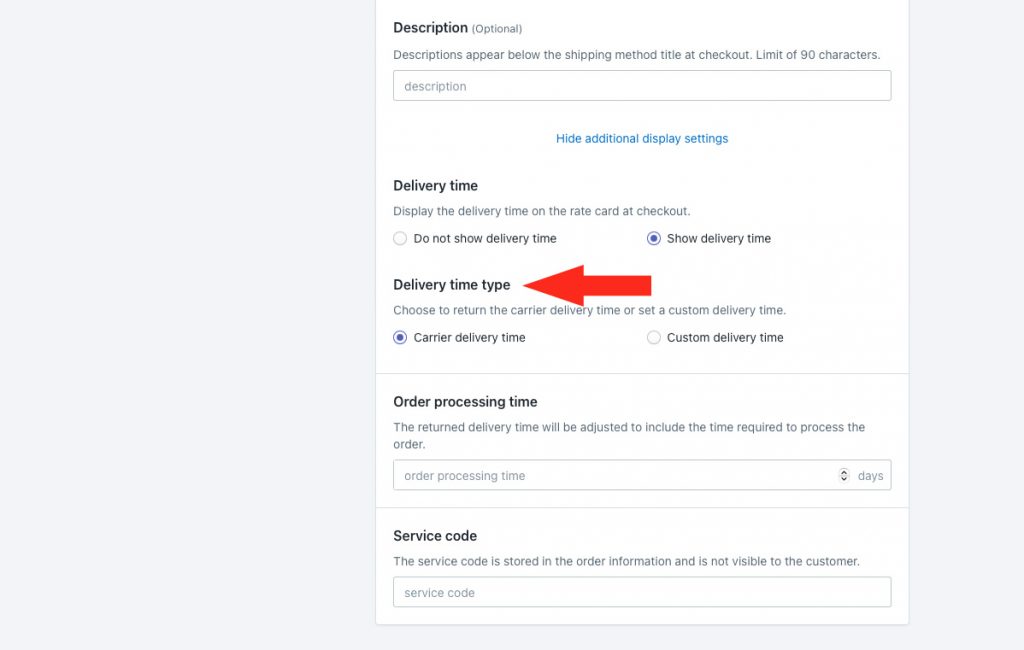
You have two (2) settings to choose from:
Carrier delivery time – delivery times displayed at checkout are estimates provided directly by the carriers connected to your ShipStation account along with the live rate calculation. This is the default setting.
Custom delivery time – delivery times displayed at checkout are the values entered by you in Step 8. When you select this option, additional fields will appear on the screen.
8) If you selected Custom delivery time in Step 7, enter a minimum and, if desired, a maximum number of days.
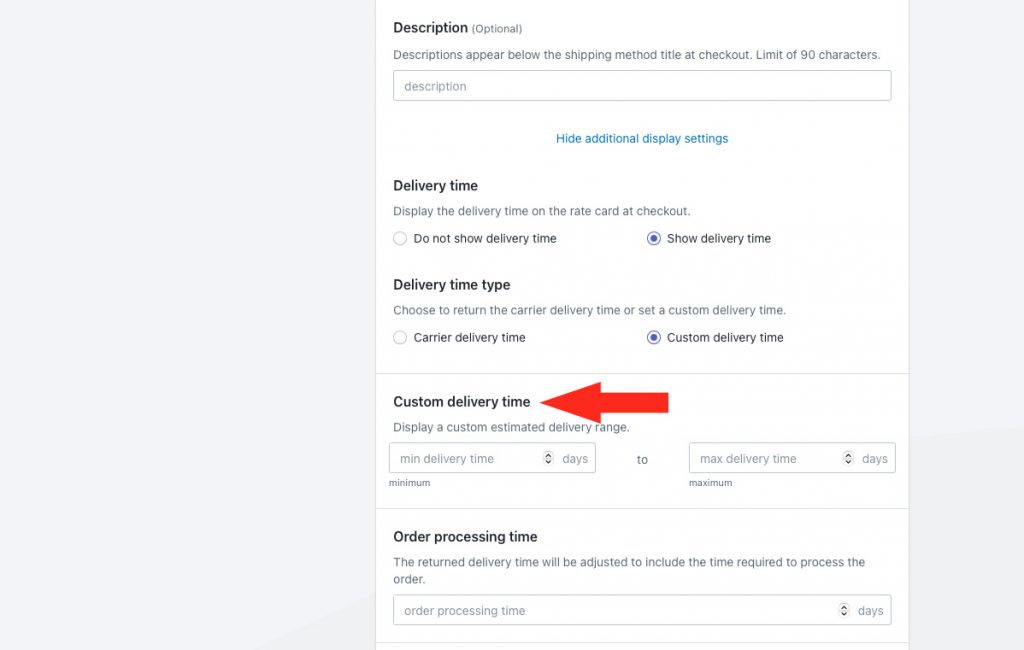
Min delivery time – enter the lower limit of your delivery time range.
Max delivery time – enter the upper limit of your delivery time range. When combined with the min setting, delivery times will be displayed like ‘3 to 5 business days’ at checkout.
For example, if you prefer to have delivery time displayed as ‘3 business days’ instead of ‘3 to 5 business days’, enter ‘3’ in either minimum or maximum and leave the other field blank.
9) If desired, add order processing time, in days. This is useful when you sell products that cannot be shipped out the same day the order is placed.
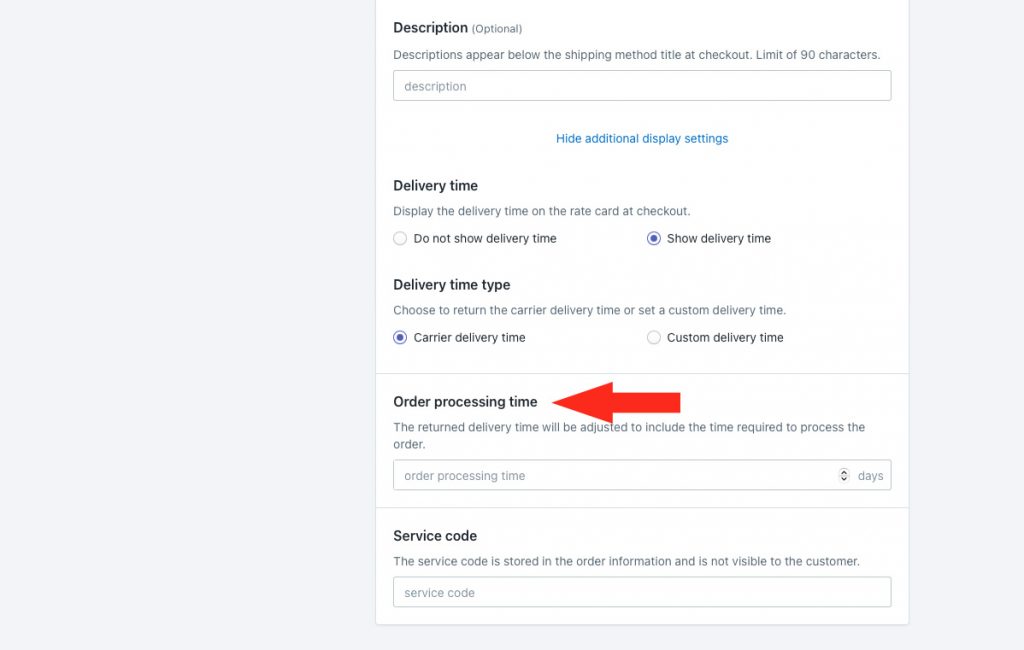
For example, if you enter 3 days for order processing and the carrier returns an estimated delivery time of 2 days, Intuitive Shipping will display the delivery time as ‘5 business days’ at checkout.
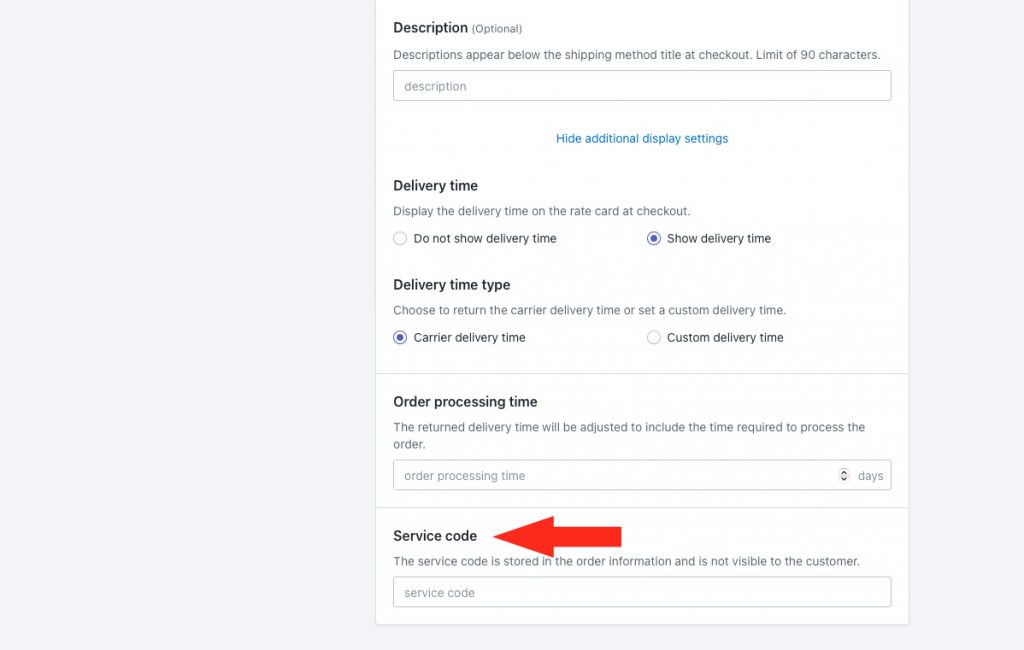
10) If desired, enter a custom service code. The service code is pushed to ShipStation when a customer successfully completes their checkout.
Entering a custom service code will override the service codes provided by the carrier. If you want carrier-provided service codes pushed to ShipStation, leave this setting blank.
Packages
You can determine how the customer’s order will be packaged by selecting the appropriate packing algorithm and assigning the packages you want to be used by the ShipStation shipping method.
1) Select a packing algorithm.
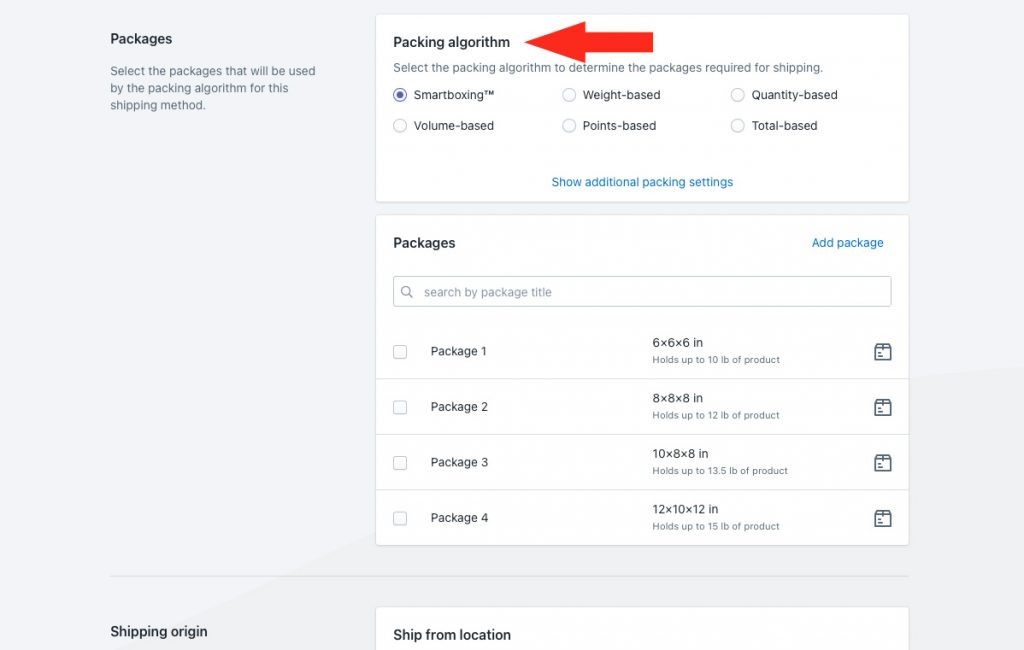
Your have six (6) options to choose from:
SmartBoxing™ – Intuitive Shipping will select the best package combination based on the weight and the volume of the order.
Weight-based – Intuitive Shipping will select the best package combination based only on the weight of order.
Quantity-based – Intuitive Shipping will select the best package combination based only on the number of items on the order.
Volume-based – Intuitive Shipping will select the best package combination based only on the volume of order.
Points-based – Intuitive Shipping will select the best package combination based on a point system.
Total-based – Intuitive Shipping will select the best package combination based only on the total value of order.
Additional packing settings are available for packing methods and multiple package blending. If you do not need to adjust these settings, skip ahead to Step 6. Otherwise, continue to Step 2.
2) Click Show additional packing settings.
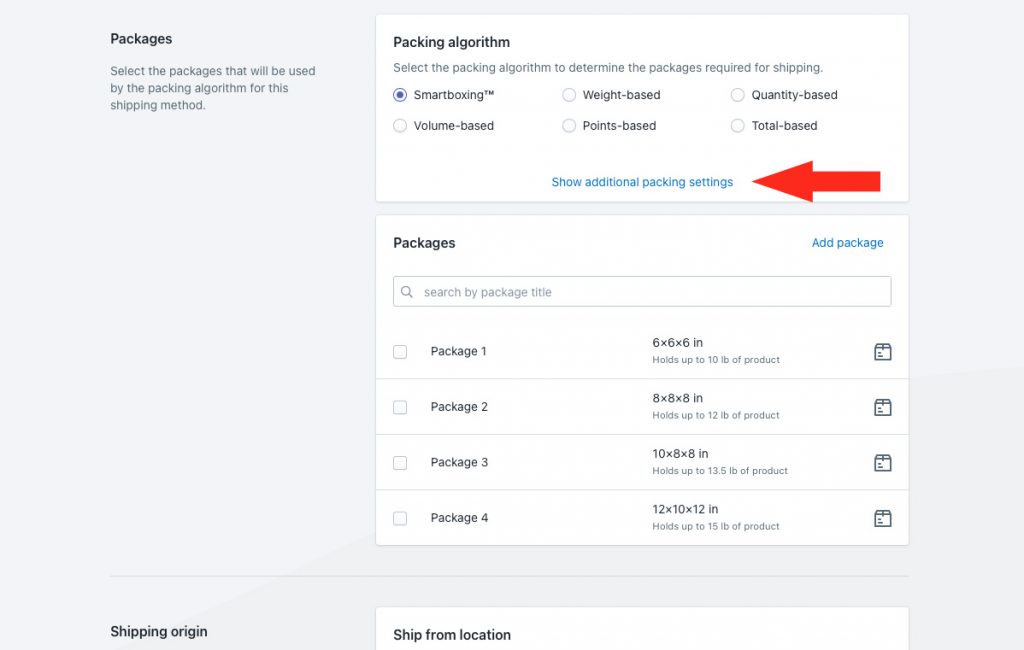
3) Select a packing method.
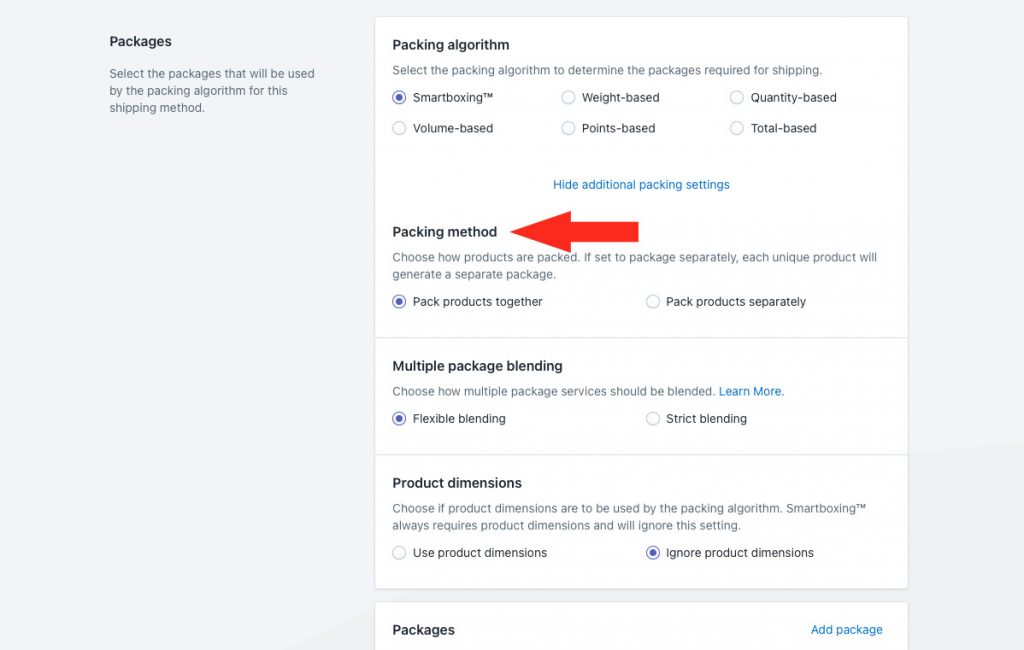
You have two (2) settings to choose from:
Pack products together – all of the products in the order will be packed together. Packages will be split based on the selected packing algorithm and the packages assigned to the shipping method. This is the default setting.
Pack products separately – each product in the order will be packed separately based on the selected packing algorithm and the packages assigned to the shipping method.
For example, if a customer orders 3 black hats and 2 yellow t-shirts, the hats will be packed together and the t-shirts will be packed together when you select the ‘separately’ setting.
4) Choose how multiple packages will be blended when carrier services don’t match.
Occasionally, packages in the order may not qualify for the same service. In the event that does happen, the costs of each package will be blended according to this setting. For example, if Package 1 returns a cost for service A and Package 2 returns a cost for service B, the flexible setting will blend them together. The strict setting will not return a shipping cost.
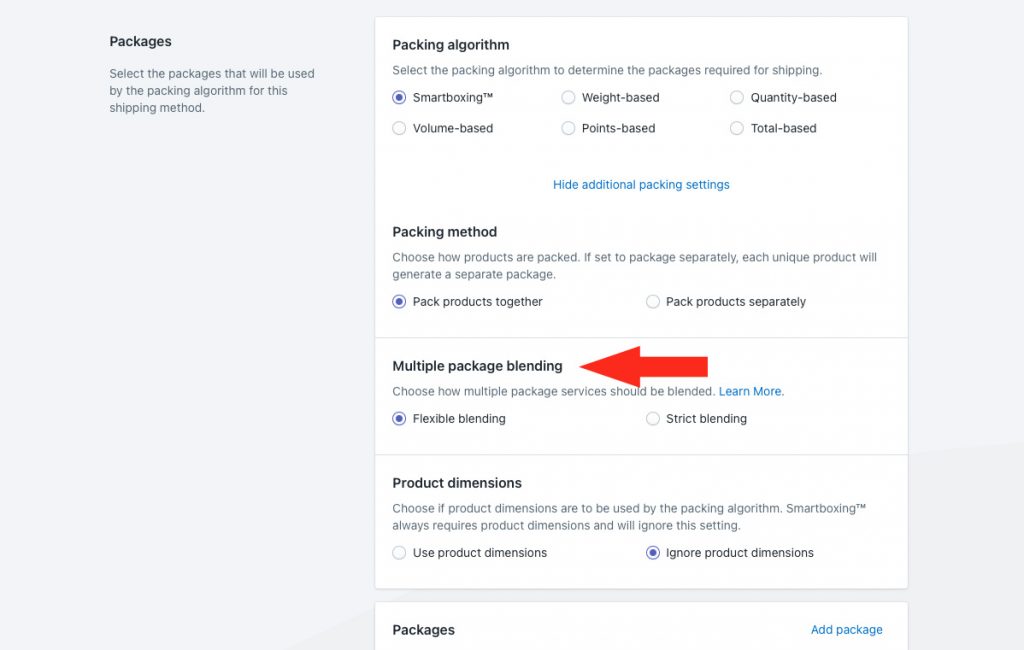
You have two (2) settings to choose from:
Flexible blending – an attempt will be made to blend costs based on services. The lowest cost for each package will be blended together if packages do not have matching services. This is the default setting.
Strict blending – costs will be blended only if all packages have matching services. No costs will be returned if packages do not have matching services.
5) Choose whether or not product dimensions should be ignored. This is useful if you have products with one or more dimensions that exceed the dimensional limits of certain packages, regardless of the packing algorithm.
For example, SmartBoxing™ uses product size and weight to optimize the package set. However, SmartBoxing™ considers the total volume (length x width x height), rather than each individual dimension.
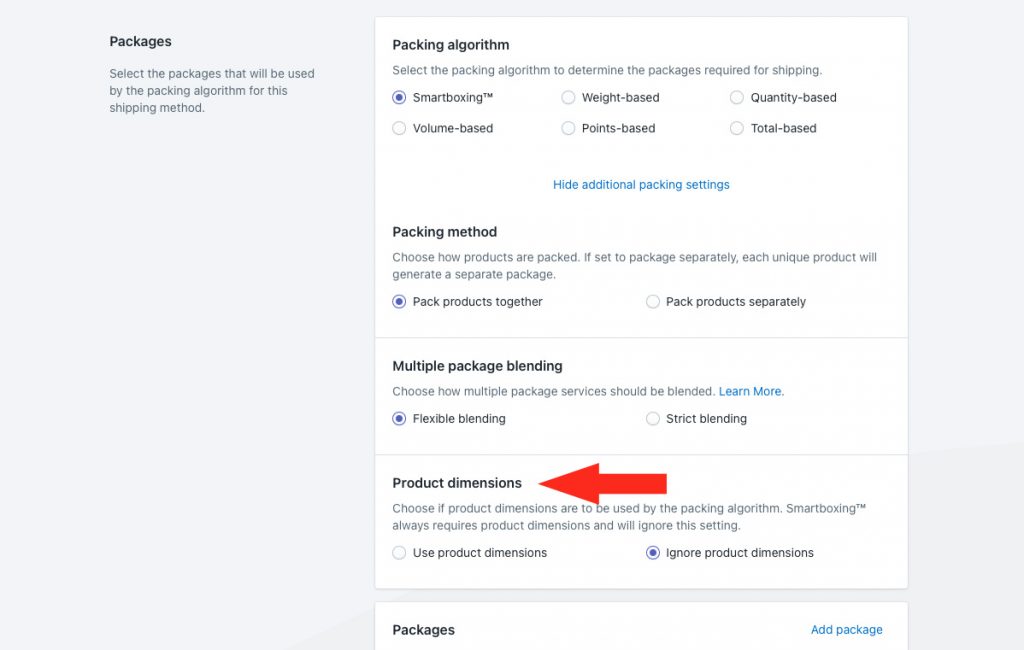
You have two (2) settings to choose from:
Use product dimensions – product dimensions are checked to ensure every product in the cart fits in the selected packages, regardless of the packing algorithm selected in Step 1.
Let’s say you’re using SmartBoxing™. You have a package that is 12 x 10 x 8 inches, for a total volume of 960 cubic inches. When a customer orders a product that is 6 x 15 x 3 inches, the package will not be selected because the product width is greater than any of the package dimensions, even though the total volume of the product (270 cubic inches) is much less than the package can hold.
This setting works well when you have rigid product dimensions that can’t be manipulated.
Ignore product dimensions – individual product dimensions are not considered, and packages are selected strictly based on the packing algorithm selected in Step 1. This is the default setting.
Using the same example, when a customer orders a product that is 6 x 15 x 3 inches, the package will be selected because the total volume of the product (270 cubic inches) is less than the 960 cubic inches the package can hold.
This setting works well when you have products that are flexible, meaning they can be bent, curved, folded or otherwise manipulated to fit into the box.
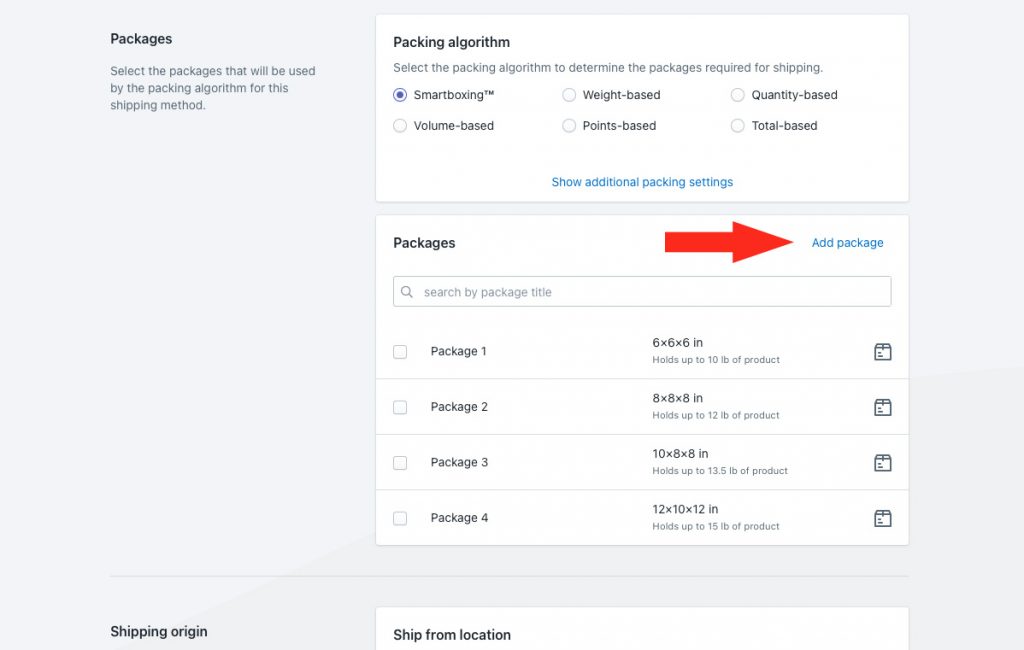
All of the packages saved to your main Packages settings will be listed in the Packages section of the shipping method as selectable options. You can also add a package directly from the shipping method.
If all of the packages you want to assign to the shipping method are listed, skip ahead to Step 16. Otherwise, continue to Step 6.
6) To add a package that is not currently listed, click Add package.
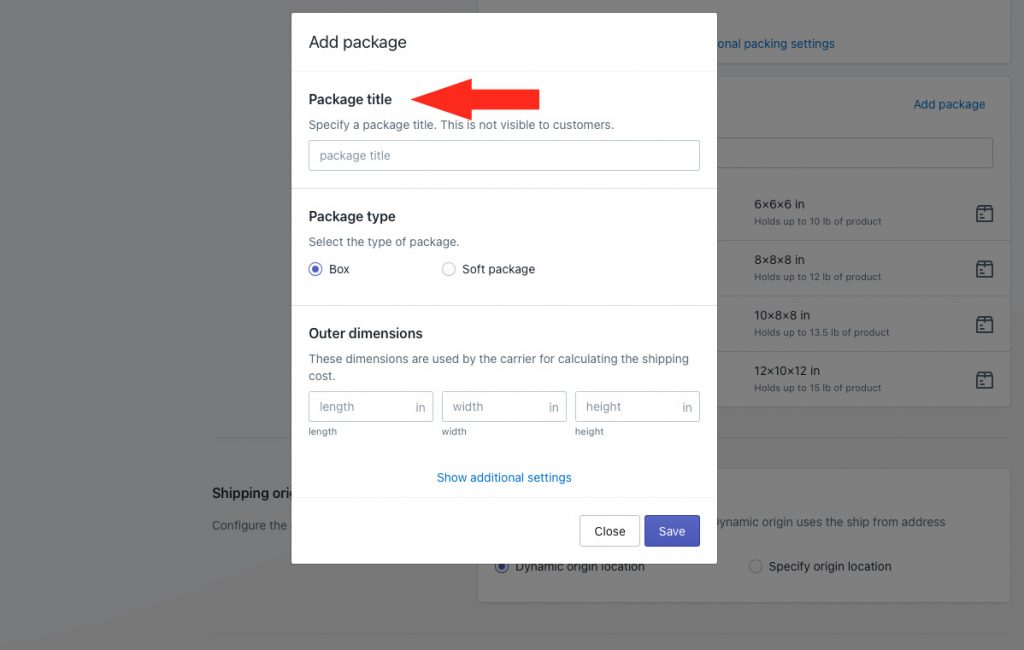
7) Enter a package title, like ‘Box 1’ or ‘Large Envelope’.
8) Select a package type.
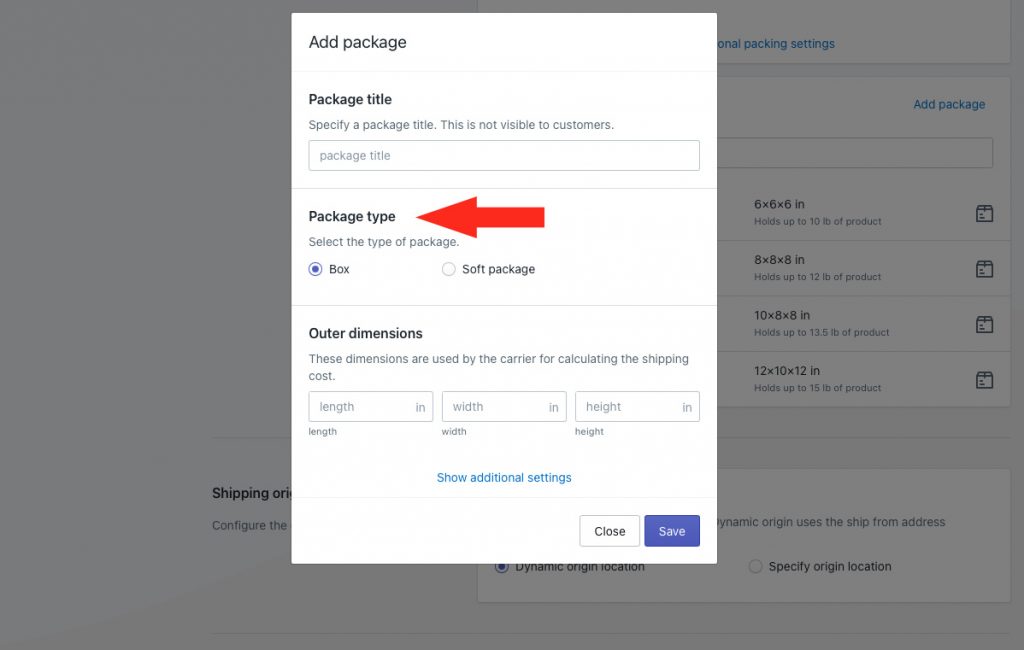
You have two (2) settings to choose from:
Box – a rigid container with fixed dimensions.
Soft package – a flexible container with adjustable height.
9) Add the outer Length, Width and Height of the package. These dimensions are used by the carrier service to calculate the shipping cost.
If you selected Soft package in Step 8, the height dimension is the maximum height. Intuitive Shipping will automatically adjust this dimension based on the size of the products being packaged.
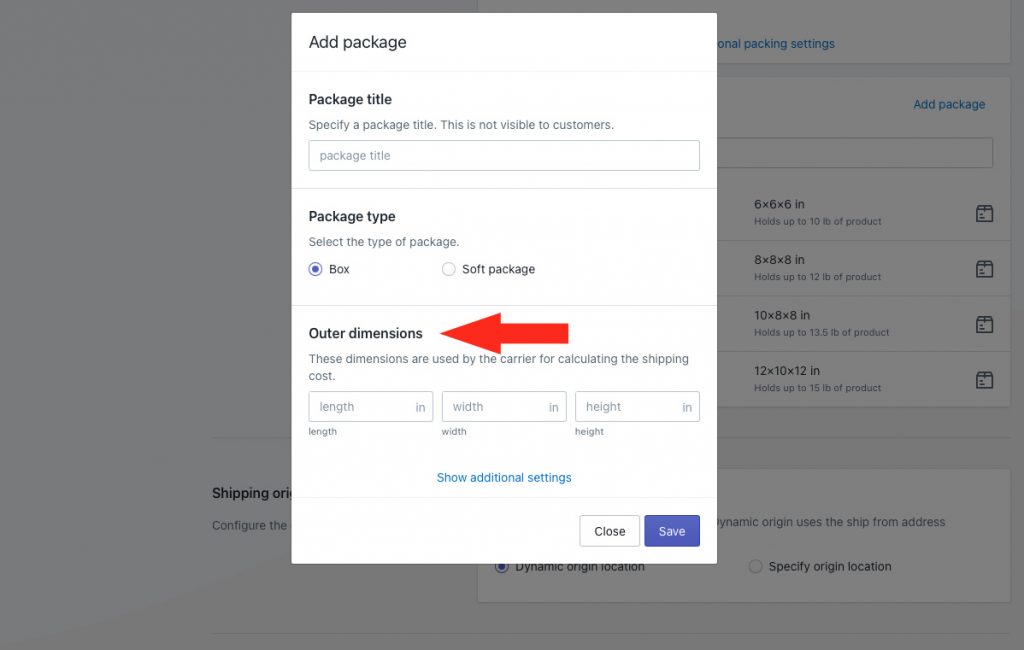
Additional settings are available for inner dimensions, maximum weight, empty weight and package cost. If you don’t need these settings, skip ahead to Step 16. Otherwise, continue to Step 10.
10) Click Show additional settings.
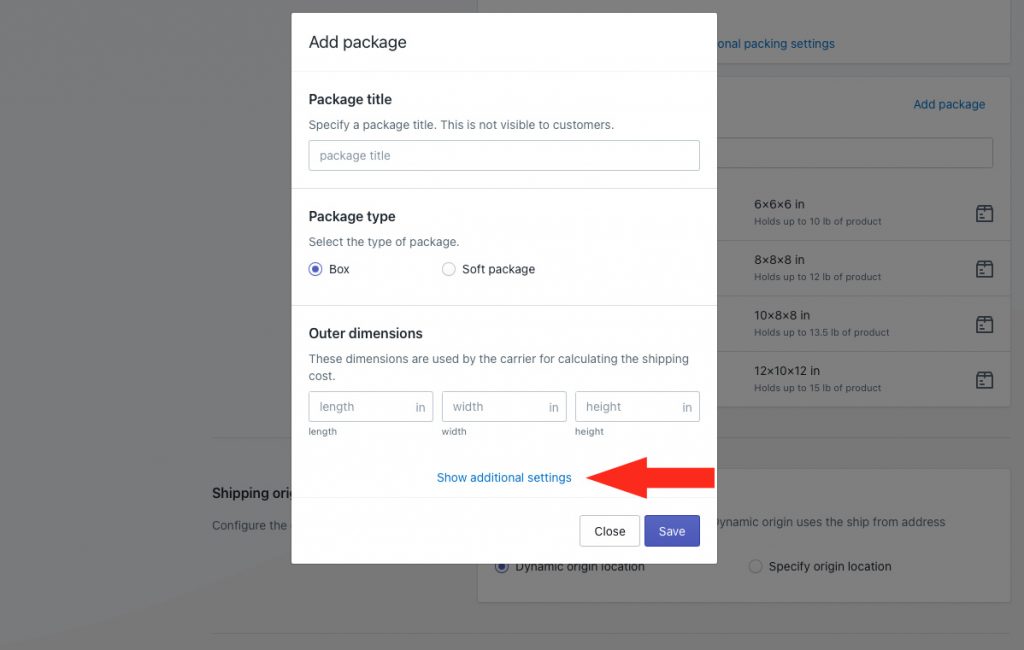
11) If desired, add the inner Length, Width and Height of the package. These dimensions provide greater accuracy for SmartBoxing™ when there is a tangible difference between the inner and outer dimensions or when extra packing material is required.
Inner dimensions can also be used with simple packing algorithms like weight-based or quantity-based packing if products in the order have been assigned dimensions.
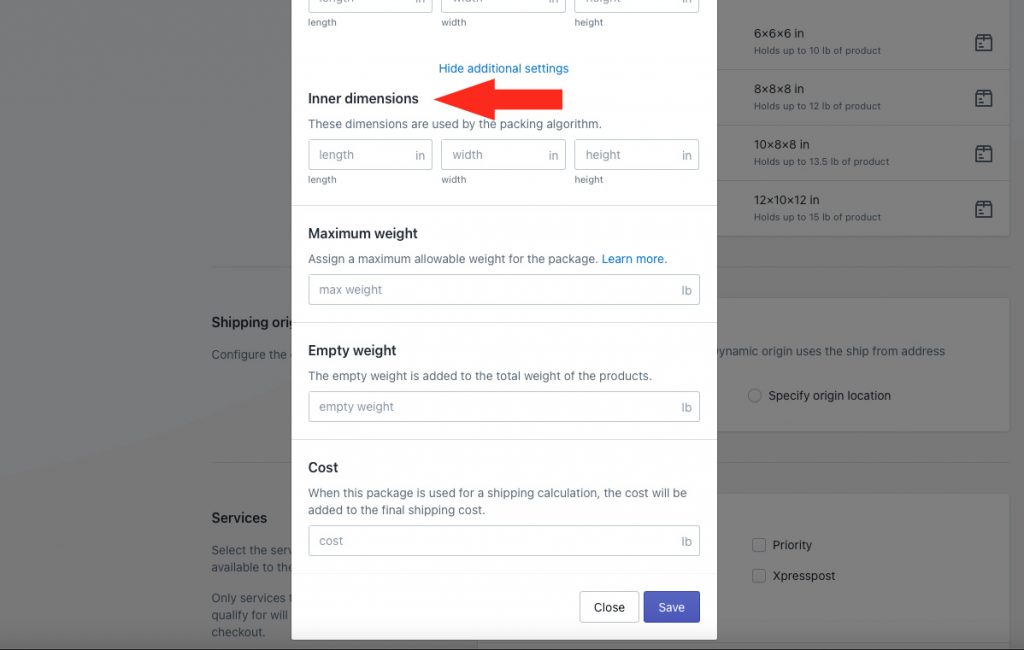
12) If desired, enter the maximum weight of the package. When specified, Intuitive Shipping will ensure that the combined product weight does not exceed this amount for a single package.
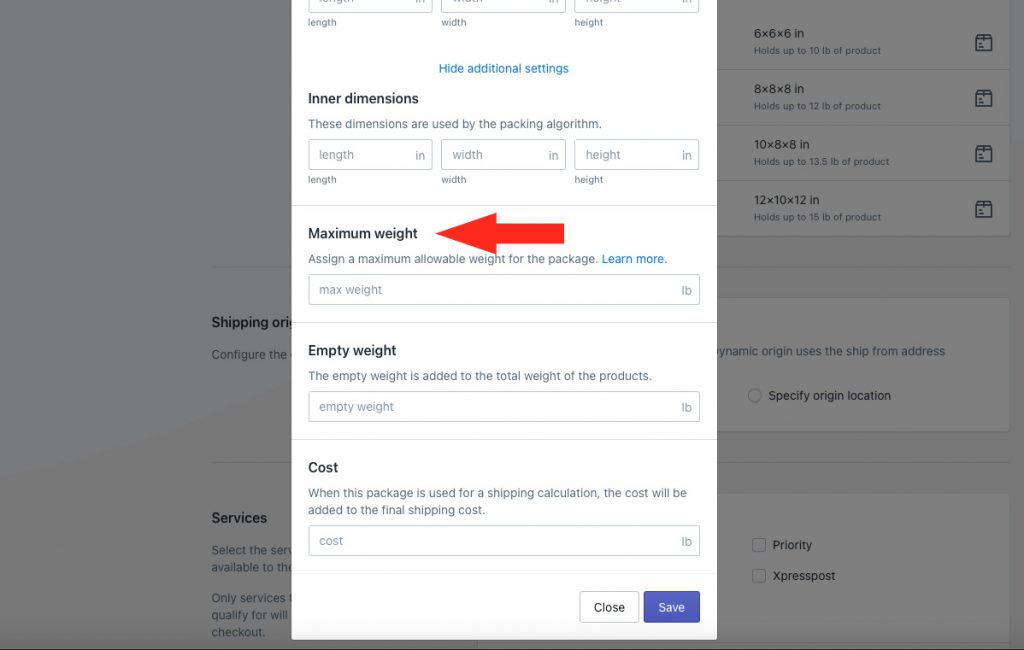
13) If desired, enter the empty weight of the package. When specified, Intuitive Shipping will add this weight to the total weight of the products.
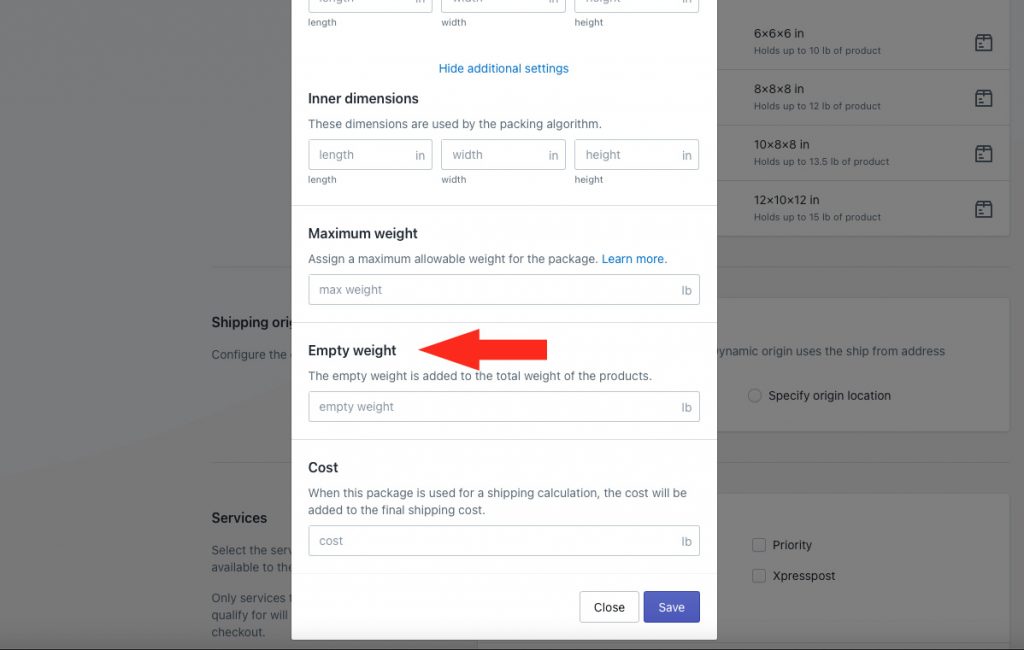
14) If desired, enter the cost of the package. When specified, Intuitive Shipping will add this cost to the total shipping cost.
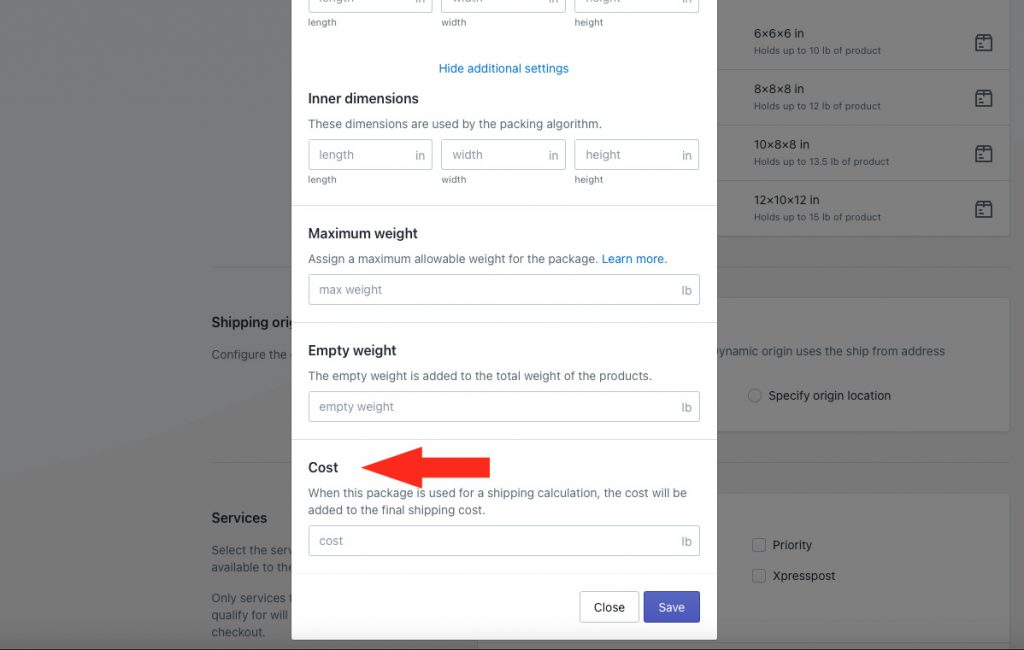
15) Click the Save button.
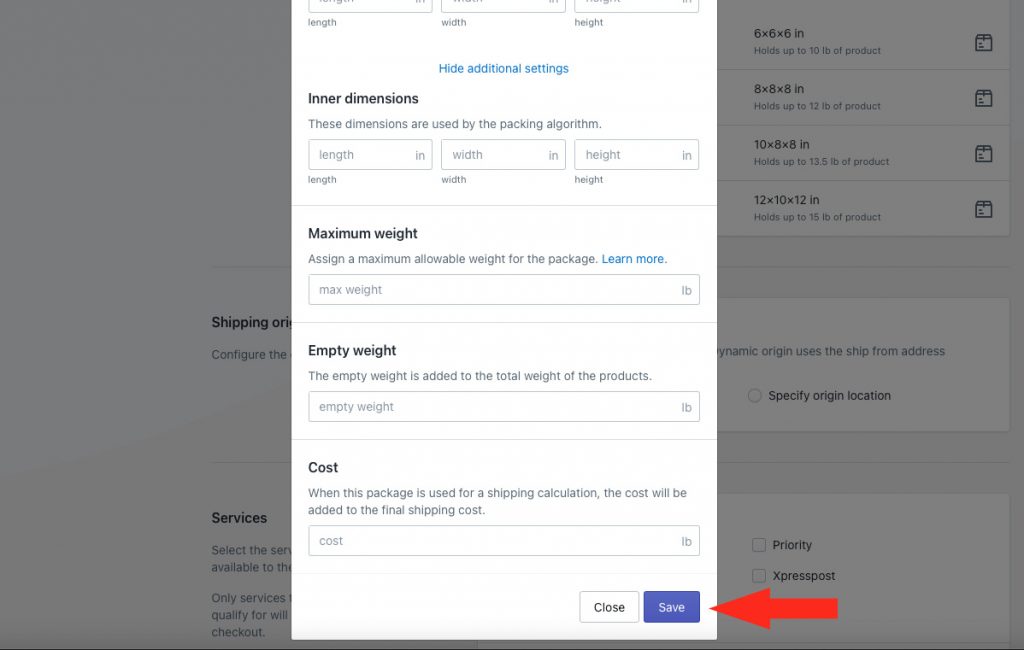
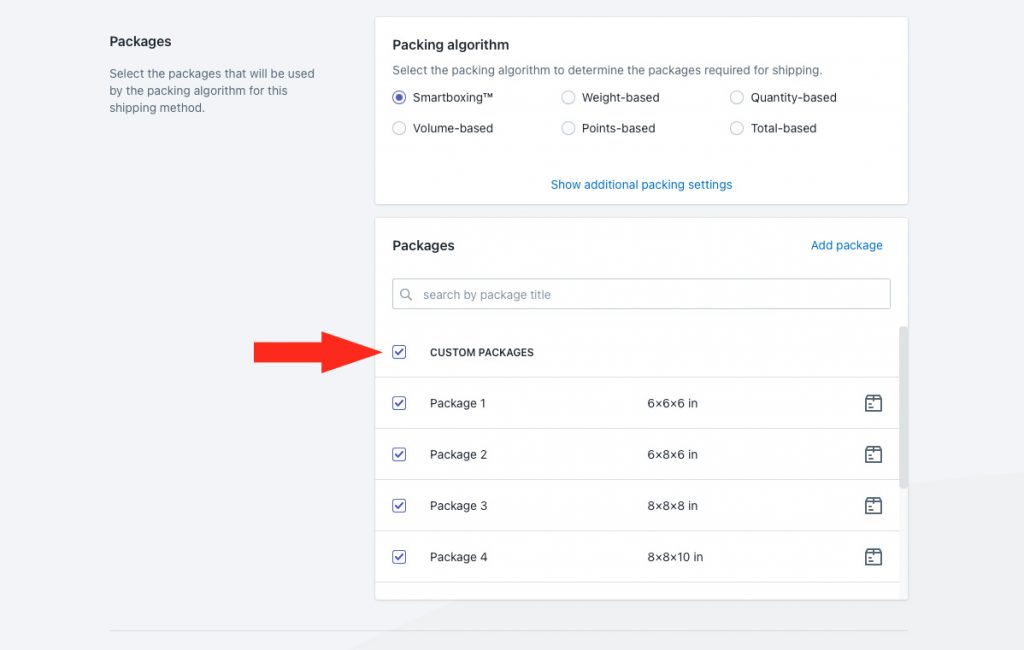
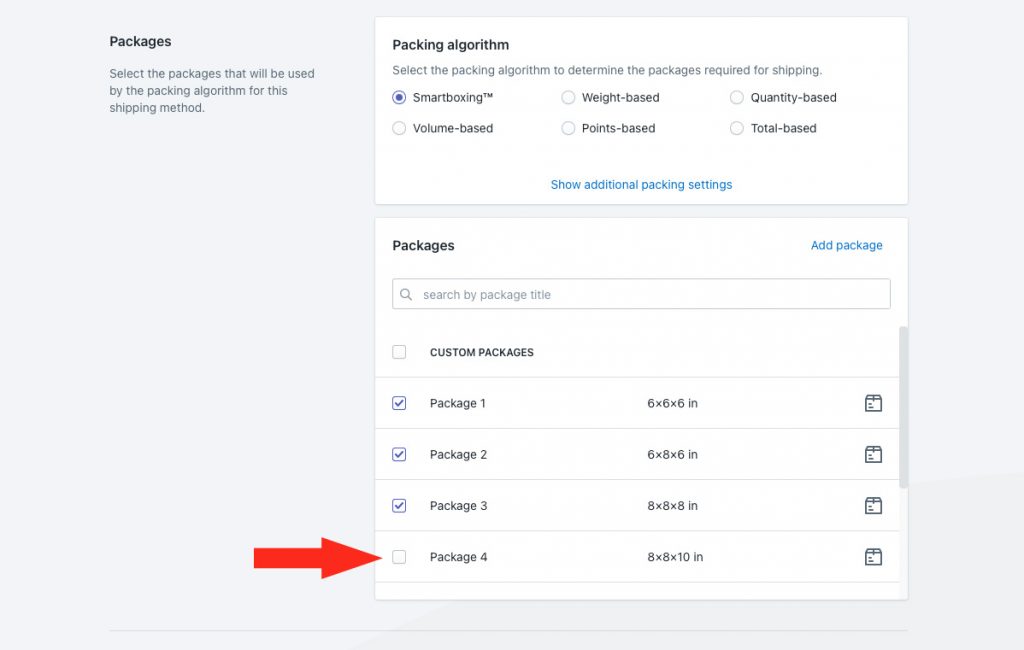
16) Select each of the packages you want to be included in the ShipStation shipping method.
To select every package saved in Intuitive Shipping, select Custom Packages, which acts like a ‘select all’ feature.
Or, select only certain packages. If you have a lot of packages, use the search function or scroll through the list.
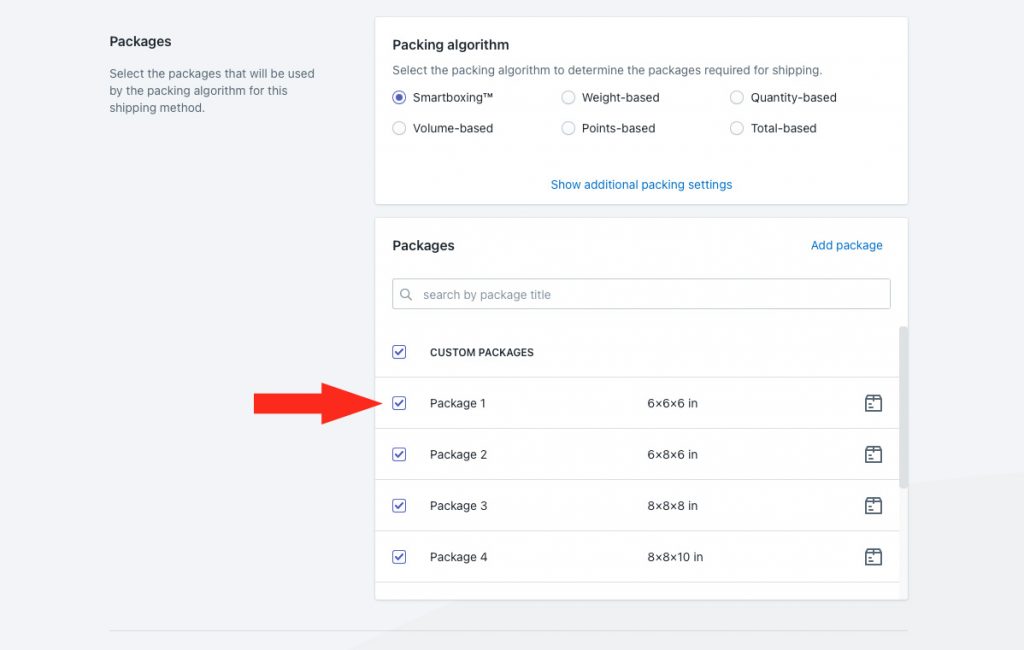
Packages not selected will be ignored by the shipping method.
Packages that have been turned off are muted. They cannot be selected or deselected, and will also be ignored by the shipping method.
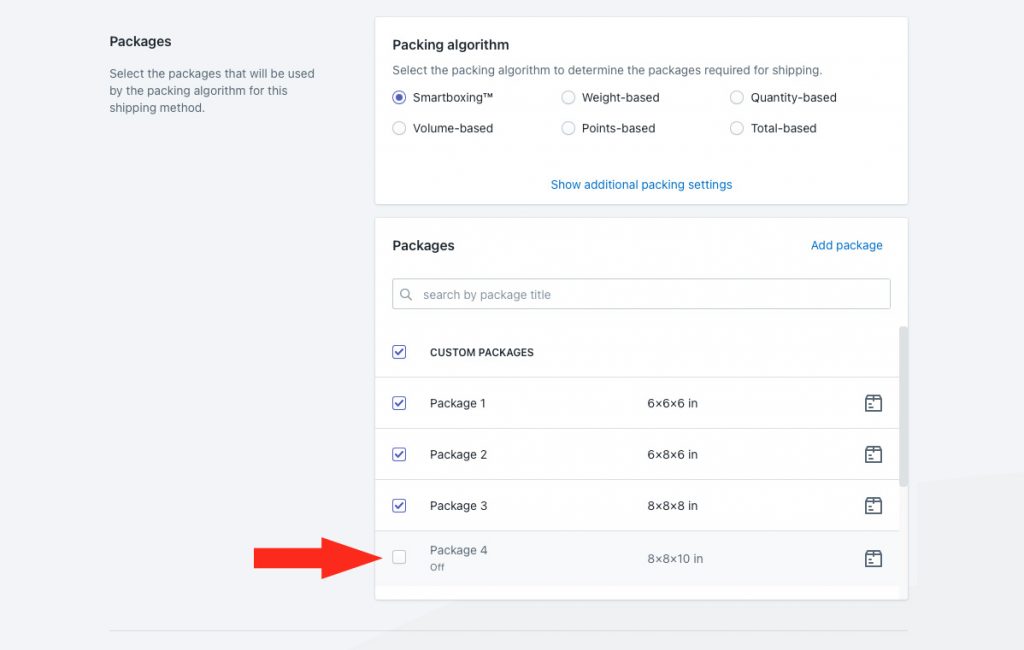
To change the On/Off status of a package, go to your main package settings after saving your shipping method.
Shipping Origin
Real-time carrier rates from your ShipStation account can be calculated using the primary location set up in Shopify, or a custom ship-from location.
1) Select the ship from location.
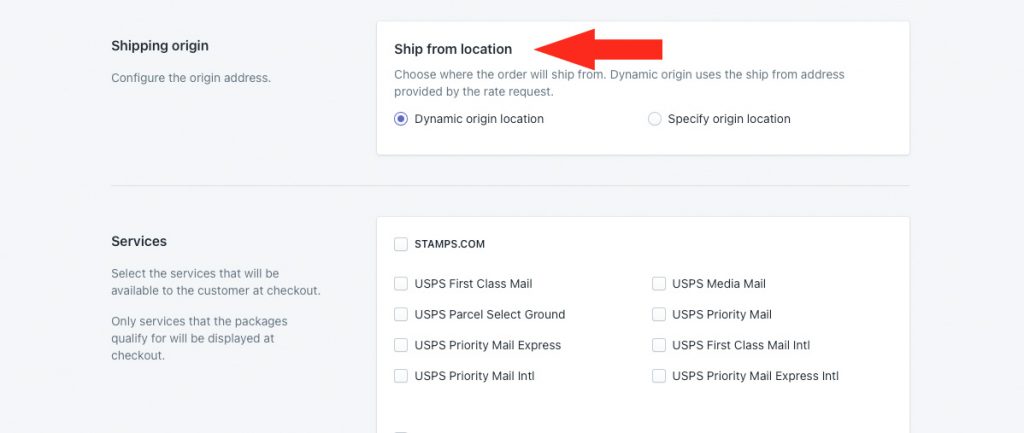
You have two (2) settings to choose from:
Dynamic origin location – carrier rates will be calculated based on the distance between the customer’s address and your primary Shopify location address. This is the default setting.
Specify origin location – carrier rates will be calculated based on the address specified in Step 2.
If you selected dynamic, skip ahead to Services.
All of the custom locations saved to your main Locations settings will be listed under Locations as selectable options. Or, you can add a location directly from the shipping method.
If the custom shipping origin you want to assign to the shipping method is listed, skip ahead to Step 6. Otherwise, continue to Step 2.
2) Click Add location.
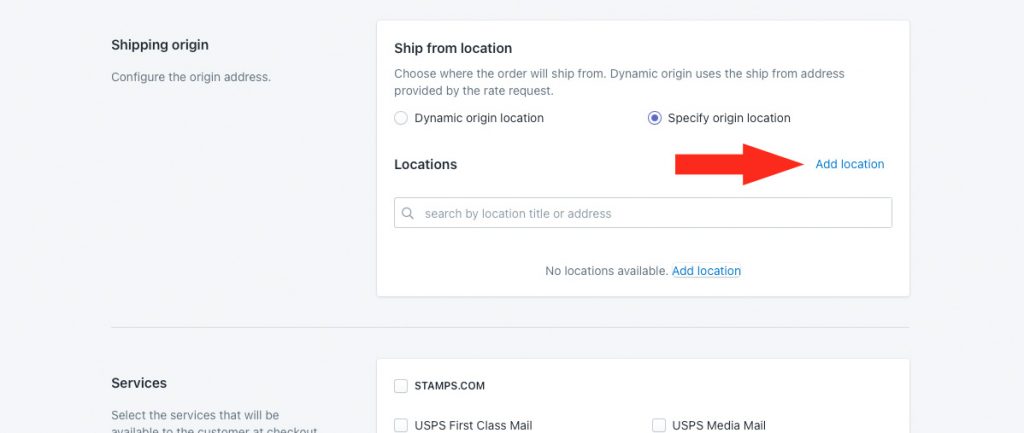
3) Enter a location title, such as ‘Warehouse 2’.
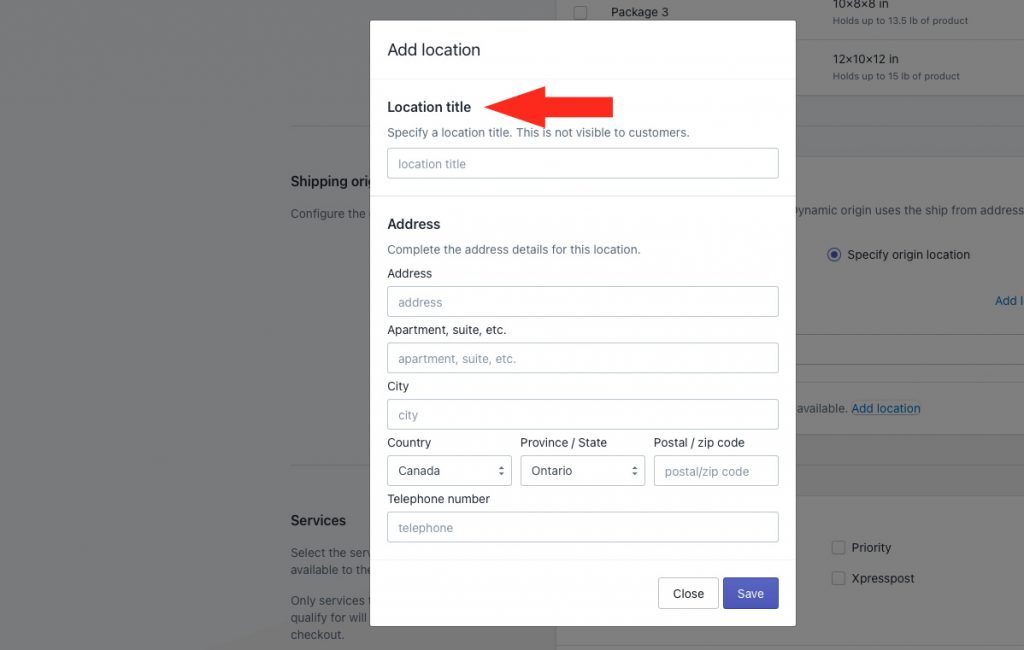
4) Enter the address for your custom ship from location.
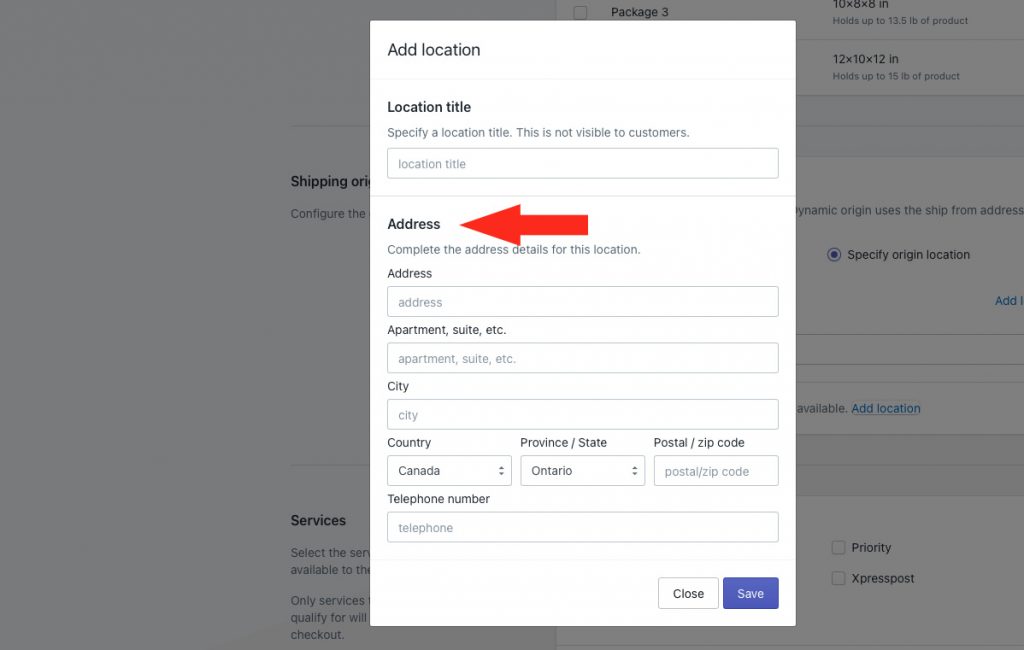
That means you don’t have to fill in every field, such as the postal/zip code field. Some carriers require a complete address in order to accurately calculate live rates.
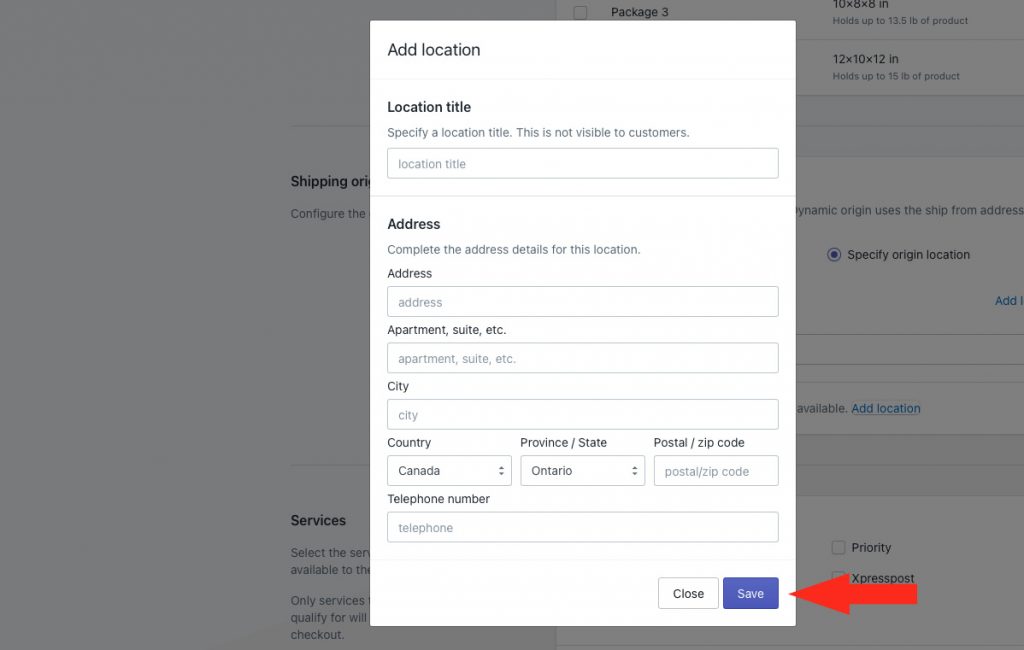
5) Click the Save button.
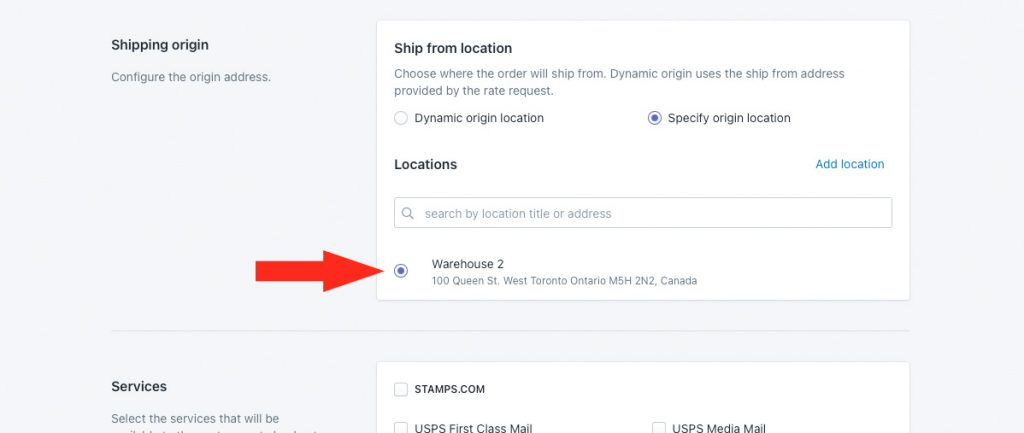
6) Select a location. This location will be used as the starting point for live carrier rate calculations in this shipping method.
Services
Unlike regular parcel service shipping methods, which only list available services for a specific carrier, ShipStation shipping methods let you select any service from any carrier connected to your ShipStation account.
If you notice a carrier or carrier service that is missing, try updating your carrier services or reconnecting ShipStation after saving the shipping method.
1) Select all of the carriers or carrier services you wish to offer to your customers.
Select the carrier name to select all of the services available for that carrier.
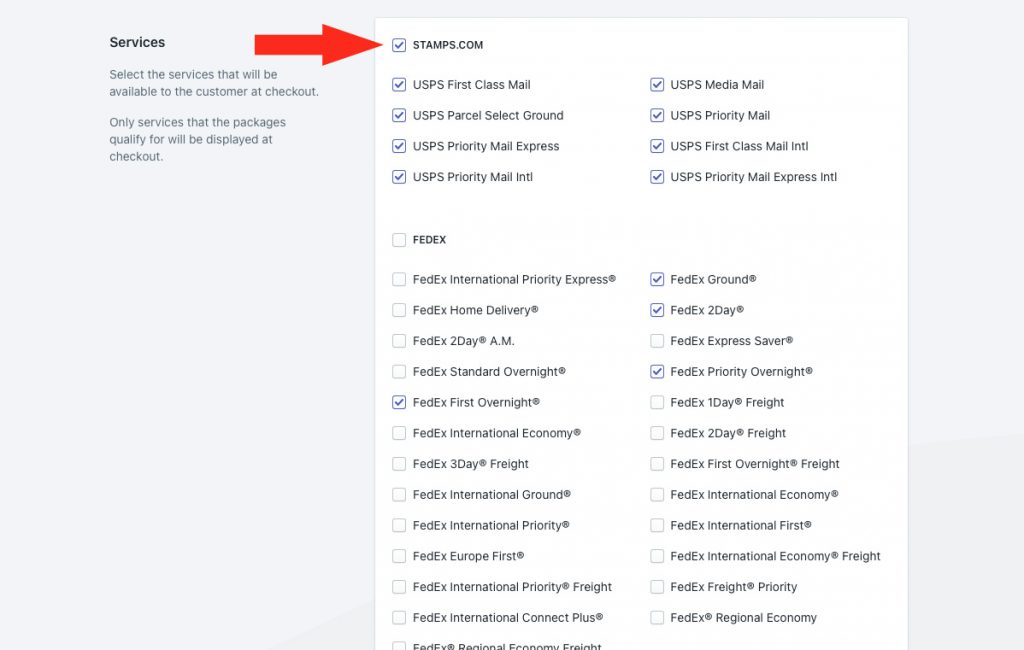
Or, select specific services available for that carrier.
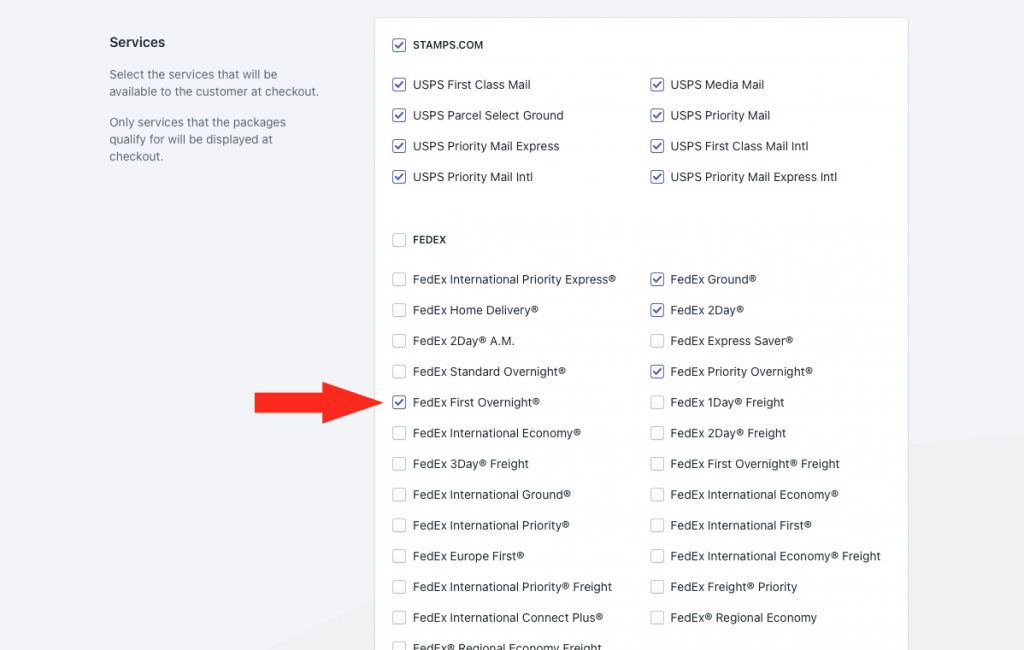
Let’s say you’ve selected FedEx International Priority, FedEx International First, and FedEx International Ground. If a customer lives in a postal code where International First is not offered by Fed Ex, they will only see Priority and Ground services at checkout.
By default, all selected services are displayed at checkout, if available. Each carrier service can be filtered so that only one service is displayed, depending on your preference.
If you want all of the selected services to appear at checkout, skip ahead to Optional Settings. Otherwise, continue to Step 2.
2) Click Show additional service settings.
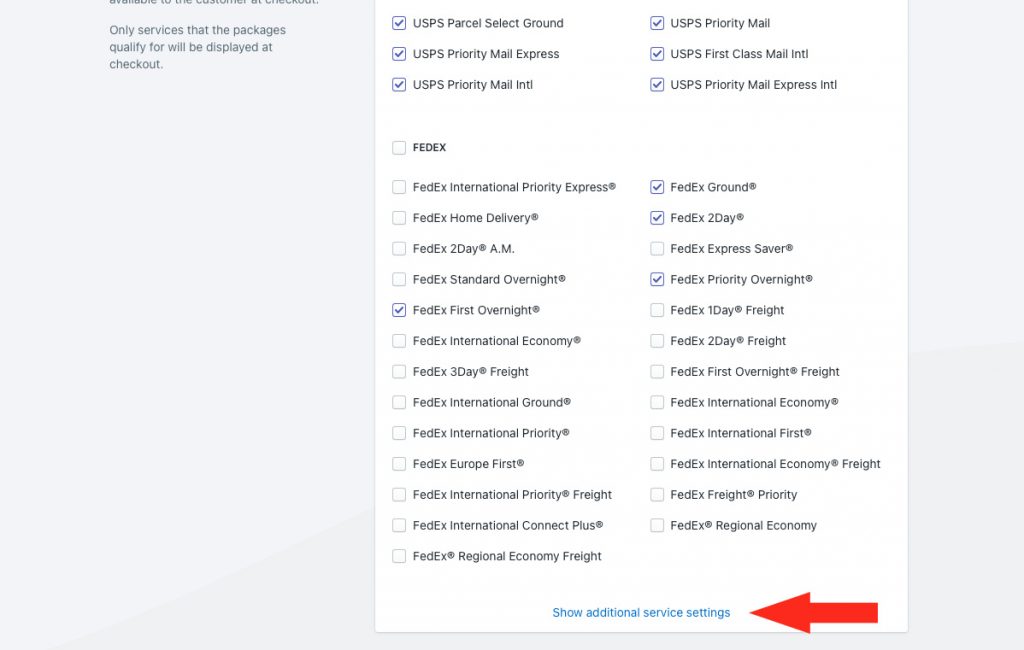
3) Choose how services will be filtered.
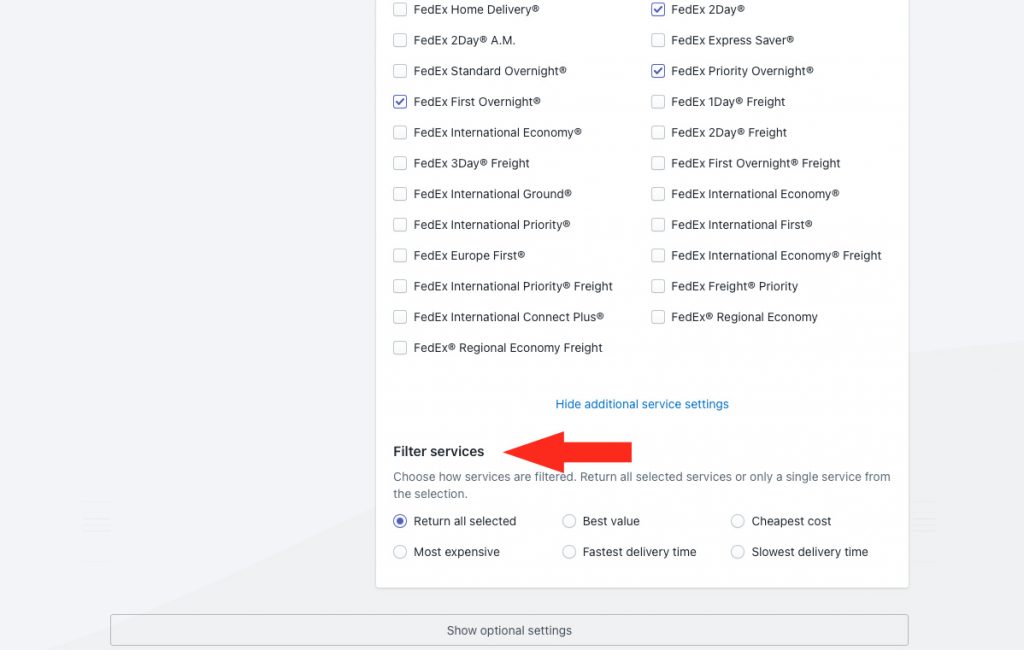
You have six (6) options to choose from:
Return all selected – all available services selected in Step 1 will be displayed to the customer at checkout.
Best value – from the services selected in Step 1, only the available service with the best value will be displayed to the customer at checkout.
Cheapest cost – from the services selected in Step 1, only the available service with the lowest cost will be displayed to the customer at checkout.
Most expensive – from the services selected in Step 1, only the available service with the highest cost will be displayed to the customer at checkout.
Fastest delivery time – from the services selected in Step 1, only the available service with the fastest estimated delivery time will be displayed to the customer at checkout.
Slowest delivery time – from the services selected in Step 1, only the available service with the slowest estimated delivery time will be displayed to the customer at checkout.
Optional Settings
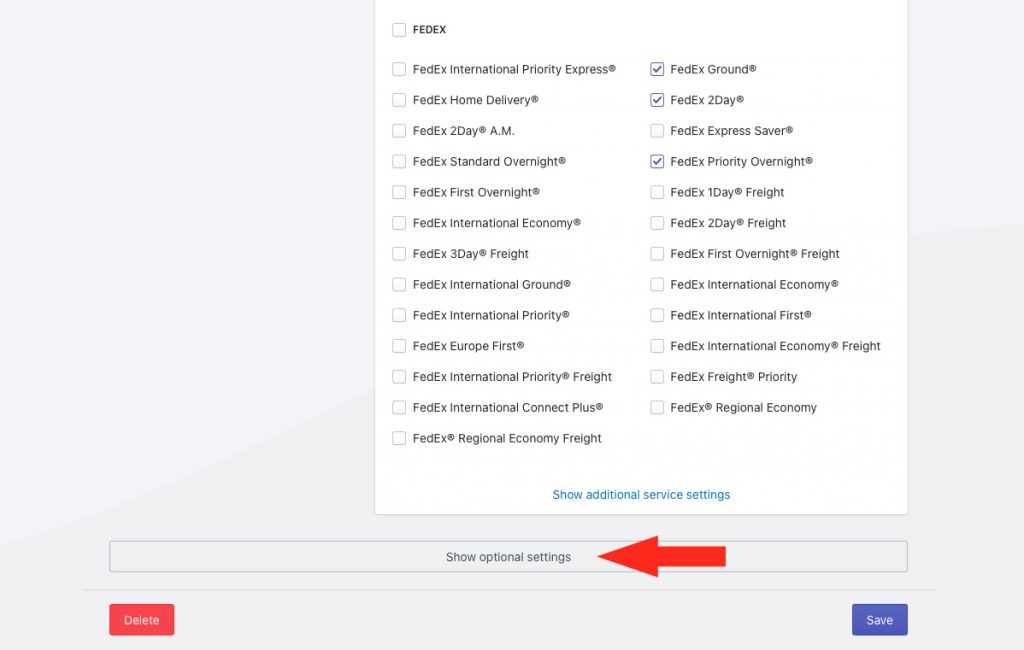
Additional settings are available for each ShipStation shipping method. These settings are optional and not required. If you don’t need to apply any further settings, skip ahead to Save Your Settings.
1) Click Show optional settings, then adjust settings as desired.
Save Your Settings
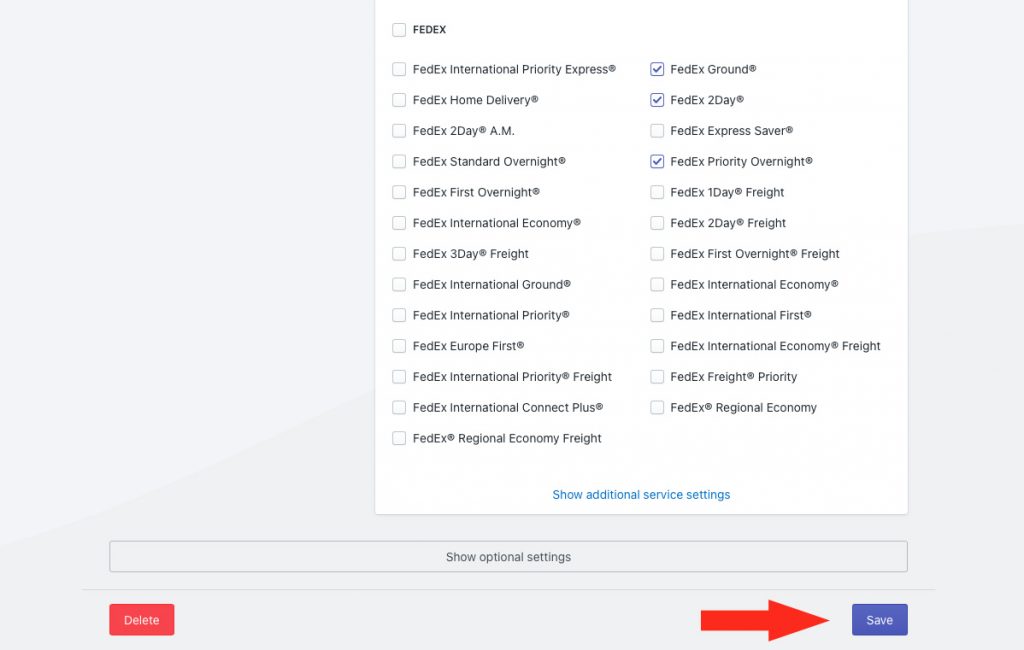
1) Click the Save button at the bottom of the screen to save your ShipStation shipping method.
Edit ShipStation Settings
From time to time, you may need to update the integration with ShipStation. You can select how Intuitive Shipping pushes packing information to your ShipStation account by editing the Delivery Options. And, if you make any changes to the carrier services connected to your ShipStation account, be sure update the carrier services.
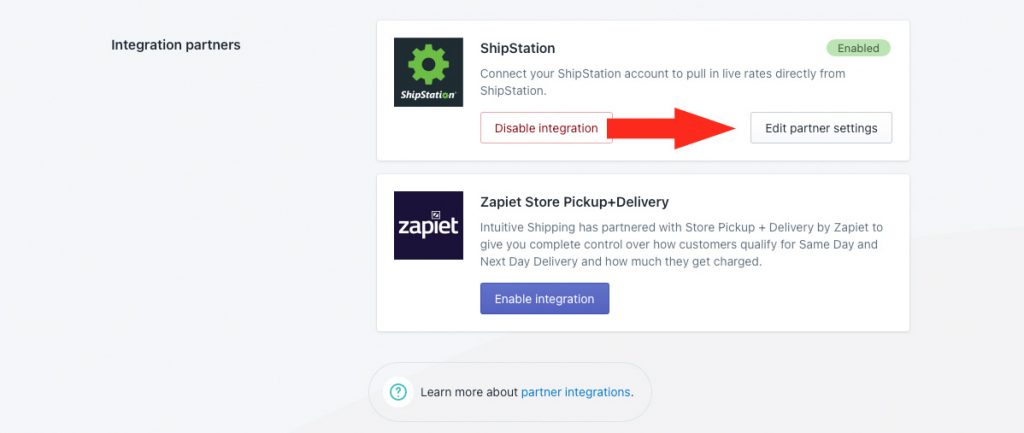
1) Click Partner integrations on the sidebar menu.

2) Click the Edit partner settings button on the ShipStation card.
3) Choose a delivery options setting.
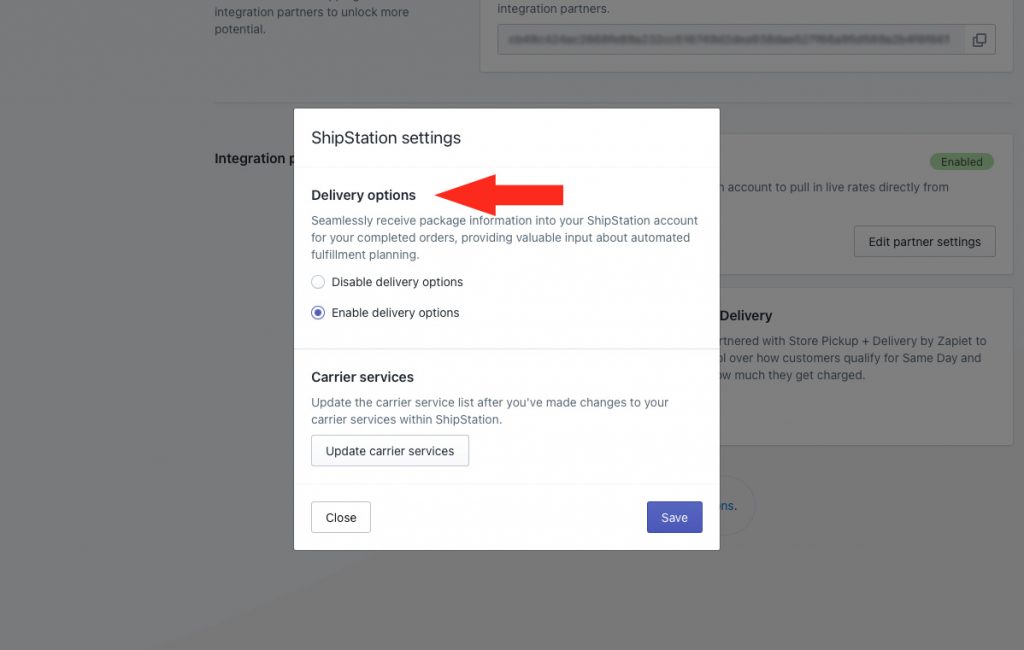
You have two (2) options to choose from:
Disable delivery options – Intuitive Shipping will not push package information from the order to your ShipStation account.
Enable delivery options – Intuitive Shipping will push package information from the order directly to your ShipStation account. This is the default setting.
When enabled, you can review the shipping method selected by your customer from your ShipStation account, then set up the shipping label.
Coming soon: Intuitive Shipping will automatically populate a suggested shipping label, which you can either confirm or change as needed. When this functionality is added, it will be turned on automatically. You won’t need to opt-in or adjust any settings.
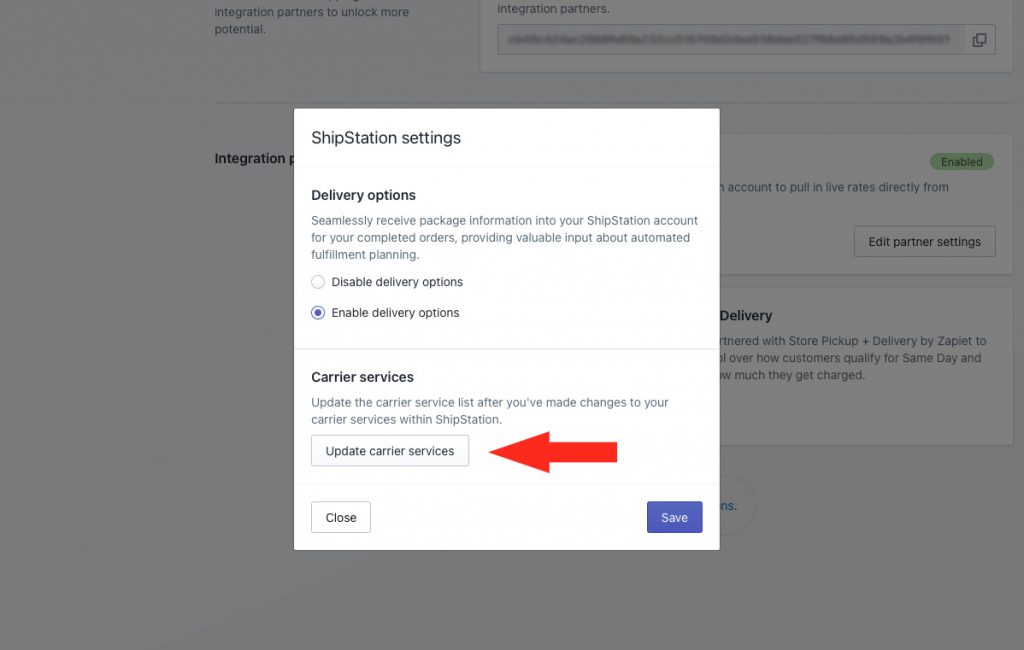
4) If required, click the Update carrier services button.
Any time you add, remove or edit carriers or services linked to your ShipStation account, you will need to update your carriers list in Intuitive Shipping.
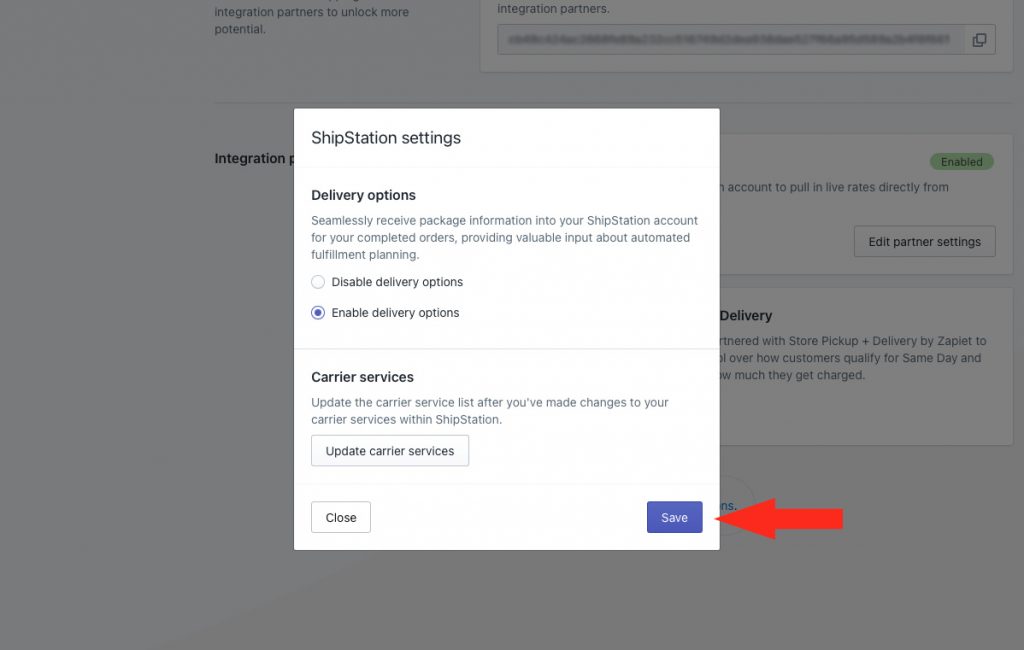
5) If you edited the delivery options setting or updated carrier services, click the Save button to save the changes.
How It Works
The integration with ShipStation requires ShipStation’s New Layout version. If you are still on the legacy version of ShipStation, your account can be connected to Intuitive Shipping, but the integration will not function.
If you’re not sure which version of ShipStation you’re using, look at the URL in your browser while you’re signed into ShipStation. If you’re on the New Layout version, the URL will contain ‘shipX’, where ‘X’ is a set of numbers, typically 2-digit numbers, such as ‘ship11’. If you do not see this in the URL, you are on the Legacy version.
You can switch to the New Layout version by clicking the Try new layout button at the top of the screen in ShipStation.
Intuitive Shipping will calculate live rates from carriers the same way we calculate live rates directly from carriers in other parcel service shipping methods, except that the calls to carriers will be routed through your ShipStation account.
When an order is completed by a customer, Intuitive Shipping will send the package information used for the shipping method selected by the customer to your ShipStation account. Package information includes the package name and dimensions.
If you run into any issues with rates from ShipStation, please contact us or submit a support request from the Support page in the Intuitive Shipping app.
For account issues such as login credentials and carrier options, please contact ShipStation directly.
Disconnect ShipStation
If you need to permanently or temporarily disconnect ShipStation from Intuitive Shipping, you can disable the integration. Any shipping methods currently using ShipStation will no longer work. However, if you decide to reenable the integration in the future, your ShipStation shipping methods will resume working, as long as you haven’t deleted them or made changes to how rates are displayed or calculated.
Disabling and reenabling the integration can also be used as a troubleshooting step if you’re having trouble getting rates from your ShipStation account.
1) Click Settings on the sidebar menu, then selected Partner integrations from the drop-down list.

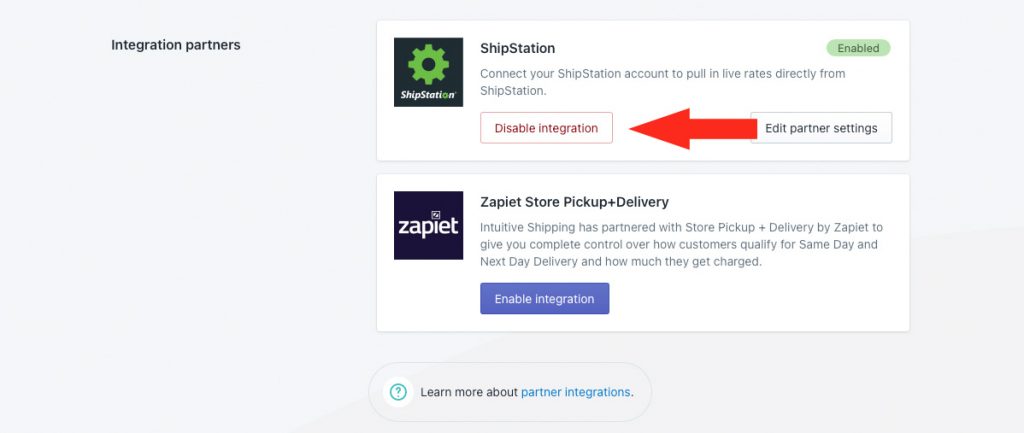
2) Click the Disable integration button on the ShipStation card.
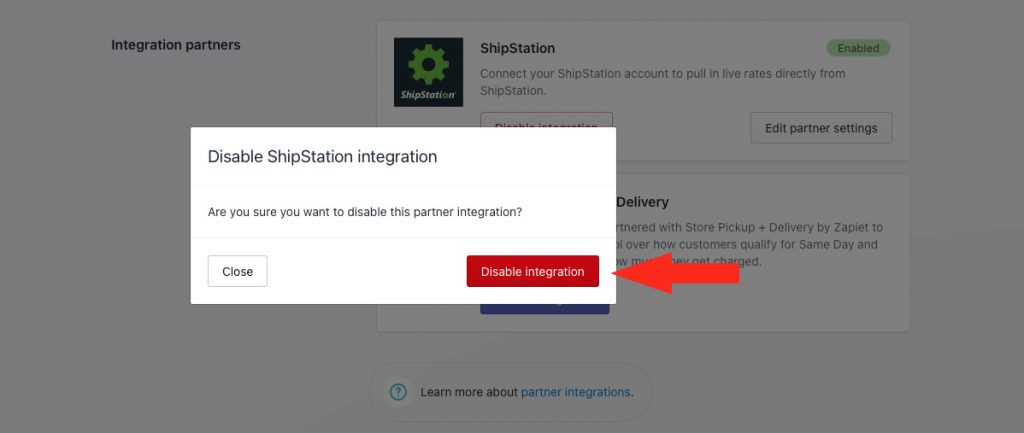
3) Click the Disable integration button on the pop-up box to confirm you wish to proceed.
If you’re troubleshooting, or if you decide at any time to reenable the ShipStation integration, repeat the steps in Connect A ShipStation Account.
API Shipments Store Workaround
There is a temporary issue with the ShipStation integration that causes an ‘Api Shipments’ store to be created on your ShipStation account. This issue is resulting in ‘ghost orders’ being created from abandoned carts during the shipping rate lookup, and may not correspond to actual completed orders.
Intuitive Shipping is working closely with ShipStation to resolve this issue quickly. In the meantime, there are two possible workarounds until a permanent fix is rolled out. These workaround will help you to ignore the ghost orders.
Both fixes can be done from within ShipStation.
Follow this guide provided by ShipStation, or follow the steps below.
Option 1 – Rename the ‘Api Shipments’ Store
1) Click the gear icon in the top right corner of ShipStation.
2) Click Selling Channels on the sidebar menu, then select Store Setup from the drop-down list.
3) Under the Store Setup column, click Edit in the row for ‘Api Shipments’.
4) Rename ‘Api Shipments’ to something else lower alphabetically, like ‘ZZApi Shipments’. This will cause the store to appear at the bottom of lists.
Option 2 – Filter the ‘Api Shipments’ store from Orders Grid
1) Click Orders on the ShipStation menu.
2) Click Awaiting Shipment on the sidebar menu.
3) Click Store on the ‘Filter By’ options.
4) Select all stores other than ‘Api Shipment’
5) If desired, click Shipments on the ShipStation menu, then repeat Steps 2 to 4.
