Harness the power of Intuitive Shipping to create a series of prioritized, tiered Shipping Scenarios.
Let’s say you have three special product groups, each with its own flat rate and all of which take priority over general rates. You can create multiple Shipping Scenarios to ensure that the correct rate is always displayed no matter what’s in the cart.
For this example, we’ll use Product Tags to identify our special product groups and general weight-based rates for our remaining products. We’ll tag the product group with the highest flat rate as ‘Large’, we’ll tag the group with the next highest flat rate as ‘Medium, and we’ll tag the group with the lowest flat rate as ‘Small’. However, you can use Conditions that look for any product identifier, such as ‘Name’, ‘Collection’ or ‘Vendor’.
This setup guide is useful if you want to charge a tiered, single flat shipping rate for special products regardless of what other products are in the cart. For example, if a customer orders a product tagged ‘Large’, a product tagged ‘Small’ and a general product, only the rate associated with the ‘Large’ product will be displayed at checkout.
Add The Highest Priority Shipping Scenario
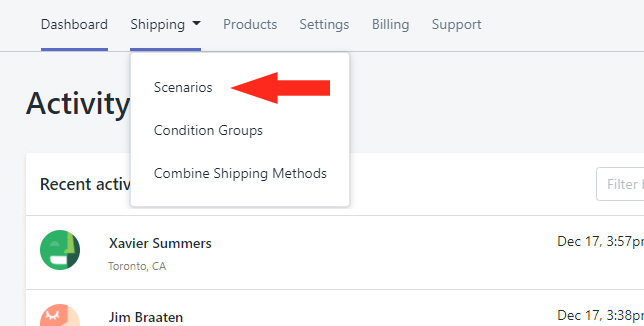
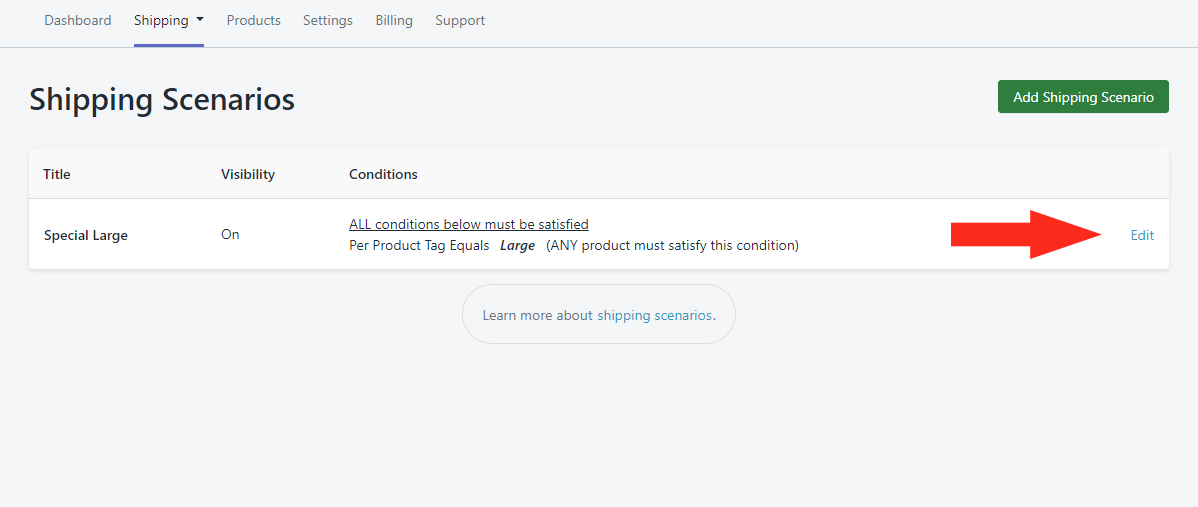
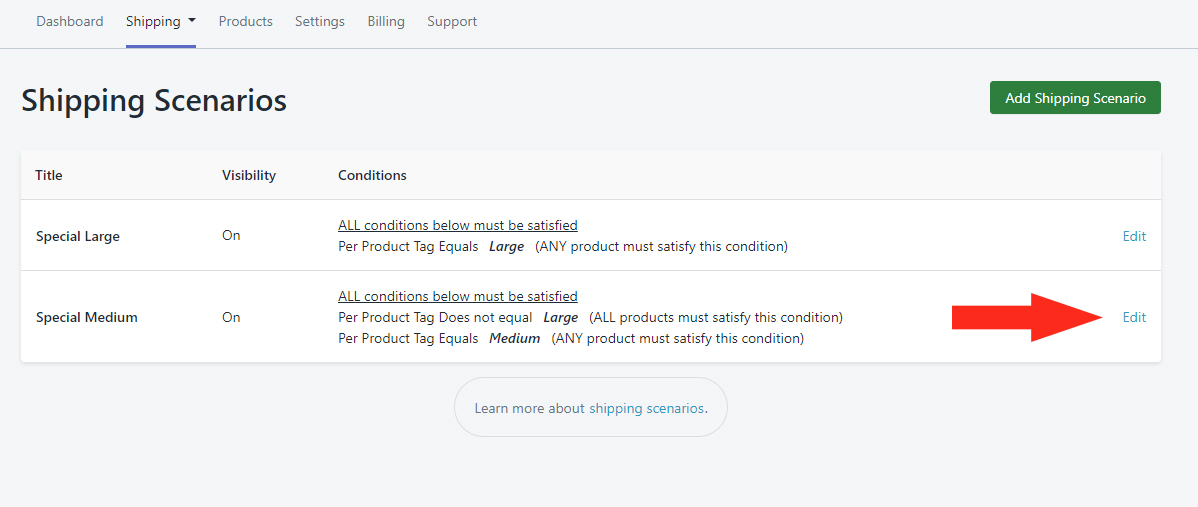
1) Click Shipping on the main menu, then select Scenarios from the drop-down list.
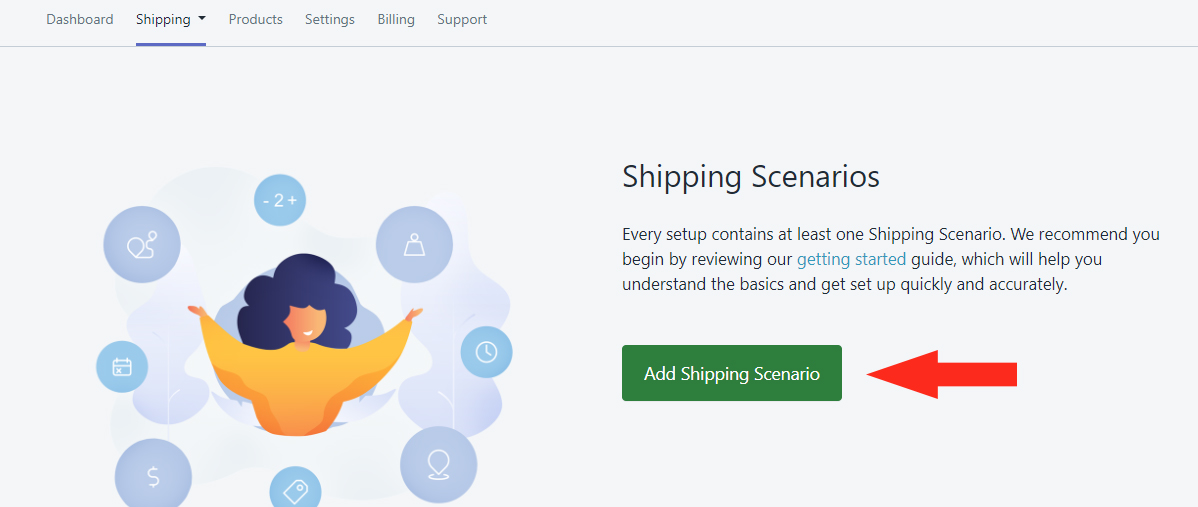
2) Click the Add Shipping Scenario button.
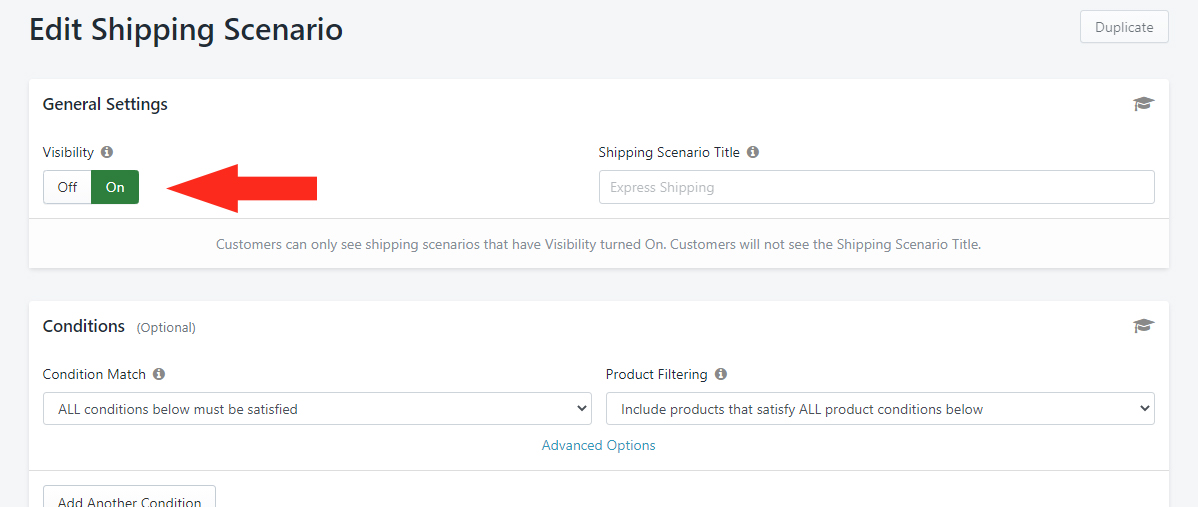
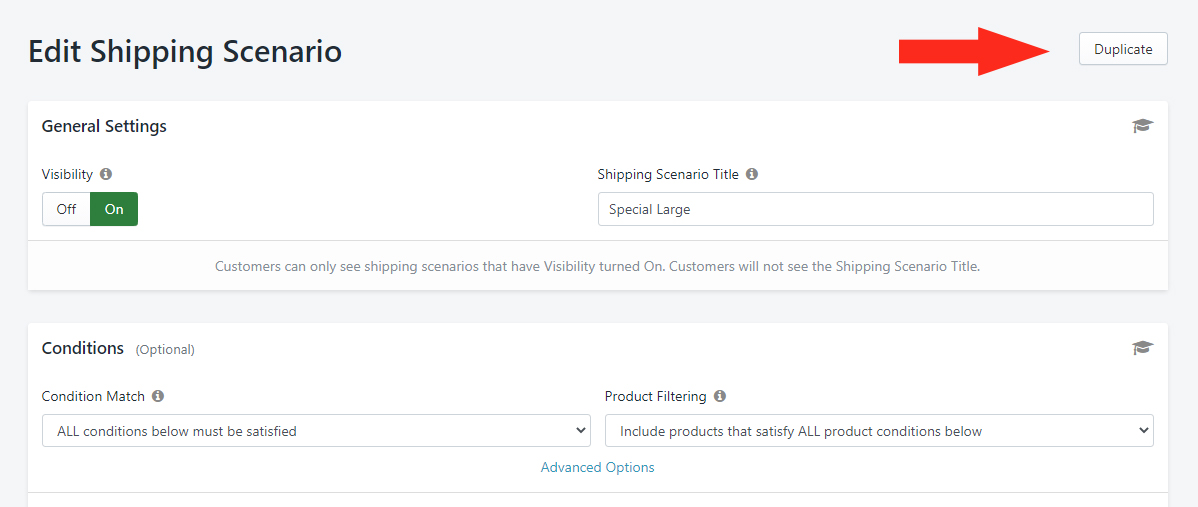
3) Set Visibility to On.
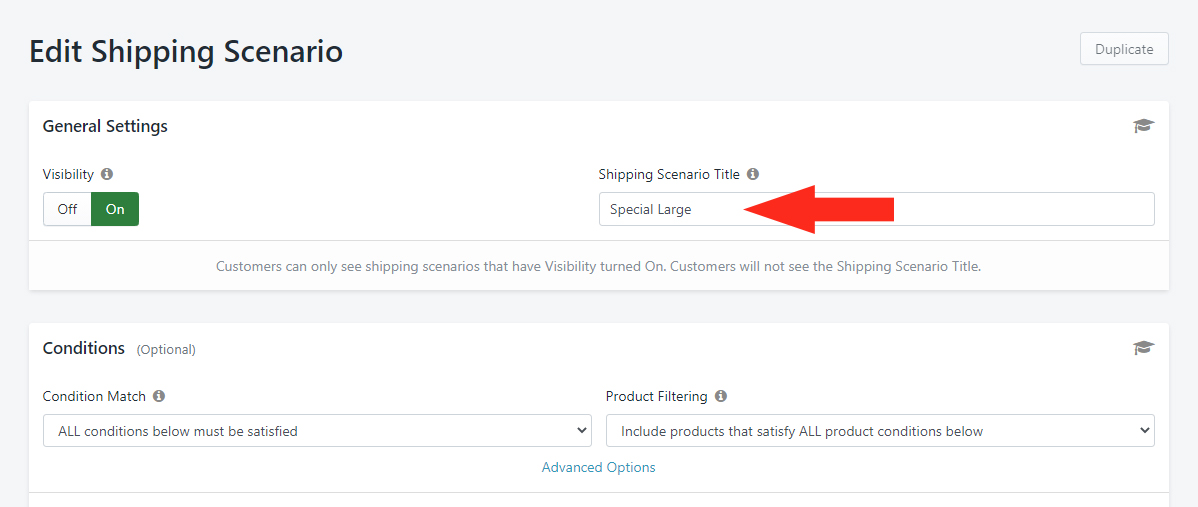
4) Enter a Title for your Shipping Scenario – e.g. ‘Special Large’.
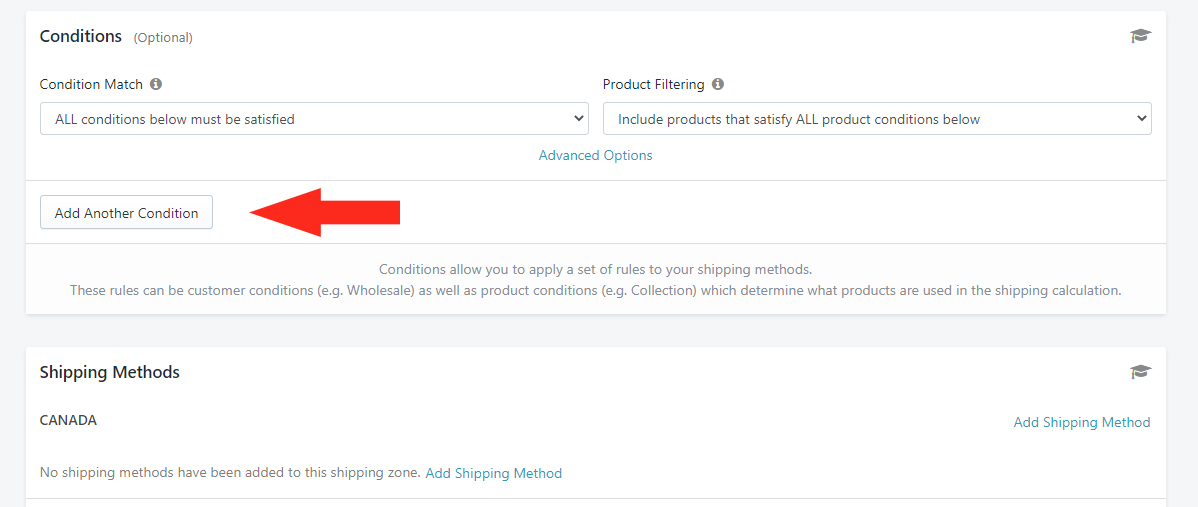
Set The Priority Condition
1) Leave the settings under Condition Match, Product Filtering, and Advanced Options on their Default settings.
2) Click the Add Another Condition button.
For this example, we’ll set the Condition based on a Product Tag. You can set the Condition based on other product criteria if desired.
3) Click the Condition field, then select Tag from the Per Product Conditions group.
4) Set the Condition logic to Equals.
5) Enter the Value as the Tag name you assigned to your highest priority products – e.g. ‘Large’.
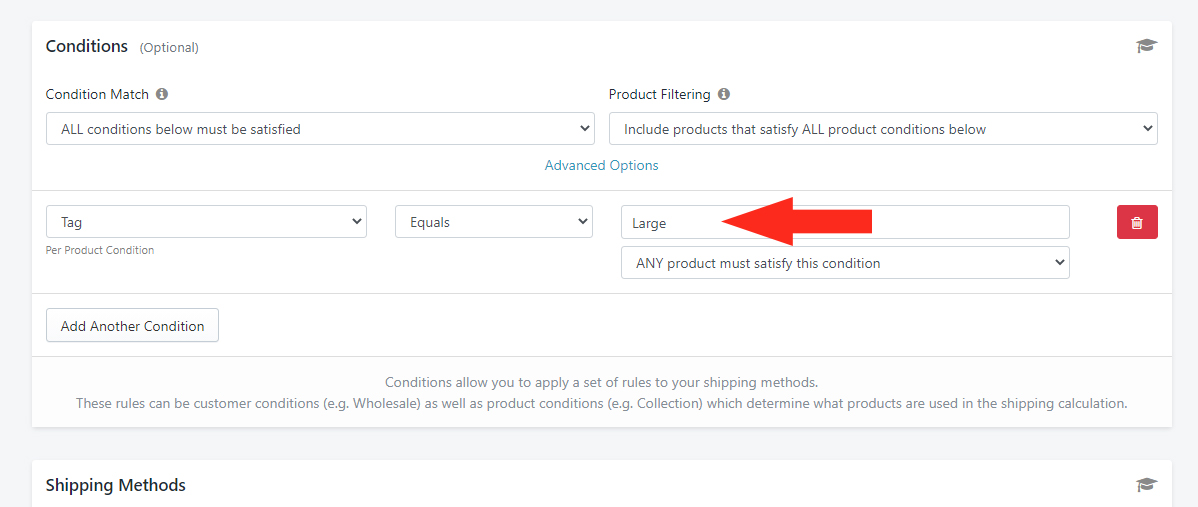
6) Leave the setting below the Tag value set to ‘ANY product must satisfy this condition’. This will ensure that the Large product flat rate Shipping Method is displayed at checkout as long as there is at least one product in the cart tagged ‘Large’.
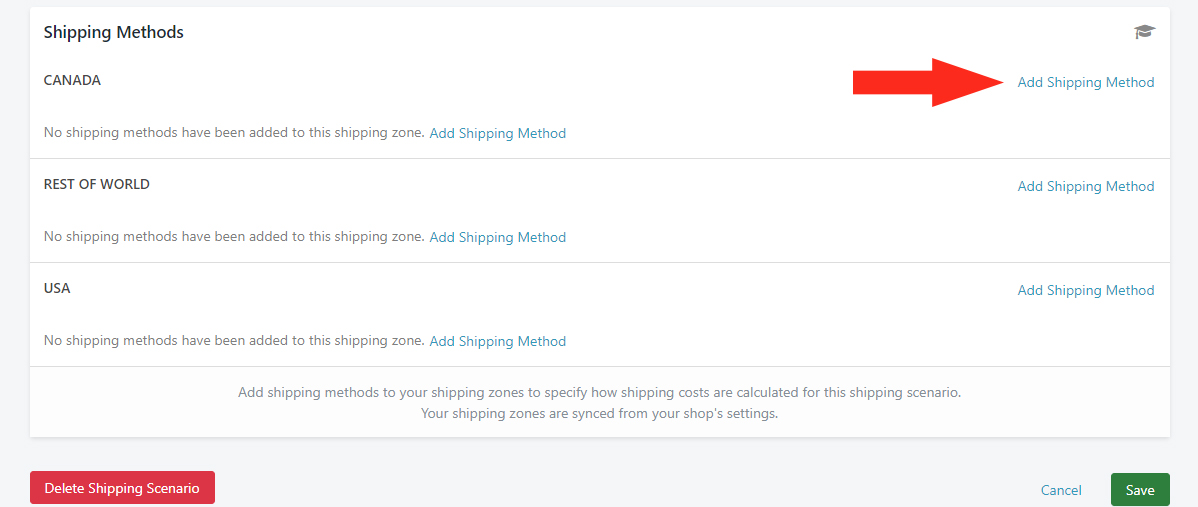
Add A Shipping Method
1) In the Shipping Methods section, click Add Shipping Method beside a Shipping Zone.
2) Add a Title for your Shipping Method – e.g. ‘[Carrier Name] Flat Rate’.
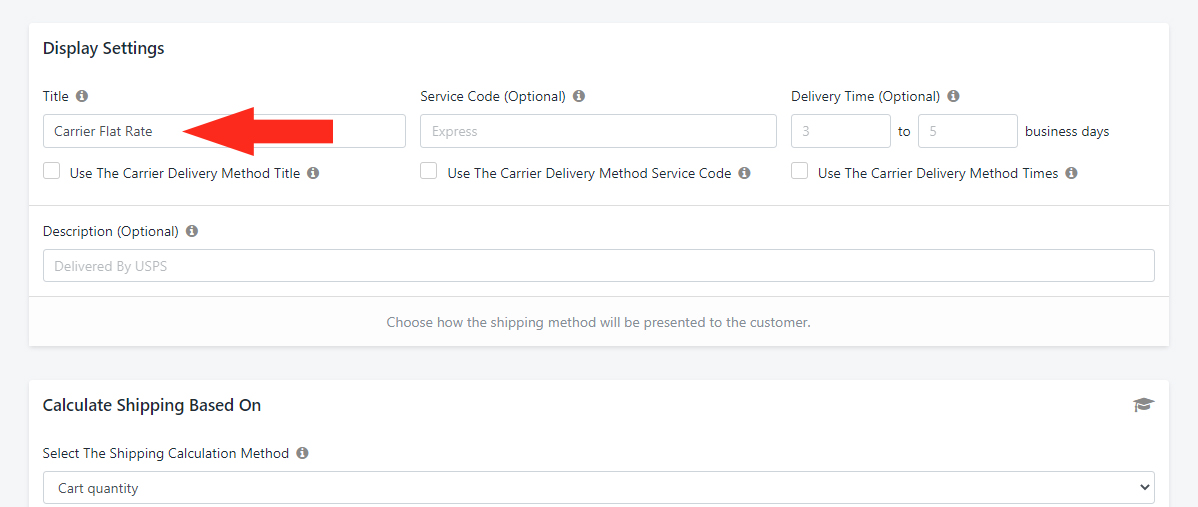
3) If desired, enter a custom delivery time or range under Delivery Time (Optional).
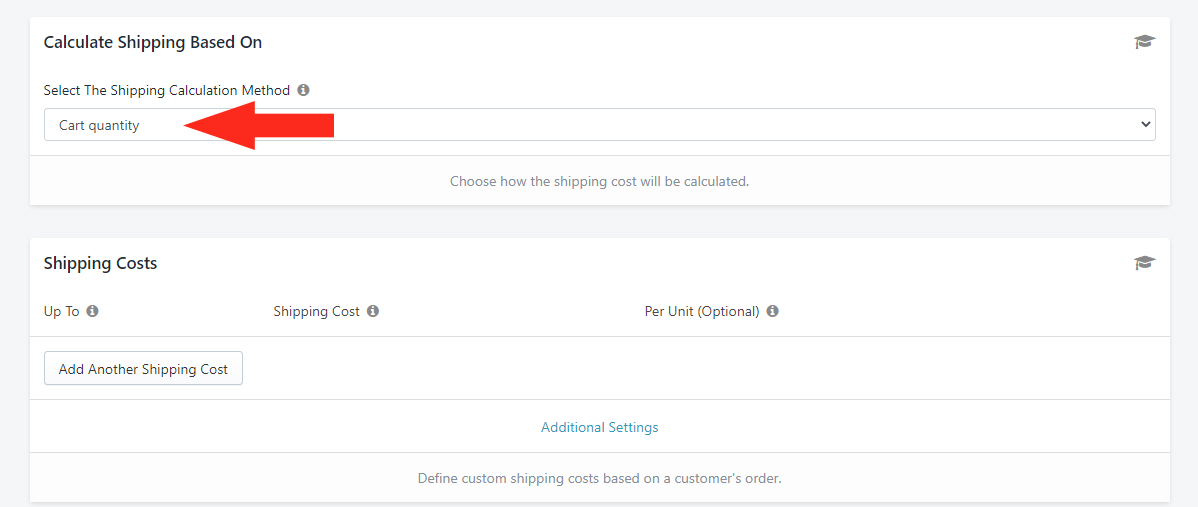
Select The Shipping Calculation Method
1) In the Calculate Shipping Based On section, leave ‘Select The Shipping Calculation Method’ on Cart quantity. This is the default setting.
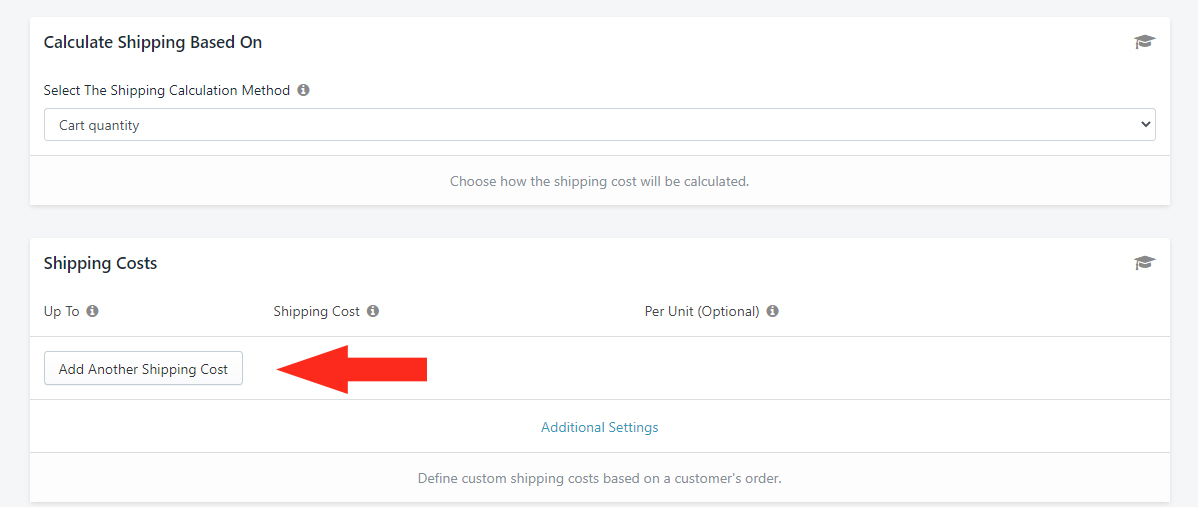
Enter The Shipping Cost
1) In the Shipping Costs section, click the Add Another Shipping Cost button.
2) Enter the Up To limit as the ~ tilde symbol.
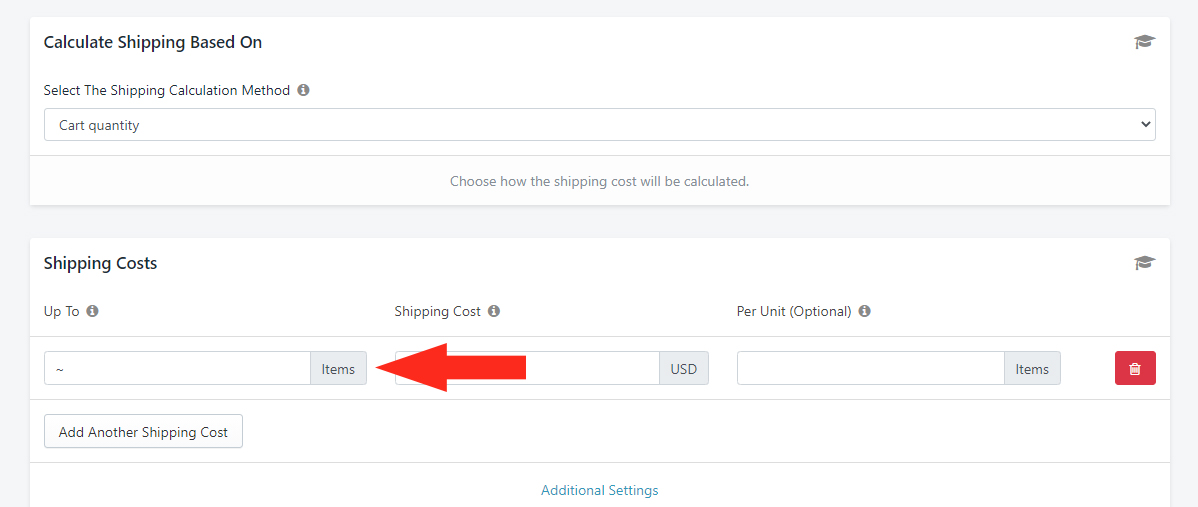
3) Enter the Shipping Cost. For this example, we’ll use ‘80.00’ – i.e. $80.00.

4) Leave the Per Unit (Optional) setting blank.
Additional Settings are not required for this setup.
Save Your Tier 1 Shipping Method
Click the Save button to save your Shipping Method!
Add The Second Highest Priority Shipping Scenario
To simplify the process, you can make a Duplicate of your highest priority Scenario, then make minor adjustments to the Condition and Shipping Method, rather than creating a new Scenario from scratch.
If you’re still on the Edit Shipping Scenario screen from setting up your first Scenario, skip ahead to Step 3. Otherwise, begin at Step 1.
1) Click Shipping on the main menu, then select Scenarios from the drop-down list.
2) Click Edit beside your highest priority Scenario.
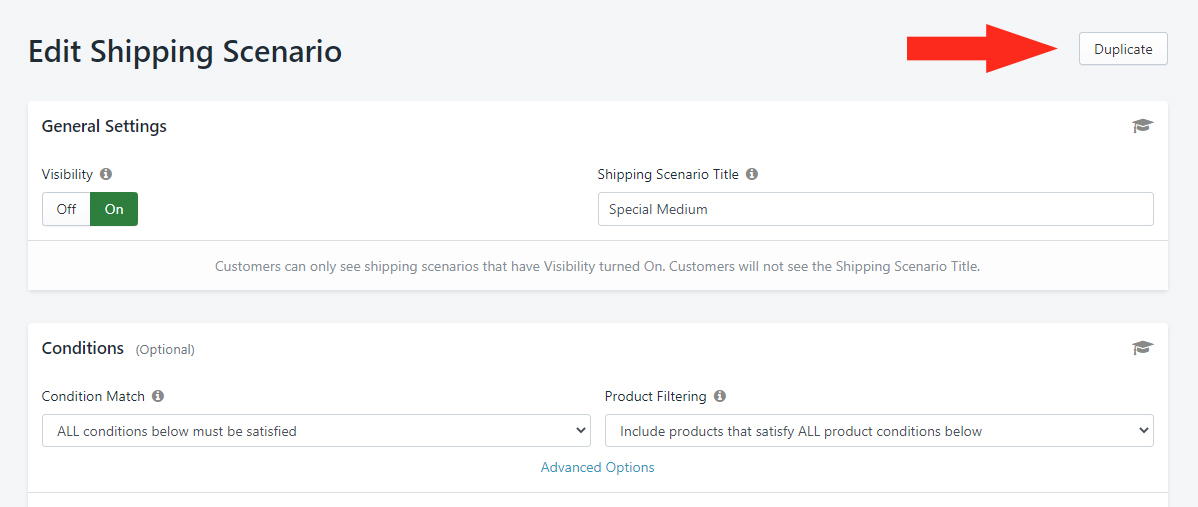
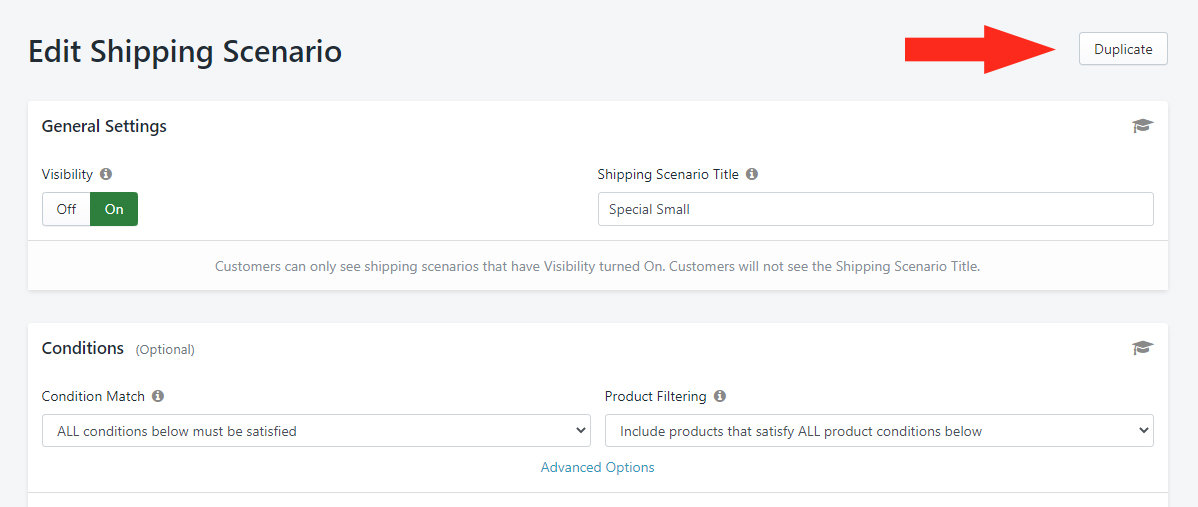
3) Click the Duplicate button in the top right. This will create an exact copy of the original Scenario, including the Shipping Method.
4) Confirm Visibility is set to On.
5) Change the Shipping Scenario Title from ‘Copy of [whatever you titled the first Scenario]’ to whatever you want to title your second-highest priority Scenario – e.g. ‘Special Medium’.
Set The Priority Conditions
1) Leave the settings under Condition Match, Product Filtering, and Advanced Options on their Default settings.
2) Leave the Condition type set to Tag from the Per Product Conditions group.
For this example, we’ll keep the Conditions based on a Product Tag to be consistent with the first Scenario. No matter what type of Condition you used in your highest priority Scenario, leave it as-is.
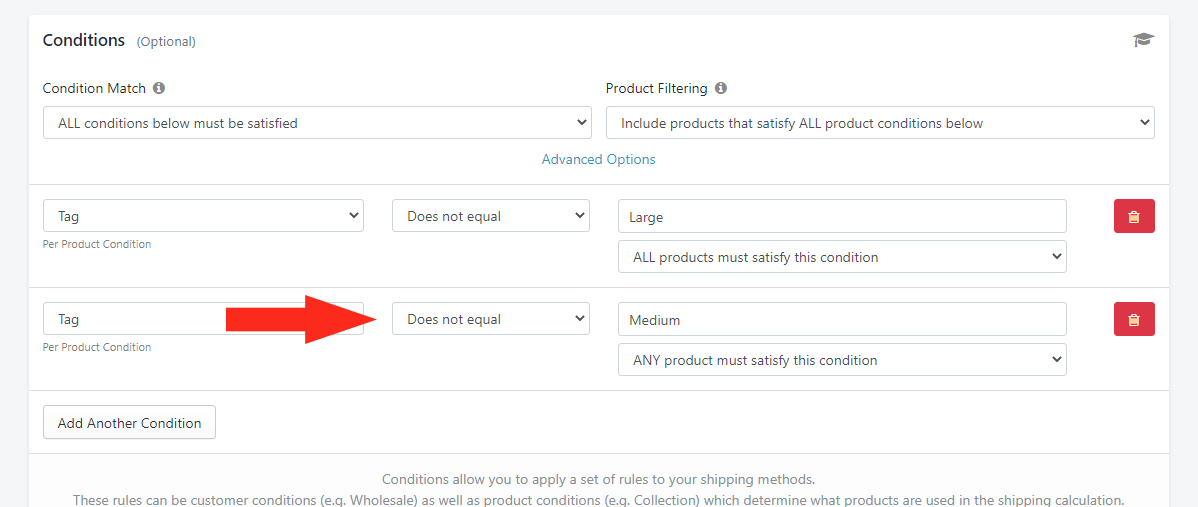
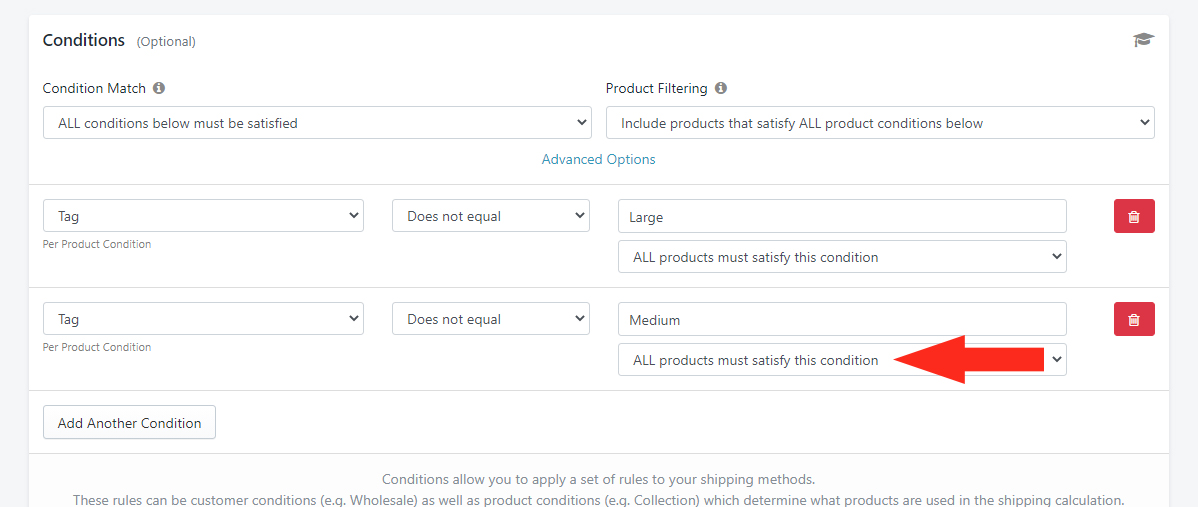
3) Change the Condition logic to Does not equal.
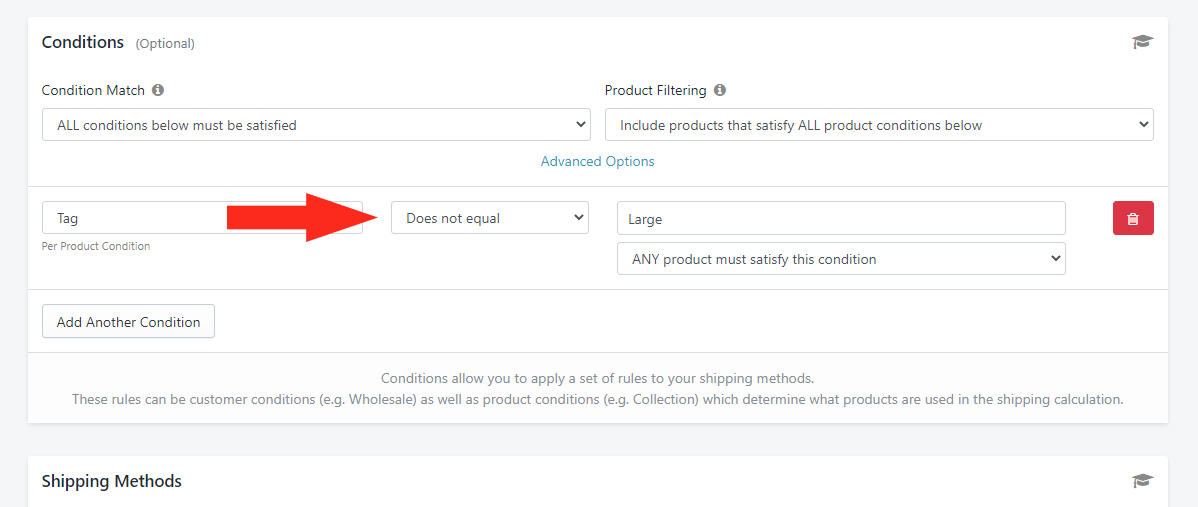
4) Leave the Value as whatever Tag name you assigned to your highest priority products – e.g. ‘Large’.
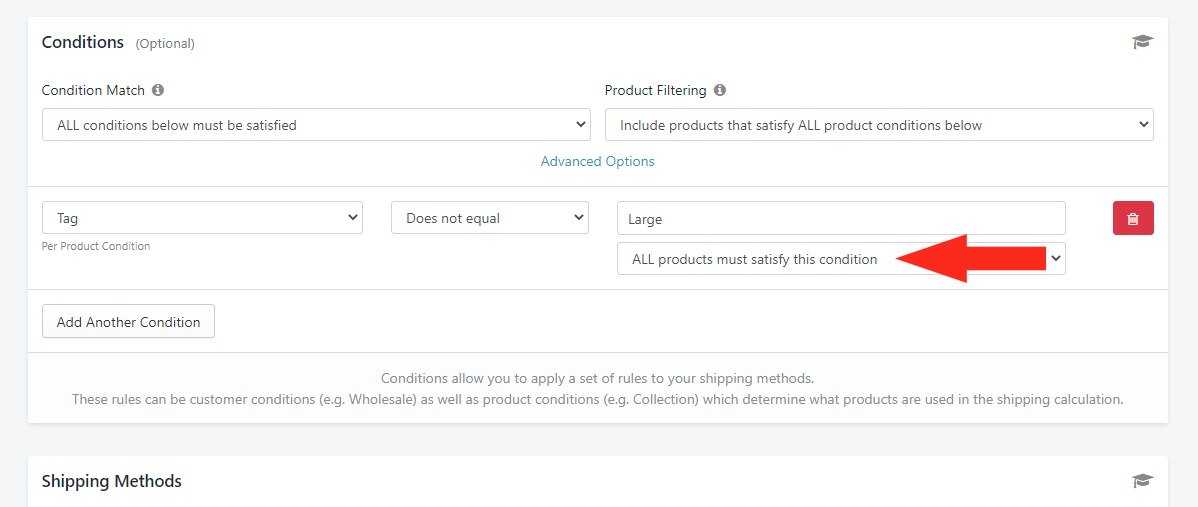
5) Change the setting below the Tag value to ‘ALL products must satisfy this condition’. This will ensure that the Medium product flat rate Shipping Method is displayed at checkout as long as there are no products in the cart tagged ‘Large’.
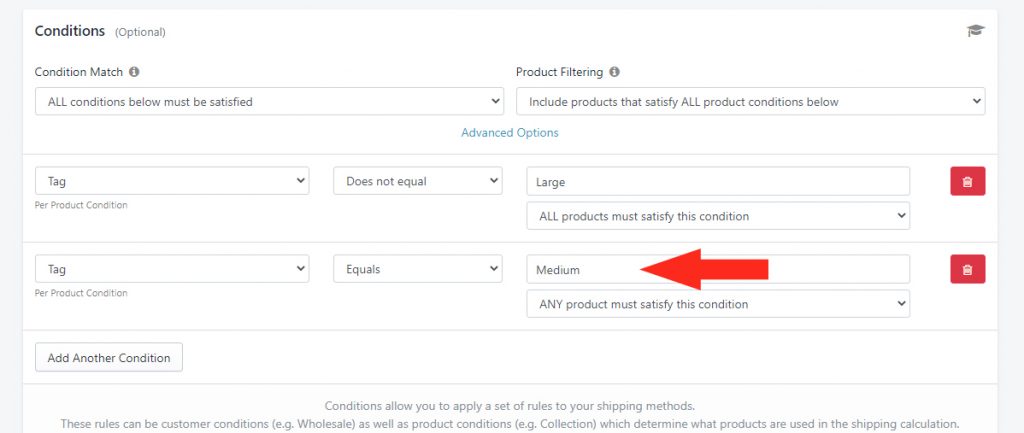
6) Click the Add Another Condition button.
For this example, we’ll also set the additional Condition based on a Product Tag. You can set the Condition based on other product criteria if desired.
7) Click the Condition field, then select Tag from the Per Product Conditions group.
8) Set the Condition logic to Equals.
9) Enter the Value as the Tag name you assigned to your second-highest priority products – e.g. ‘Medium’.
10) Leave the setting below the Tag value set to ‘ANY product must satisfy this condition’. This will ensure that the Medium product flat rate Shipping Method is displayed at checkout as long as there is at least one product in the cart tagged ‘Medium’.
Save Your Settings
Click the Save button!
Edit Shipping Method
When you created a Duplicate of the highest priority Scenario, it included an exact copy of the Shipping Method you added to it.
For your second-highest priority Scenario, you will need to edit the Shipping Method that was copied from your first Scenario.
1) Click Edit beside the Shipping Method.

2) If you want the tier 2 Shipping Method to have the same title, leave the title as-is. Or, change it if desired.
3) If desired, add or edit any other Display Settings.
4) In the Calculate Shipping Based On section, leave ‘Select The Shipping Calculation Method’ on Cart quantity.
5) In the Shipping Costs section, change the Shipping Cost. For this example, we’ll change it to ‘50.00’ – i.e. $50.00.

Save Your Tier 2 Shipping Method
Click the Save button to save your Shipping Method!
Add The Third Highest Priority Shipping Scenario
To again simplify the process, you can make a Duplicate of your second-highest priority Scenario, then make minor adjustments to the Conditions and Shipping Method, rather than creating a new Scenario from scratch.
If you’re still on the Edit Shipping Scenario screen from setting up your second Scenario, skip ahead to Step 3. Otherwise, begin at Step 1.
1) Click Shipping on the main menu, then select Scenarios from the drop-down list.
2) Click Edit beside your second-highest priority Scenario.
3) Click the Duplicate button in the top right. This will create an exact copy of the Scenario, including the Shipping Method.
4) Confirm Visibility is set to On.
5) Change the Shipping Scenario Title from ‘Copy of [whatever you titled the second Scenario]’ to whatever you want to title your third-highest priority Scenario – e.g. ‘Special Small’.
Set The Priority Conditions
1) Leave the settings under Condition Match, Product Filtering, and Advanced Options on their Default settings.
2) Leave the first Condition as-is.
3) Leave the second Condition type set to Tag from the Per Product Conditions group.
For this example, we’ll keep all the Conditions based on a Product Tag to be consistent with the first and second Scenarios.
4) Change the Condition logic to Does not equal.
5) Leave the Value as whatever Tag name you assigned to your second-highest priority products – e.g. ‘Medium’.
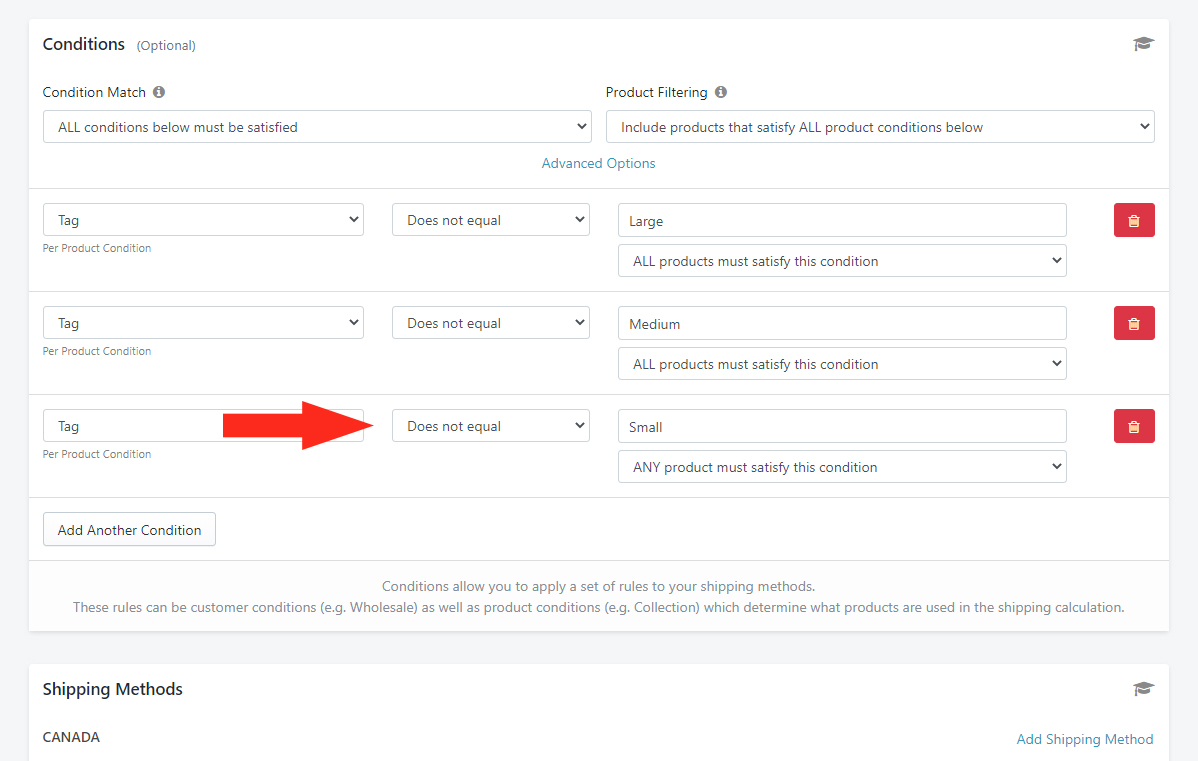
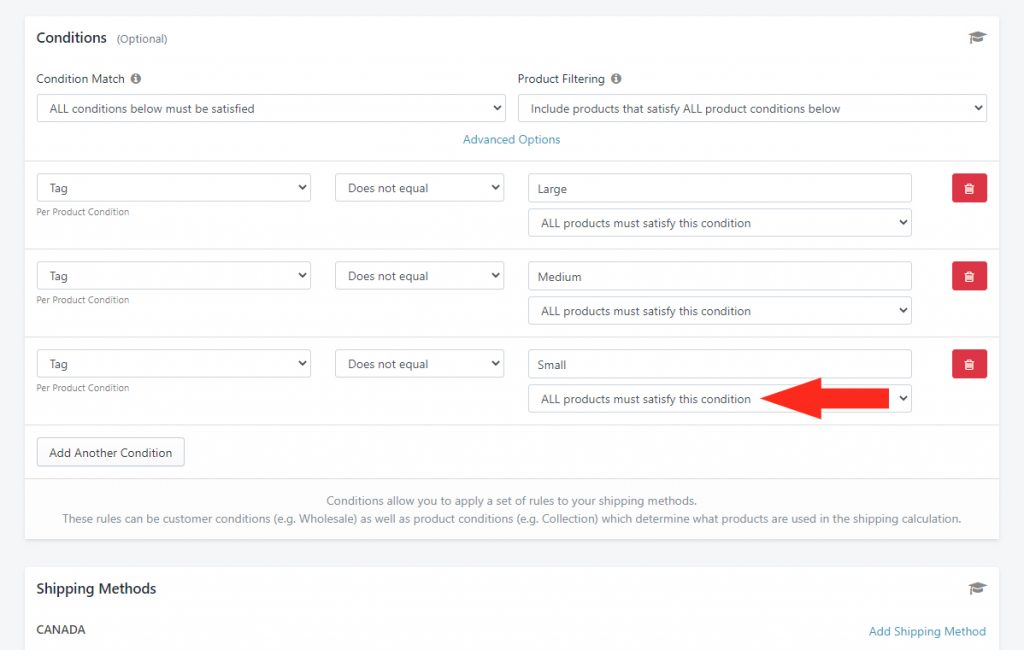
6) Change the setting below the Tag value to ‘ALL products must satisfy this condition’. This will ensure that the Small product flat rate Shipping Method is displayed at checkout as long as there are no products in the cart tagged ‘Medium’.
7) Click the Add Another Condition.
For this example, we’ll also set the additional Condition based on a Product Tag. You can set the Condition based on other product criteria if desired.
8) Click the Condition field, then select Tag from the Per Product Conditions group.
9) Set the Condition logic to Equals.
10) Enter the Value as the Tag name you assigned to your third-highest priority products – e.g. ‘Small’.
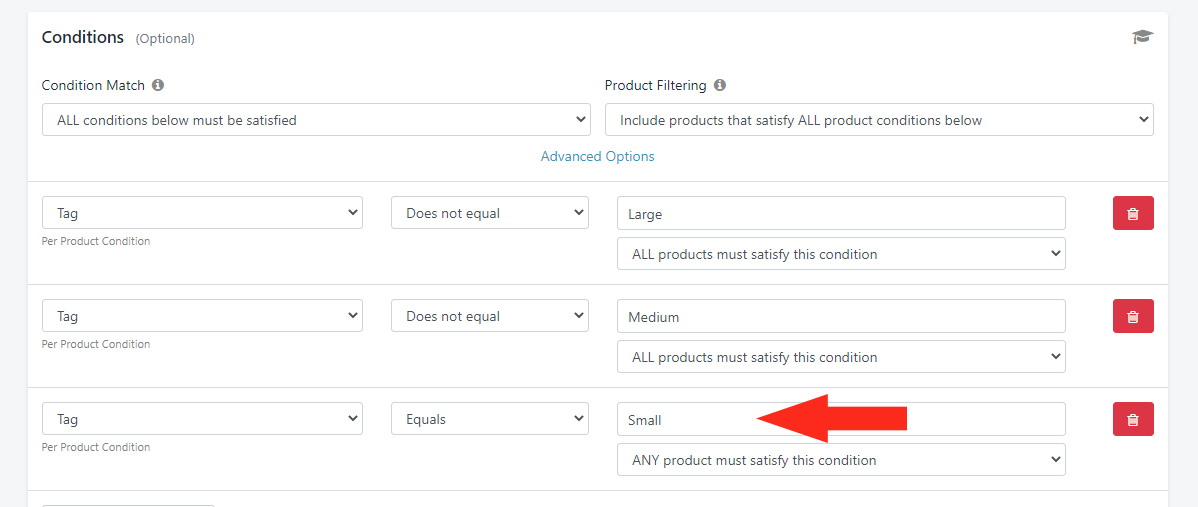
11) Leave the setting below the Tag value set to ‘ANY product must satisfy this condition’. This will ensure that the Small product flat rate Shipping Method is displayed at checkout as long as there is at least one product in the cart tagged ‘Small’.
Save Your Settings
Click the Save button!
Edit Shipping Method
When you created a Duplicate of the second-highest priority Scenario, it included an exact copy of the Shipping Method added to it.
For your third-highest priority Scenario, you will again need to edit the Shipping Method that was copied from your second Scenario.
1) Click Edit beside the Shipping Method.
2) If you want the tier 3 Shipping Method to have the same title, leave the title as-is. Or, change it if desired.
3) If desired, add or edit any other Display Settings.
4) In the Calculate Shipping Based On section, leave ‘Select The Shipping Calculation Method’ on Cart quantity.
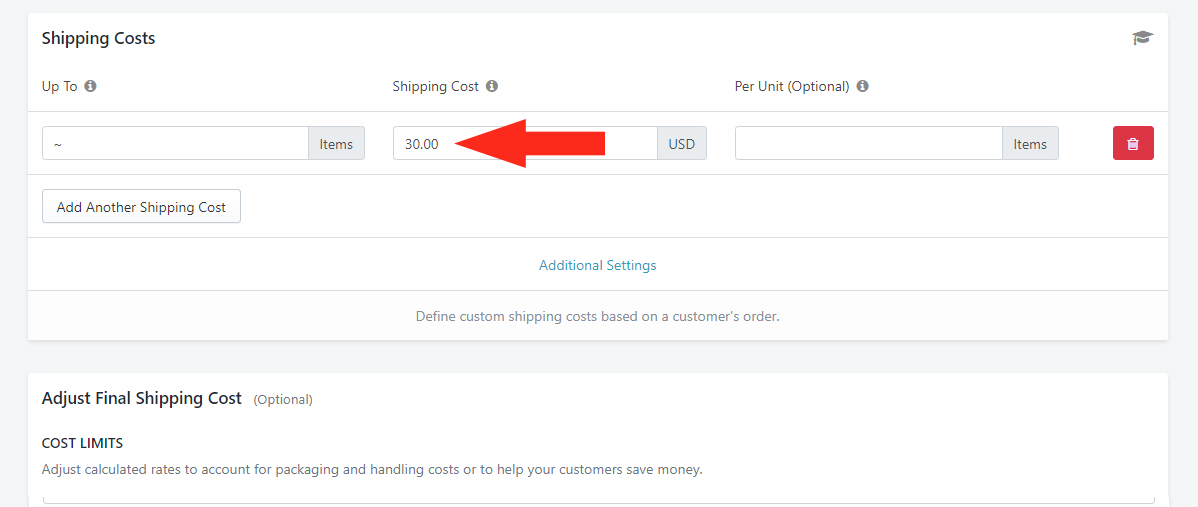
5) In the Shipping Costs section, change the Shipping Cost. For this example, we’ll change it to ‘30.00’ – i.e. $30.00.
Save Your Tier 3 Shipping Method
Click the Save button to save your Shipping Method!
Add The General Shipping Scenario
To again simplify the process, you can make a Duplicate of your third-highest priority Scenario, then make minor adjustments to the Conditions and Shipping Method, rather than creating a new Scenario from scratch.
If you’re still on the Edit Shipping Scenario screen from setting up your third Scenario, skip ahead to Step 3. Otherwise, begin at Step 1.
1) Click Shipping on the main menu, then select Scenarios from the drop-down list.
2) Click Edit beside your third-highest priority Scenario.
3) Click the Duplicate button in the top right. This will create an exact copy of the original Scenario, including the Shipping Method.
4) Confirm Visibility is set to On.
5) Change the Shipping Scenario Title from ‘Copy of [whatever you titled the third Scenario]’ to whatever you want to title your lowest-priority Scenario – e.g. ‘General’.
Set The Conditions
1) Leave the settings under Condition Match, Product Filtering, and Advanced Options on their Default settings.
2) Leave both the first and second Conditions as-is.
3) Leave the third Condition type set to Tag from the Per Product Conditions group.
For this example, we’ll keep all the Conditions based on a Product Tag to be consistent with the first, second and third Scenarios.
4) Change the Condition logic to Does not equal.
5) Leave the Value as whatever Tag name you assigned to your third-highest priority products – e.g. ‘Small’.
6) Change the setting below the Tag value to ‘ALL products must satisfy this condition’. This will ensure that the General rates Shipping Method is displayed at checkout as long as there are no products in the cart tagged ‘Small’.
No other Conditions are required.
Save Your Settings
Click the Save button!
Edit Shipping Method
When you created a Duplicate of the third-highest priority Scenario, it included an exact copy of the Shipping Method added to it.
For your lowest priority Scenario, you will again need to edit the Shipping Method that was copied from your third Scenario.
1) Click Edit beside the Shipping Method.
2) Change the Title of your Shipping Method – e.g. ‘Standard Shipping’
3) If desired, add or edit any other Display Settings.
For this example, we’ll create a weight-based rate table for any products that are not in one of the three ‘Special’ groups. You can calculate shipping based on any criteria, including Live Rates.
4) In the Calculate Shipping Based On section, change ‘Select The Shipping Calculation Method’ to Cart weight.
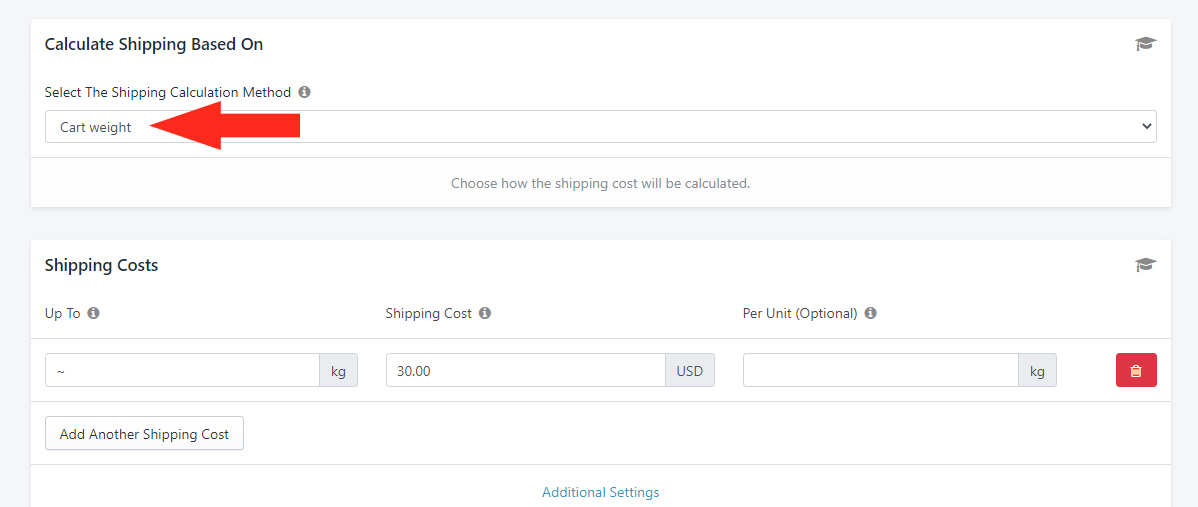
In the Shipping Costs section, you’ll see that the Up To limit and Shipping Cost from your tier 3 Shipping Method are still there, but the unit of measure for Up To has changed from ‘Items’ to your weight unit. For this example, we’ll use kilograms (kg) to calculate weight-based shipping costs.
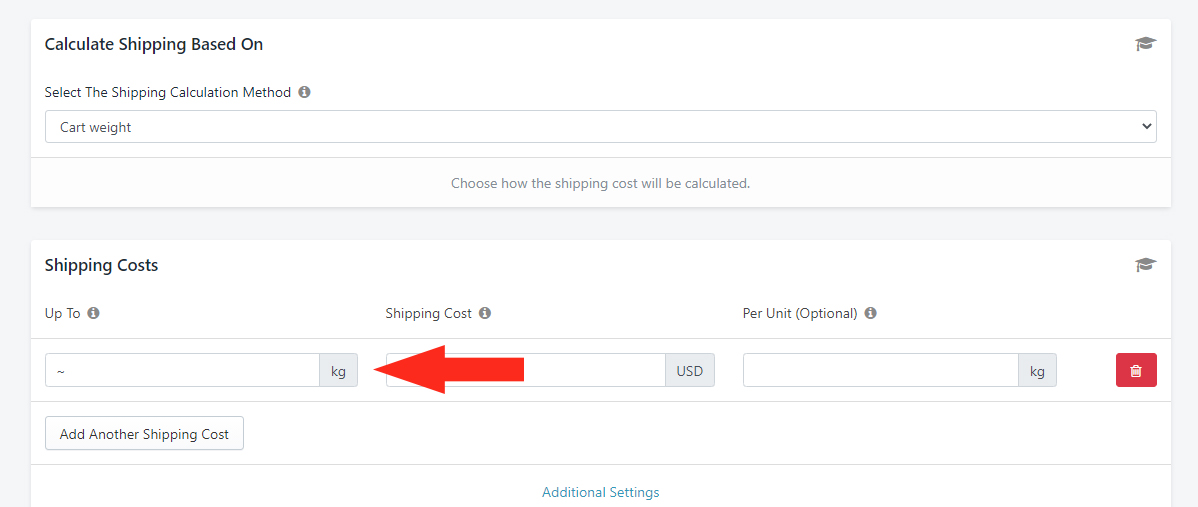
5) Under Up To, change the ~ tilde symbol to the maximum weight for your lowest weight-based rate. For this example, we’ll use 5 – i.e. 5 kg.
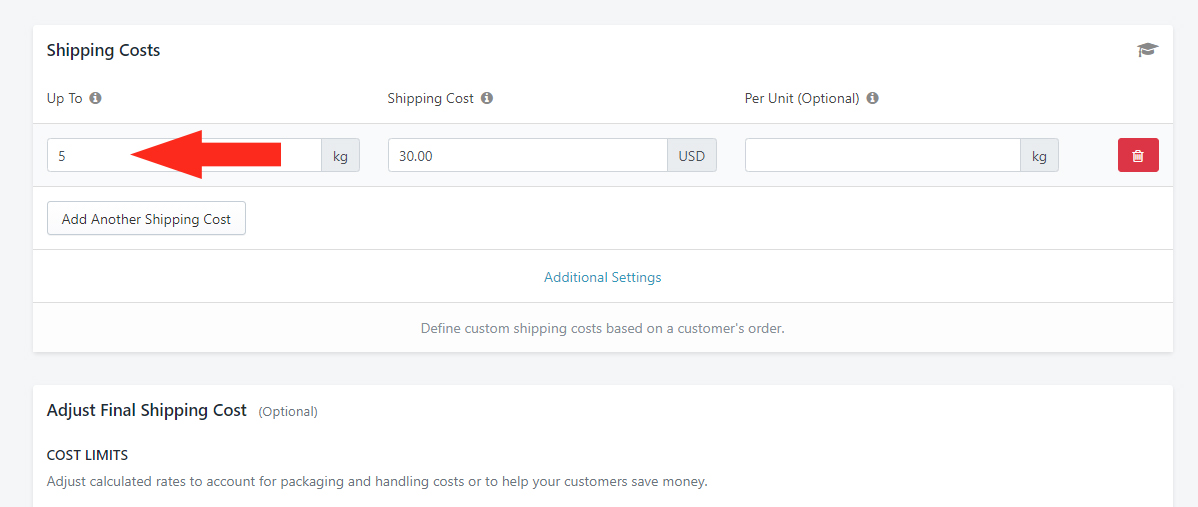
6) Under Shipping Cost, change ‘30.00’ to the cost of your lowest weight-based rate. For this example, we’ll use 10.00 – i.e. $10.00.
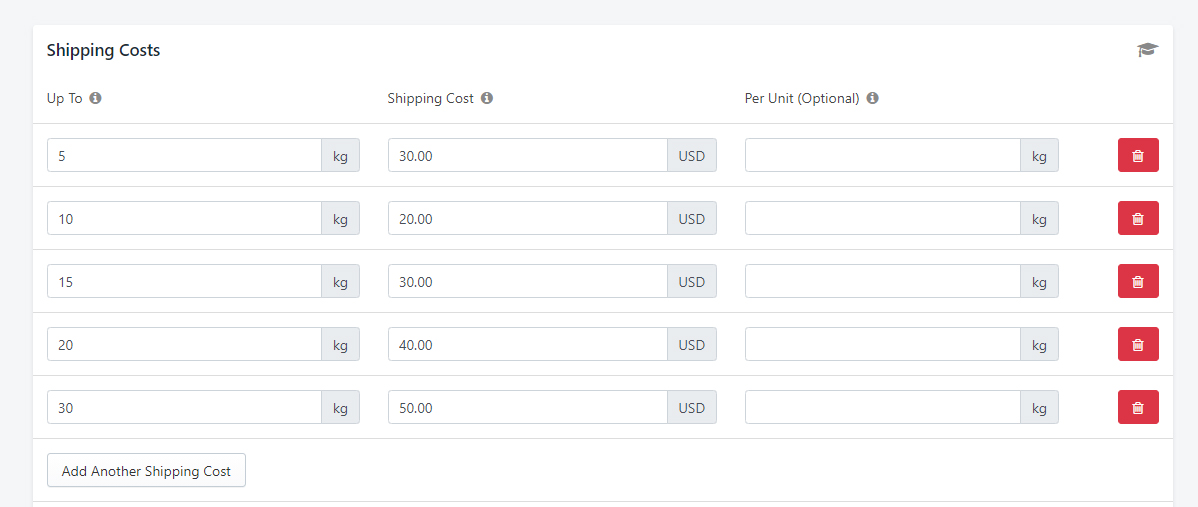
7) To add more weight-based rates, click the Add Another Shipping Cost button and repeat the above two steps for each additional rate. For this example, we have five weight limits ranging from ‘up to 5 kg’ to ‘up to 30 kg’, with Shipping Costs ranging from $10.00 to $50.00.
When there are no ‘Special’ items in the cart – i.e. no items tagged ‘Large’, ‘Medium’ or ‘Small, the shipping cost displayed at checkout will be based on the total weight of the cart.
For example, a customer with an entire cart weight of 8 kg will pay $30.00 for shipping. A customer with an entire cart weight of 22 kg will pay $50.00 for shipping.
For example, a customer with a cart weight of 34 kg will not get a shipping cost a checkout because 34 kg exceeds the Up To limit of your highest shipping cost (30 kg).
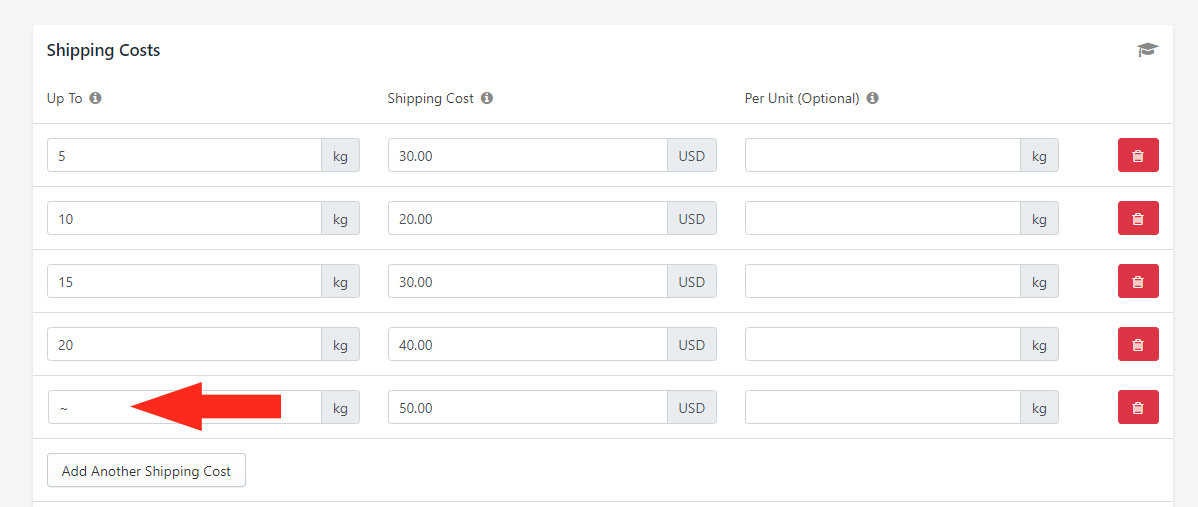
8) If you want to charge $50.00 for any weight higher than 20 kg, change ’30’ to the ~ tilde symbol. In this case, a customer with a cart weight of 34 kg – or any cart weight greater than 20 kg – (with no ‘Special’ products) will pay $50.00 for shipping.
Additional Settings are not required for this setup.
9) Leave all Optional settings blank or on their default setting.
Save Your General Weight-Based Shipping Method
Click the Save button to save your Shipping Method!
Save Your Settings
After saving your weight-based Shipping Method, you’ll be returned to the Edit Shipping Scenario screen.
1) Click the Save button!
Review Your Settings
1) Click Shipping on the main menu, then select Scenarios from the drop-down list.
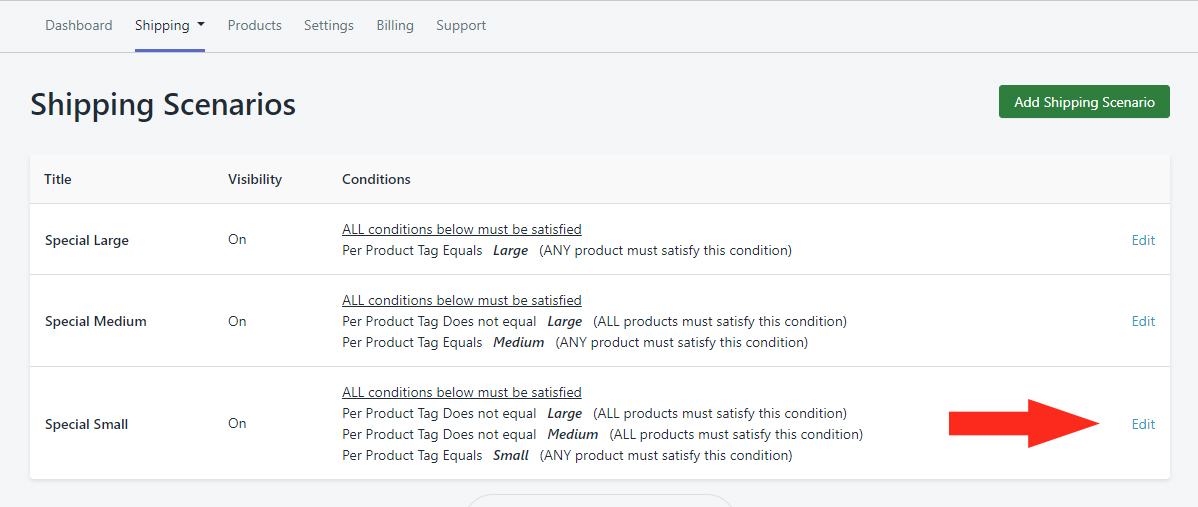
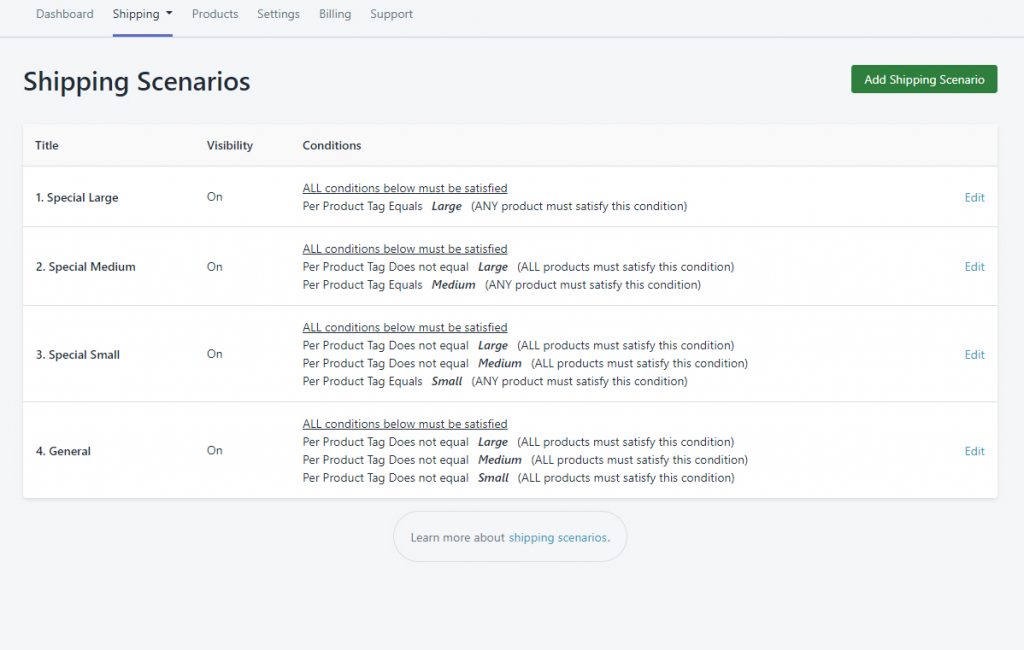
2) Review your Shipping Scenarios. For this example, you should have four (4) Scenarios – General, Special Large, Special Medium, and Special Small.
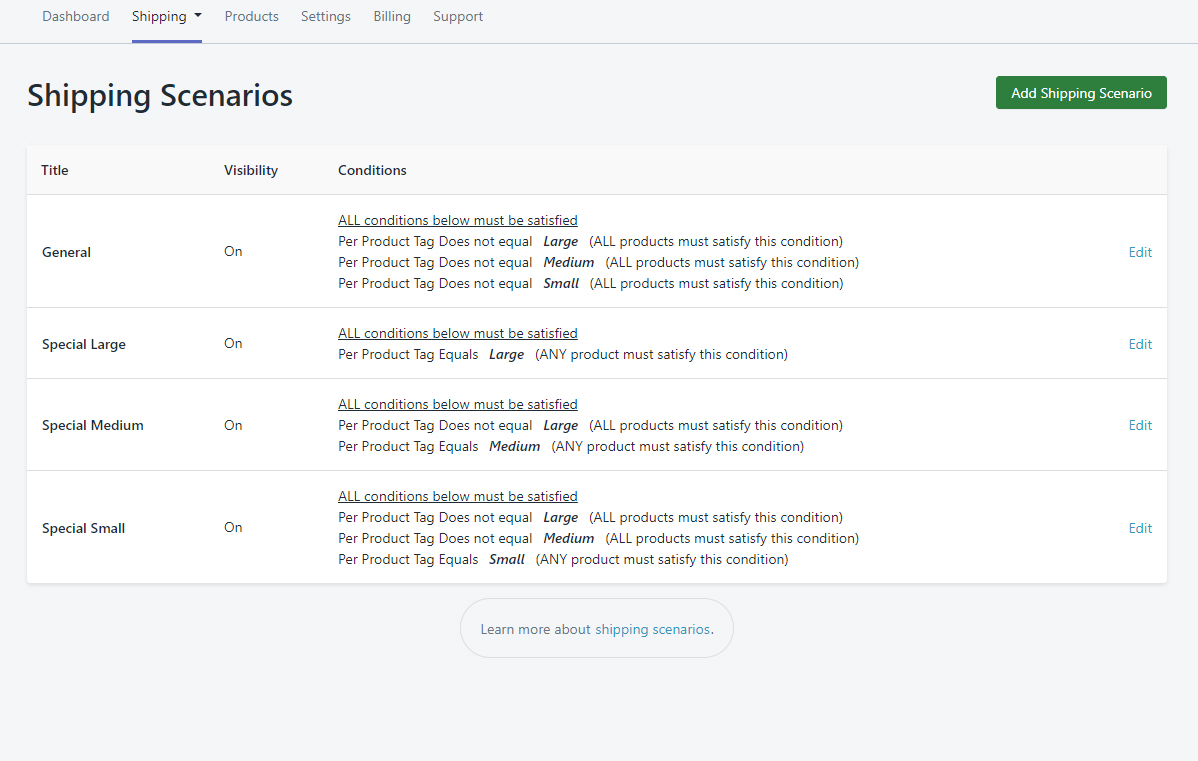
If you prefer to list your Scenarios in order of priority, edit each Scenario Title by adding a number beside it – e.g. ‘1. Special Large’, ‘2. Special Medium’, etc.
How It Works
A customer ordering at least one Large product, any number of Medium or Small products and any weight of General products will pay $80.00 for shipping because only the tier 1 Shipping Method from the ‘Special Large’ Scenario will be activated at checkout.
A customer ordering no Large products, at least one Medium product, any number of Small products and any weight of General products will pay $50.00 for shipping because only the tier 2 Shipping Method from the ‘Special Medium’ Scenario will be activated at checkout.
A customer ordering no Large or Medium products, at least one Small product and any weight of General products will pay $30.00 for shipping because only the tier 3 Shipping Method from the ‘Special Medium’ Scenario will be activated at checkout.
A customer ordering no Large, Medium or Small products and any weight of General products will pay between $10.00 and $50.00 for shipping (depending on the weight) because only the standard Shipping Method from the ‘General’ Scenario will be activated at checkout.